Our Historic Bathroom Renovation
We’ve been renovating our historic bathroom for over a year now. It’s been a project filled with ups and downs, and plumbing challenges galore.
I bought the last piece of art for the salon wall in this room a few weeks ago and wrapped up this project. This bathroom renovation has by far been the longest and most difficult project we’ve worked on. Because there are so many details to share, I’ll break the content two sections: the technical sides of the renovation and the design concept. Finally, I’ll link and list all resources at the end of the post.
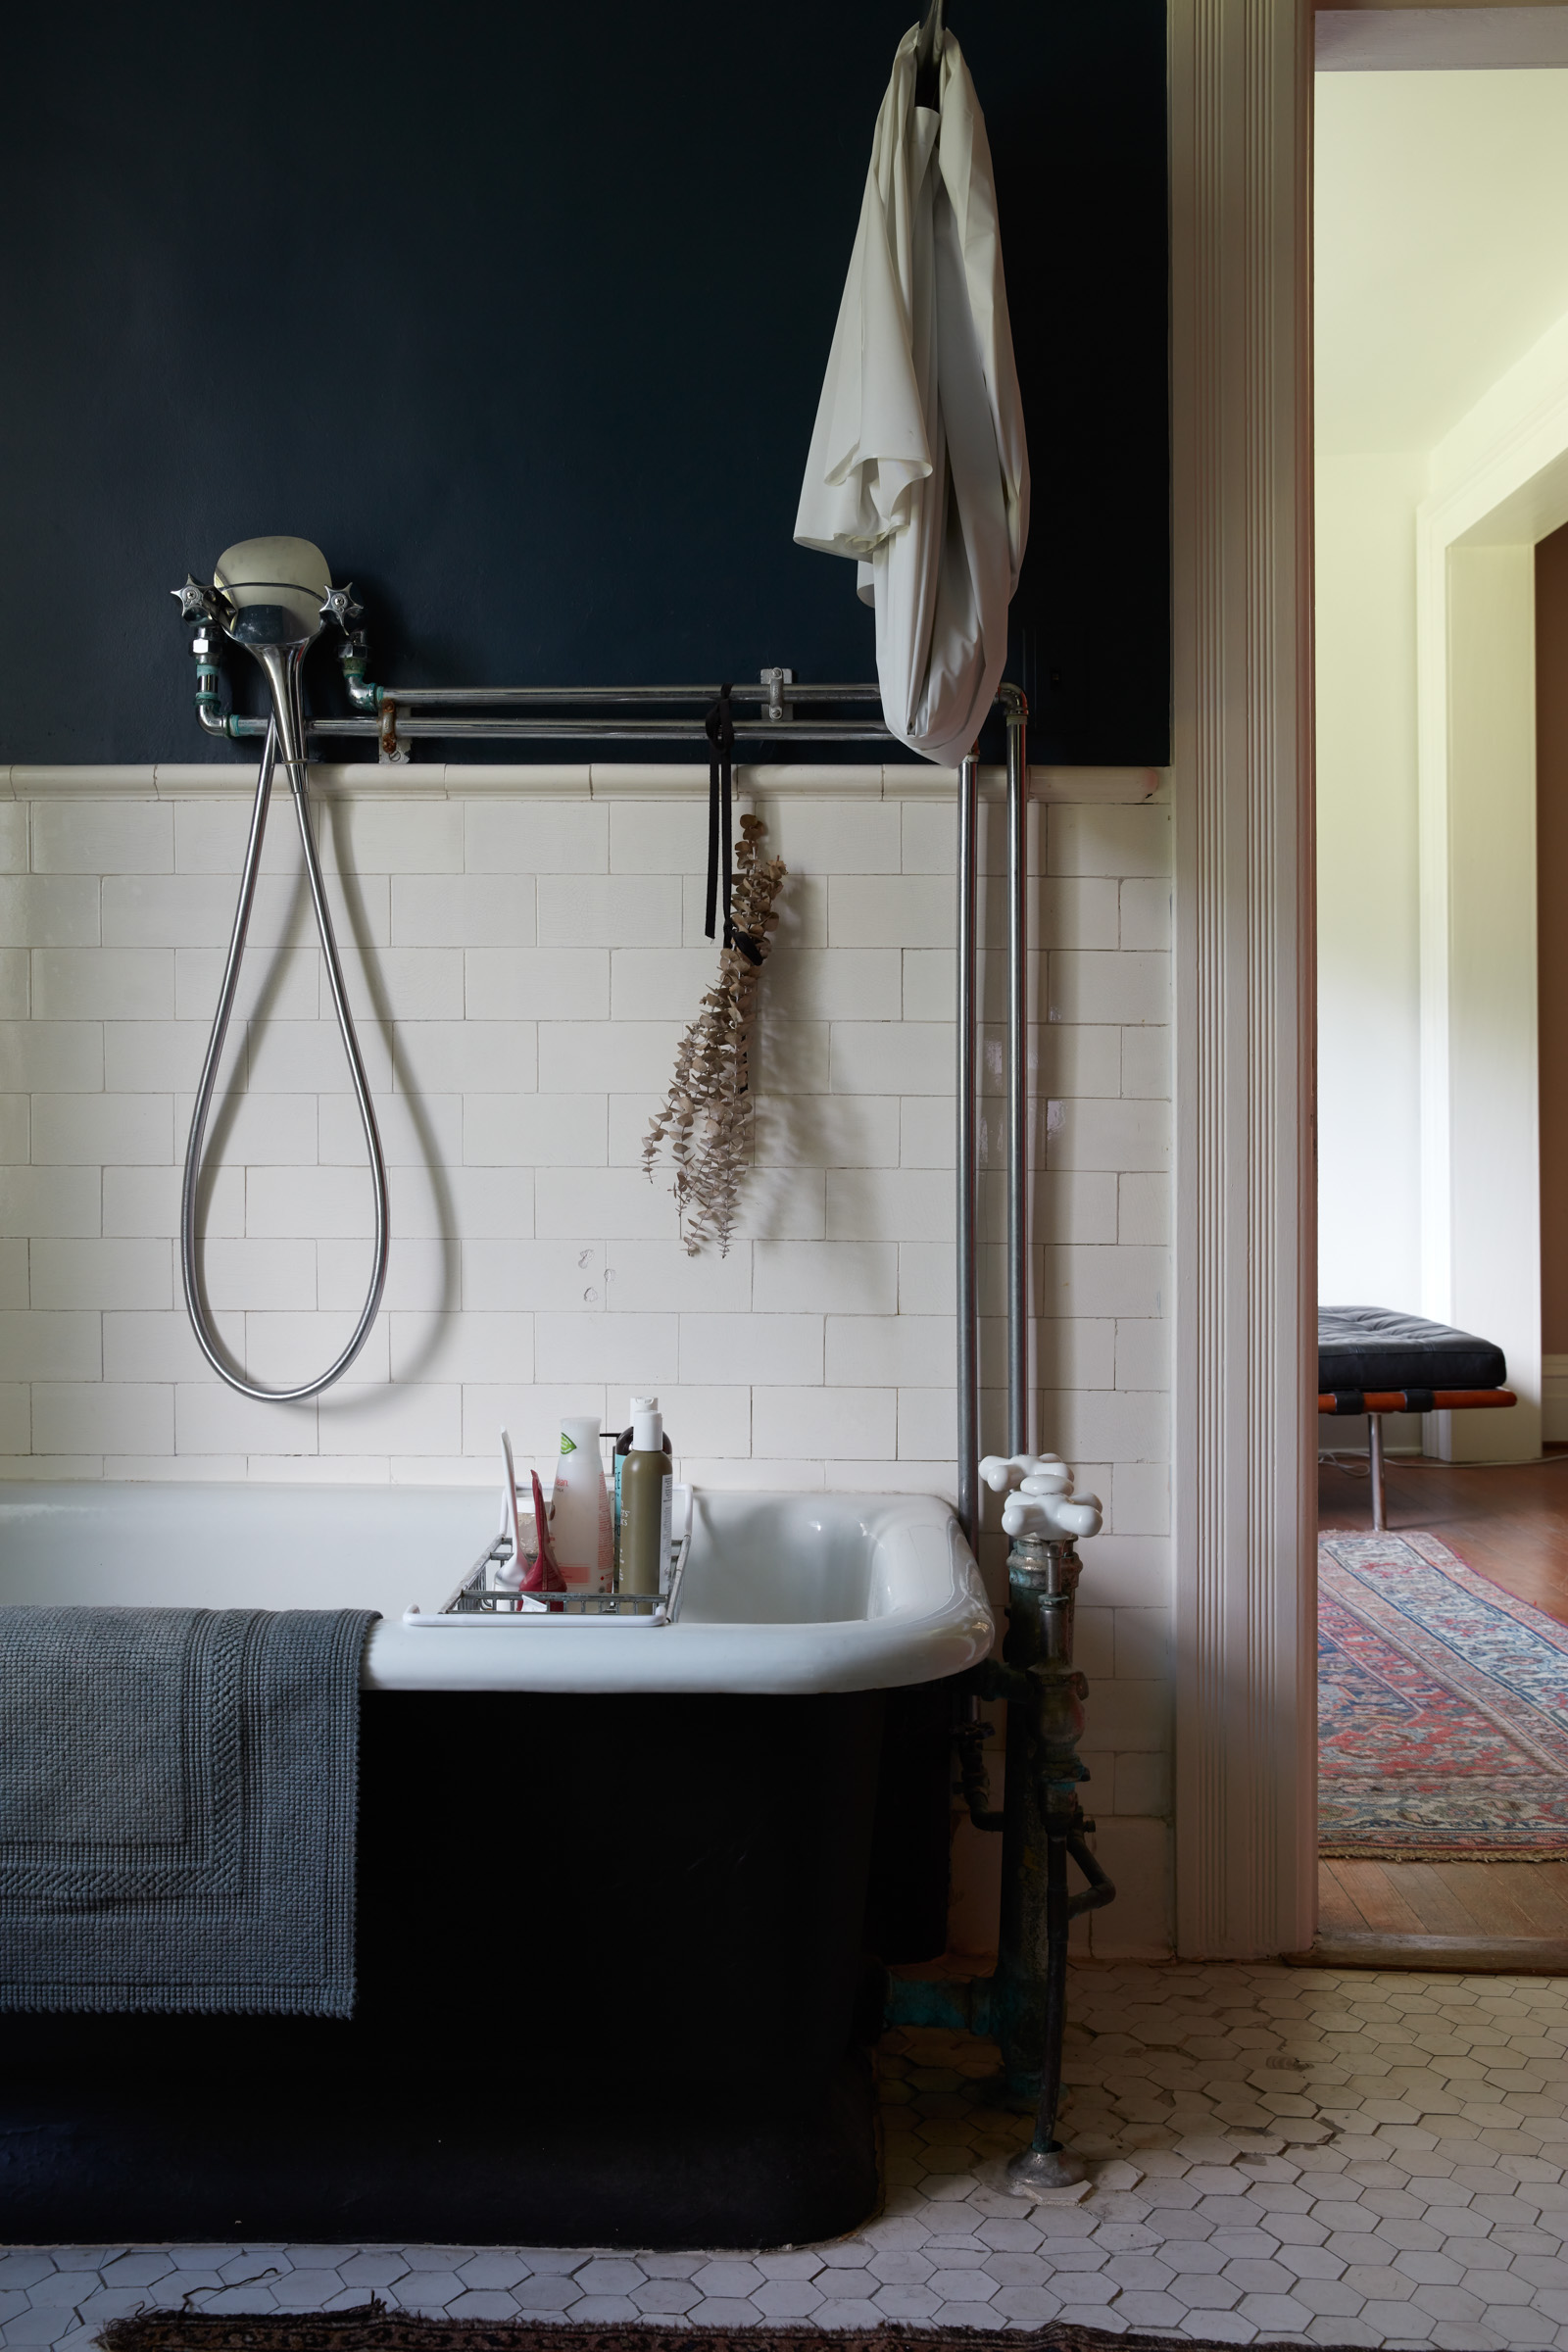
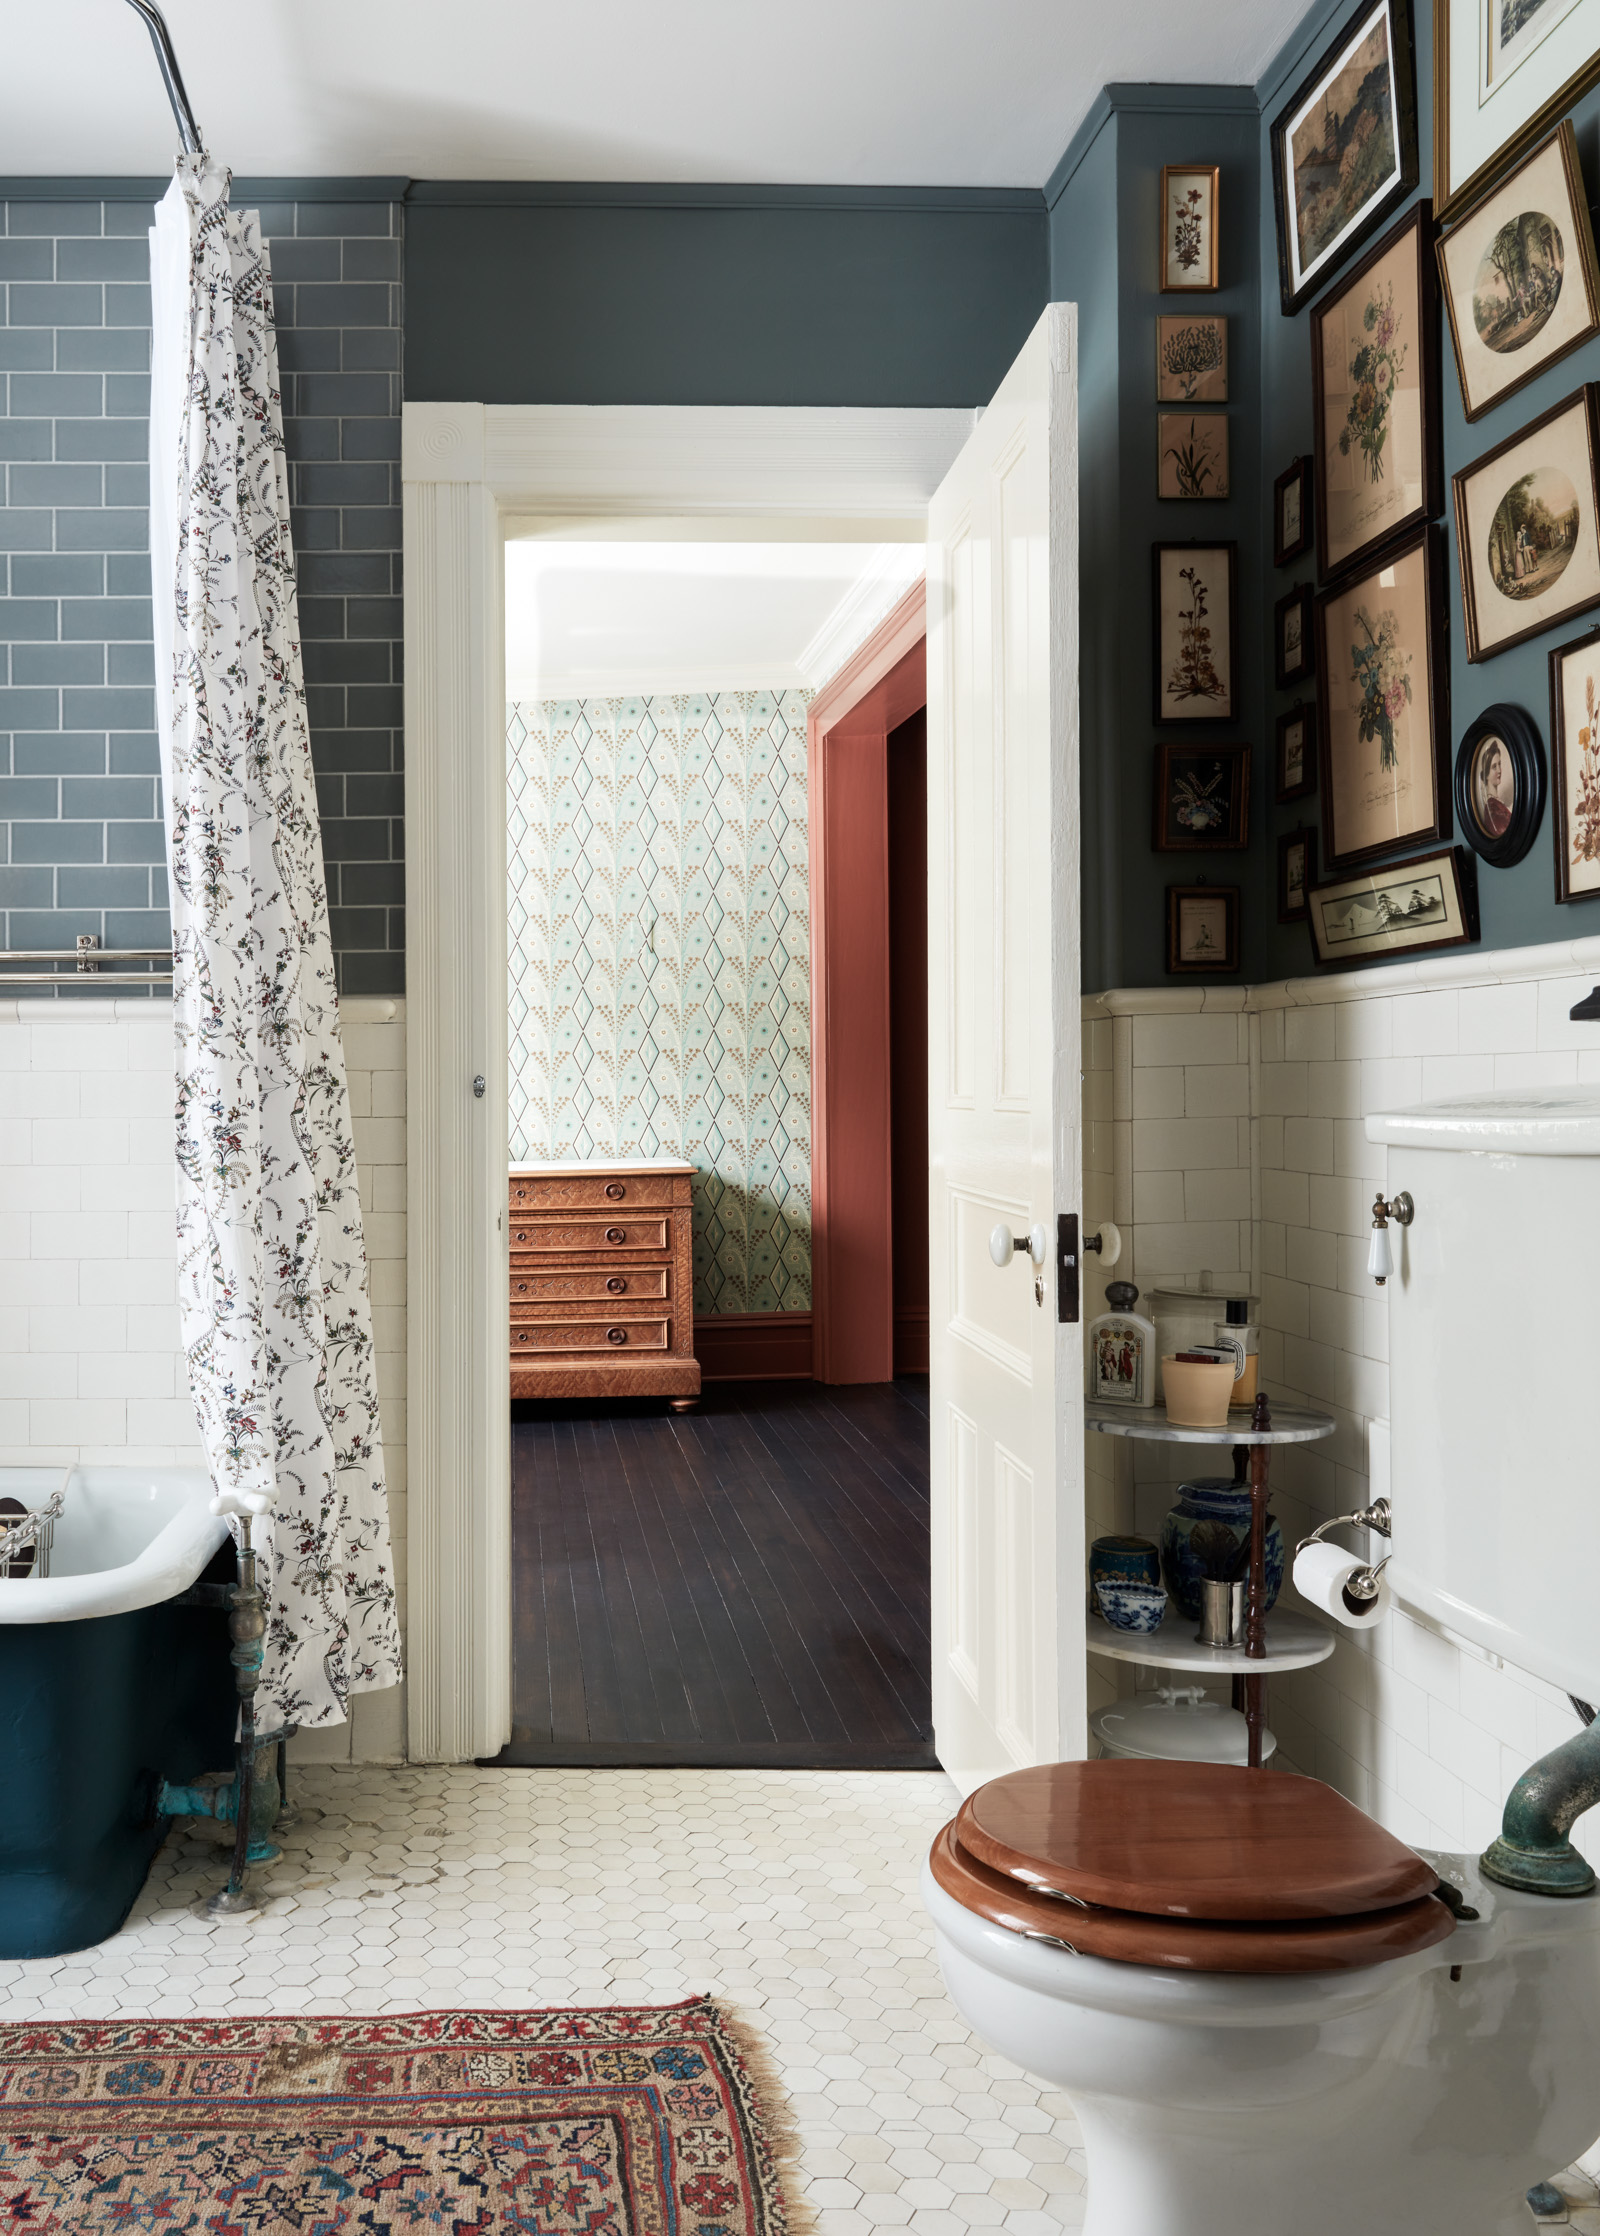
One of the reasons we purchased our house was because it had four original bathrooms from around 1900 (the 5th was a cobble of different styles. We renovated it here.). FOUR original bathrooms – here’s an example of one. We almost couldn’t believe it either – a delight and unicorn in the old home wish list. This bathroom is at the stair landing on the second floor and is the whole house bathroom, plus leads into our main bedroom. Because it’s the whole house bathroom, the functionality had to be spot on. There were a lot of technical and logistical challenges, mainly the shower area. Our renovation point of view is to preserve what’s there, but make it functional.
A quick history of plumbing in this house! The house was built sometime between 1802 and 1840. In 1900 Charles Backman dies, and the house is sold to his friend, J. Howard Ford. Being the complete baller he was, J. Howard Ford does something radical: adds plumbing and electrical. He includes JL Mott fixtures and tricks out the bathrooms with the best available in the day.
The Technical Side of the Renovation
By historic plumbing standards, bathtubs were more of a thing, so this house ONLY has bathtubs, no showers. We had to figure out how to add a stand up shower and replace the sit down shower installed in the 80s (we think). We wanted it to look historic for sure.
Here’s a quick to-do list:
- Add a stand up shower
- Exhaust fan to deal with added moisture
- Fully functioning sink (stopper never worked properly, new faucets)
- Fit these items into the existing bathroom without sacrificing character

Historic Tile
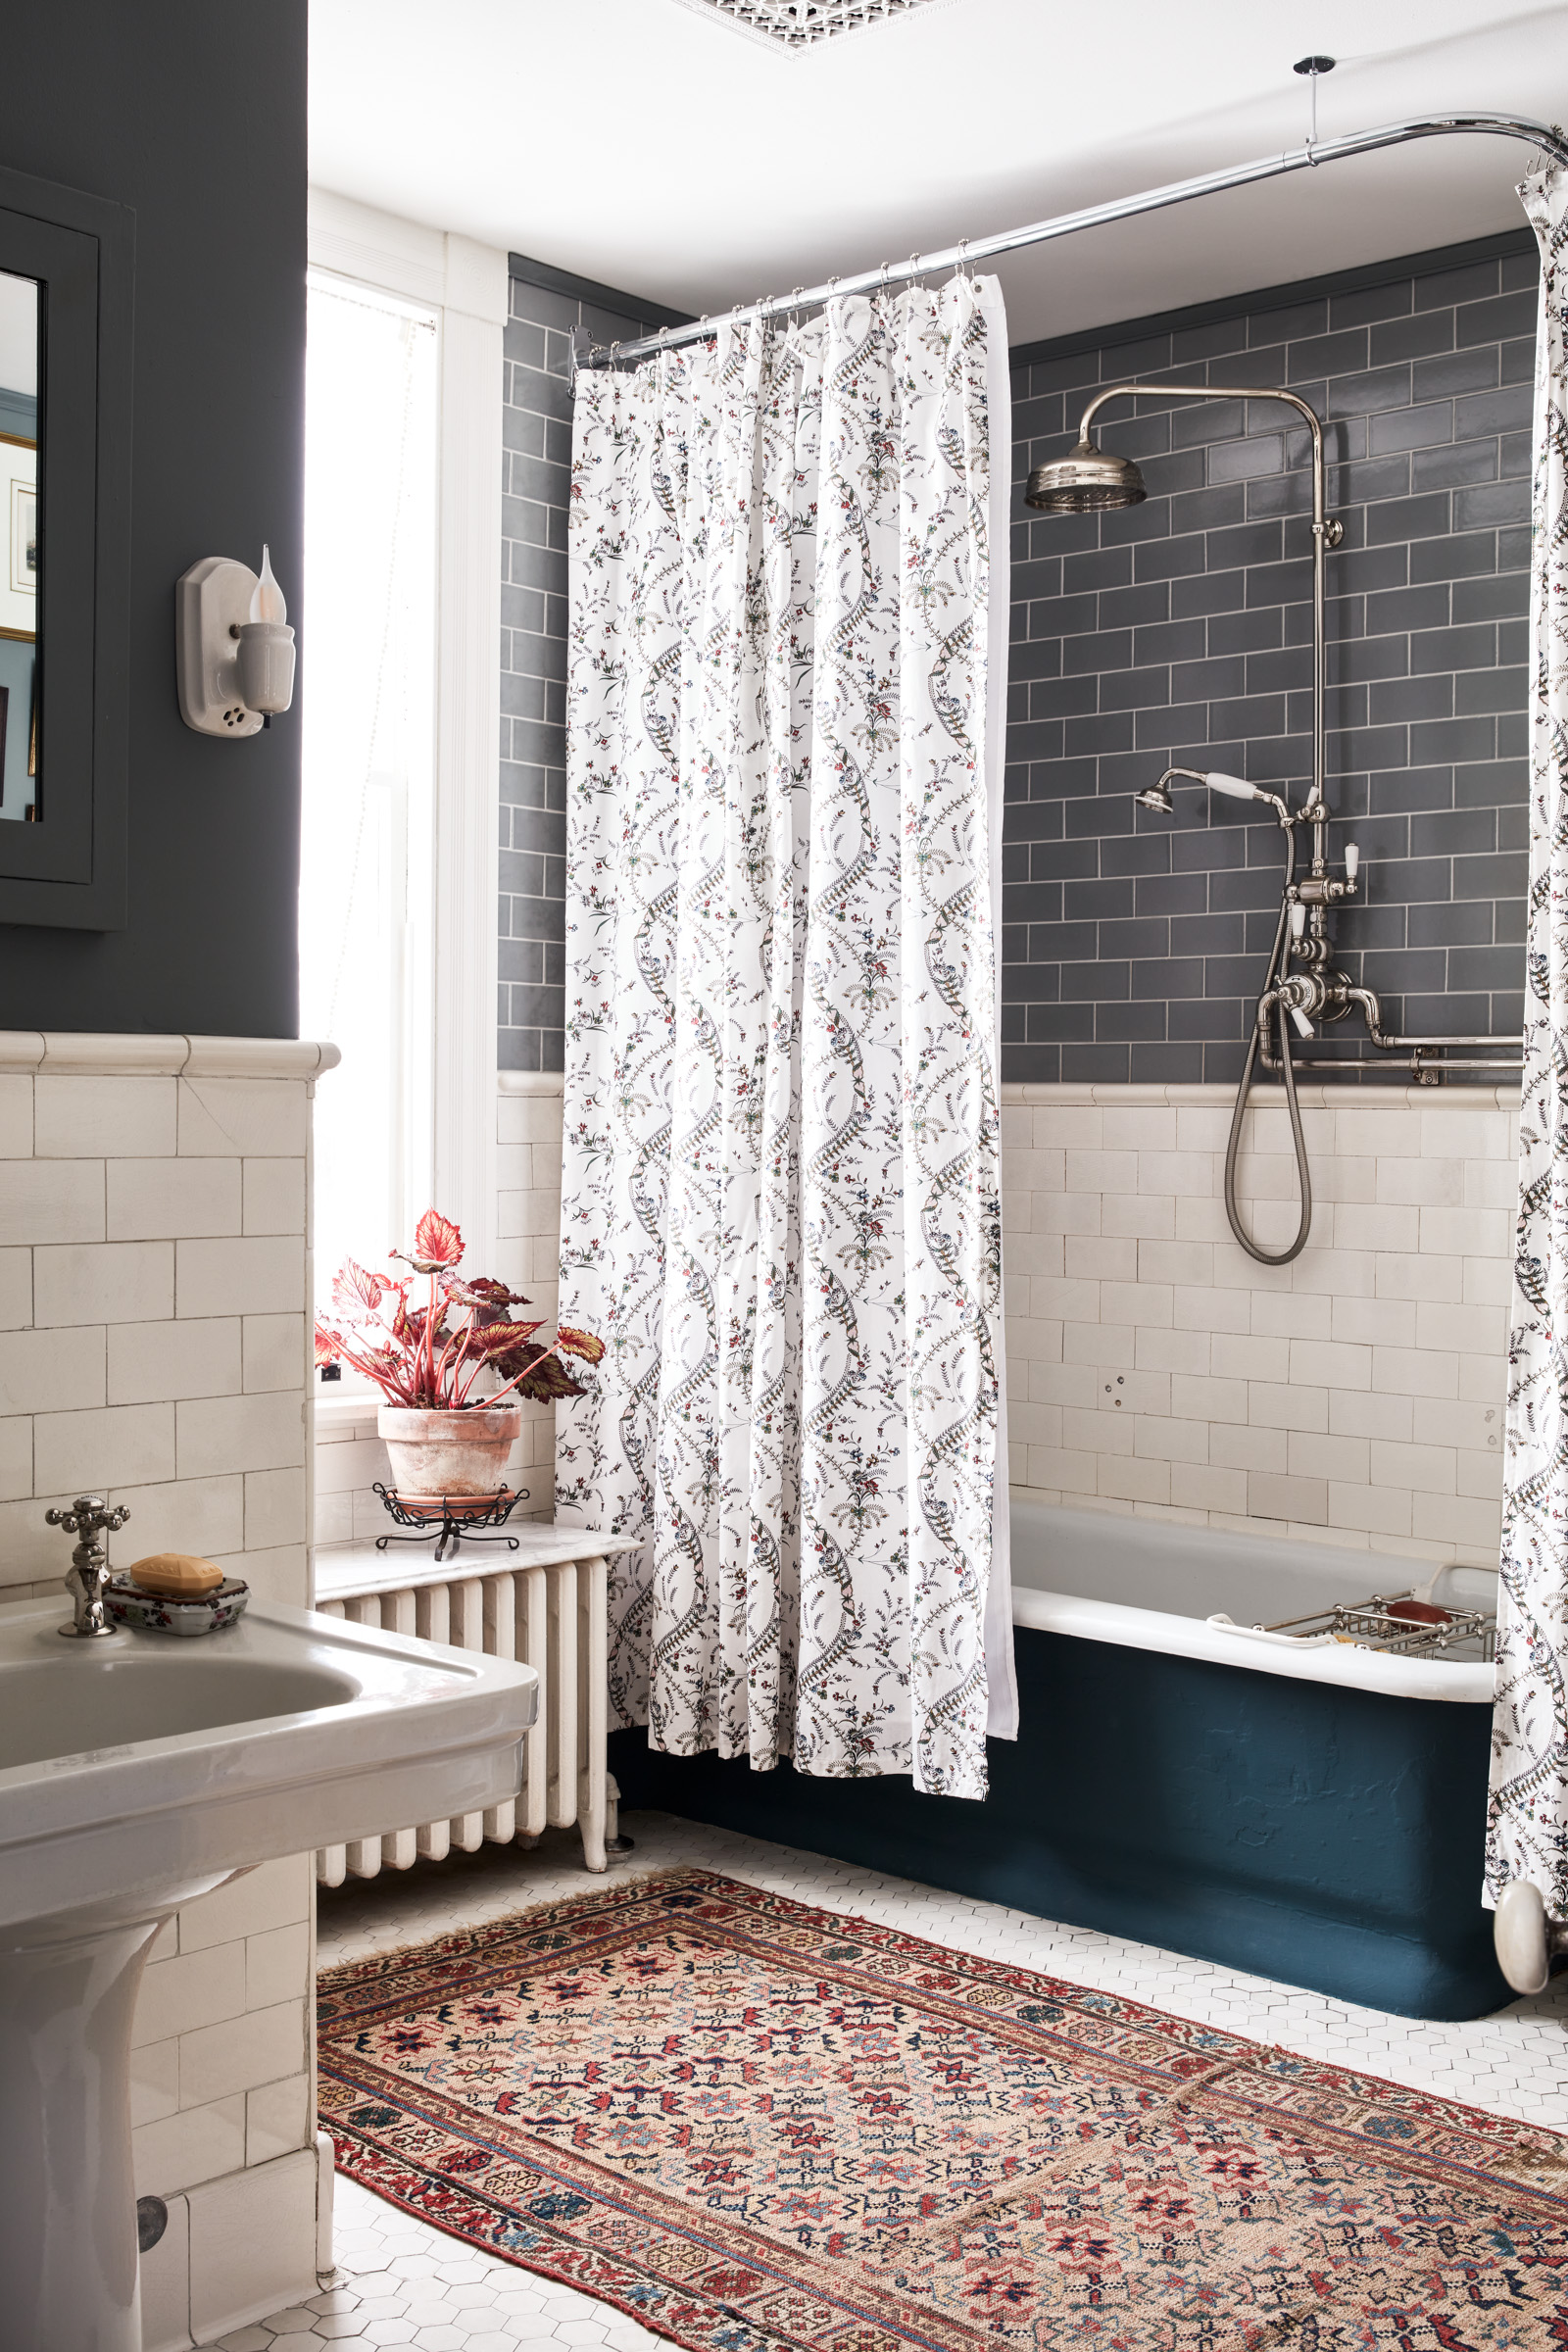
Before we could start ANY part of that list, we had to tile above the original 1900 historic tile. The wall above the tile was plaster. Talk about hours of online research, hours of discussions and back and forth. In the end, we tiled right over the plaster after applying a water barrier membrane. Our plaster was in great shape, and if we ripped it out and installed board, we could have destabalized the tile below. Plus, the main thing we discussed with ourselves, is once you apply the water barrier, is there a big benefit to removing and replacing the plaster? We couldn’t think of any, but had more concerns about removing the plaster. I can say, it’s been over a year and it’s holding up really well. As a homeowner, I think the success of a project like this depends on the stability of the plaster. The tile was over $1,000, so we sat with our decision and researched it to make sure we were making the correct choice. Fixing this tile in 5 years would really stink.


The Shower Plumbing
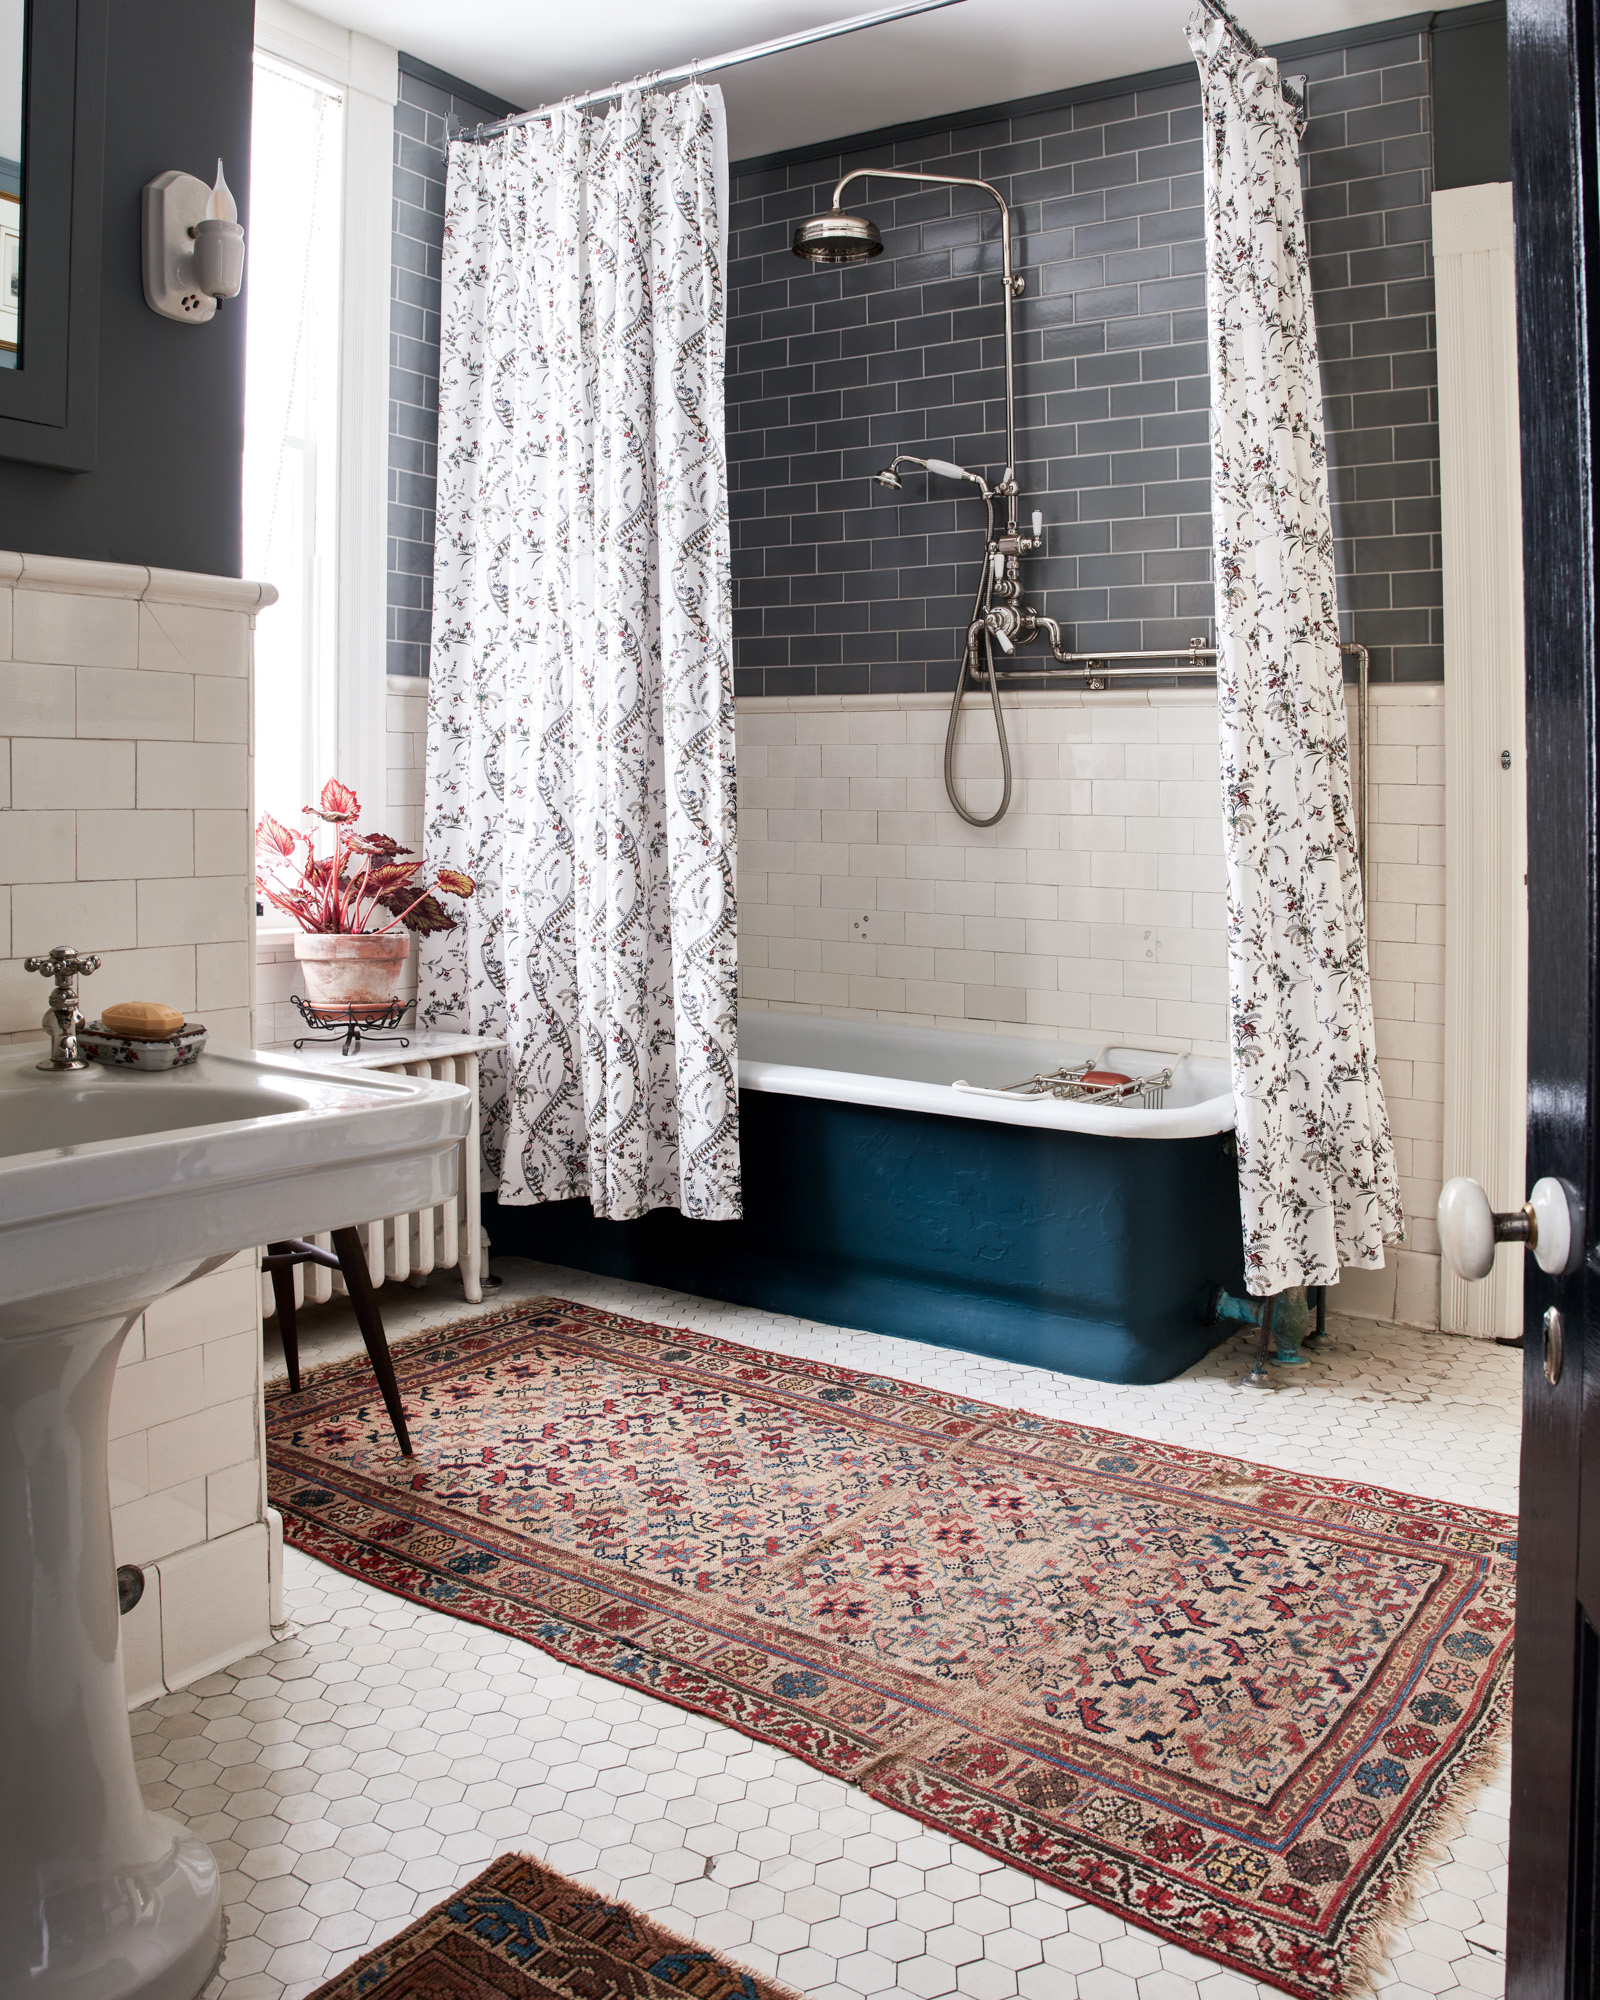
Our next challenge was the shower plumbing. We checked to see if we could run the pipes in the wall, and after a lot of research, if we were going to center the shower on the bathtub, the pipes had to be exterior. Running them in the wall would have put them on an exterior wall, and in the North East that’s a recipe for frozen pipe potential. We have another bathroom that has exterior run pipes and we have to turn it off November through March. We couldn’t risk that nonsense in the main bathroom. Next up is getting the pipes nickeled so they match and don’t look out of place. The last thing I wanted was the exterior mounted pipes to look cheap, especially since we had such a nice shower system. After months of looking and calling around, Will found someone to do the job! Don’t get me wrong, this aspect was super expensive ($500+) and we had to wait almost three weeks (or more) to get our items back. From a historic aspect, showers were either in bathtubs with some exposed plumbing, or they were these rib cage looking structures. After some thought, going with exposed plumbing would be a good aesthetic choice.
Then of course I had to scale out the new shower curtain, it’s hung with a bit of a trick to give us more room in the shower. The rod is offset from the tub by about 4 inches. The outside curtains hangs straight, but the inside one has a slight angle. And of course this bathtub is so long, it takes two shower curtains! We were careful about where we placed the ‘divider’ to make sure it makes sense where you ‘enter’ the shower and not be in a place where the curtains would meet and water would leak out. You’ll notice that offset is not centered on purpose.


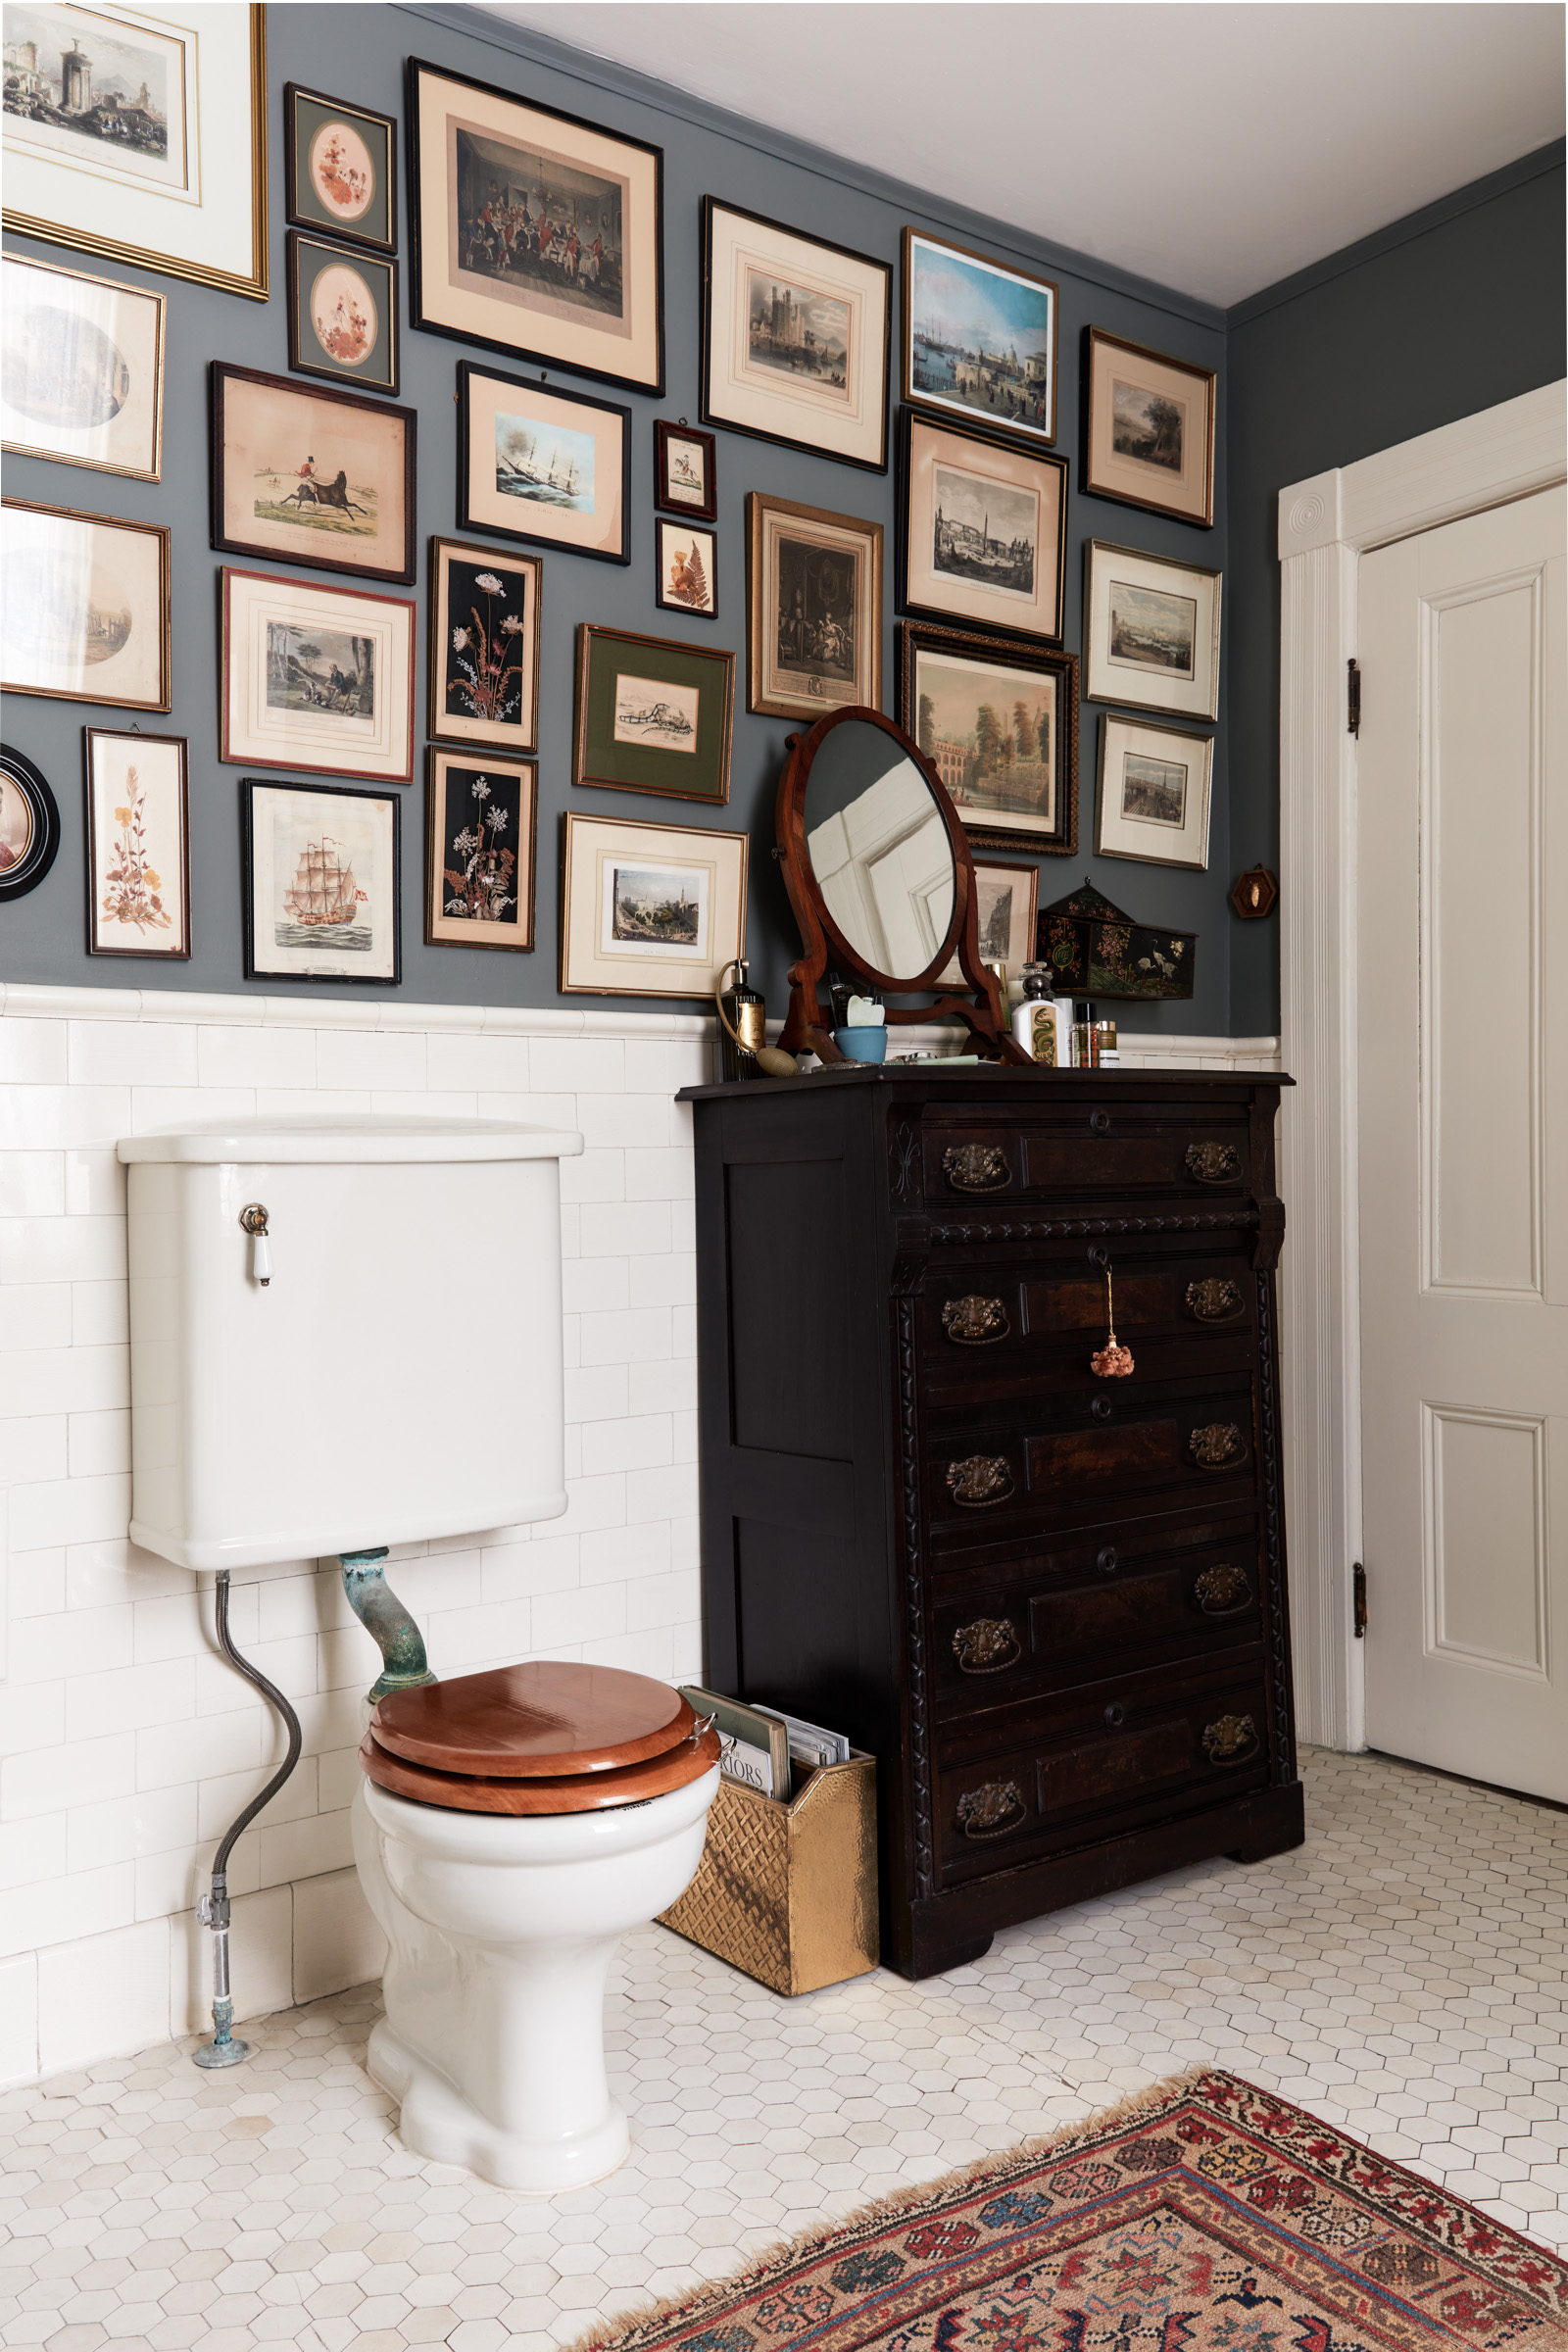
The Toilet
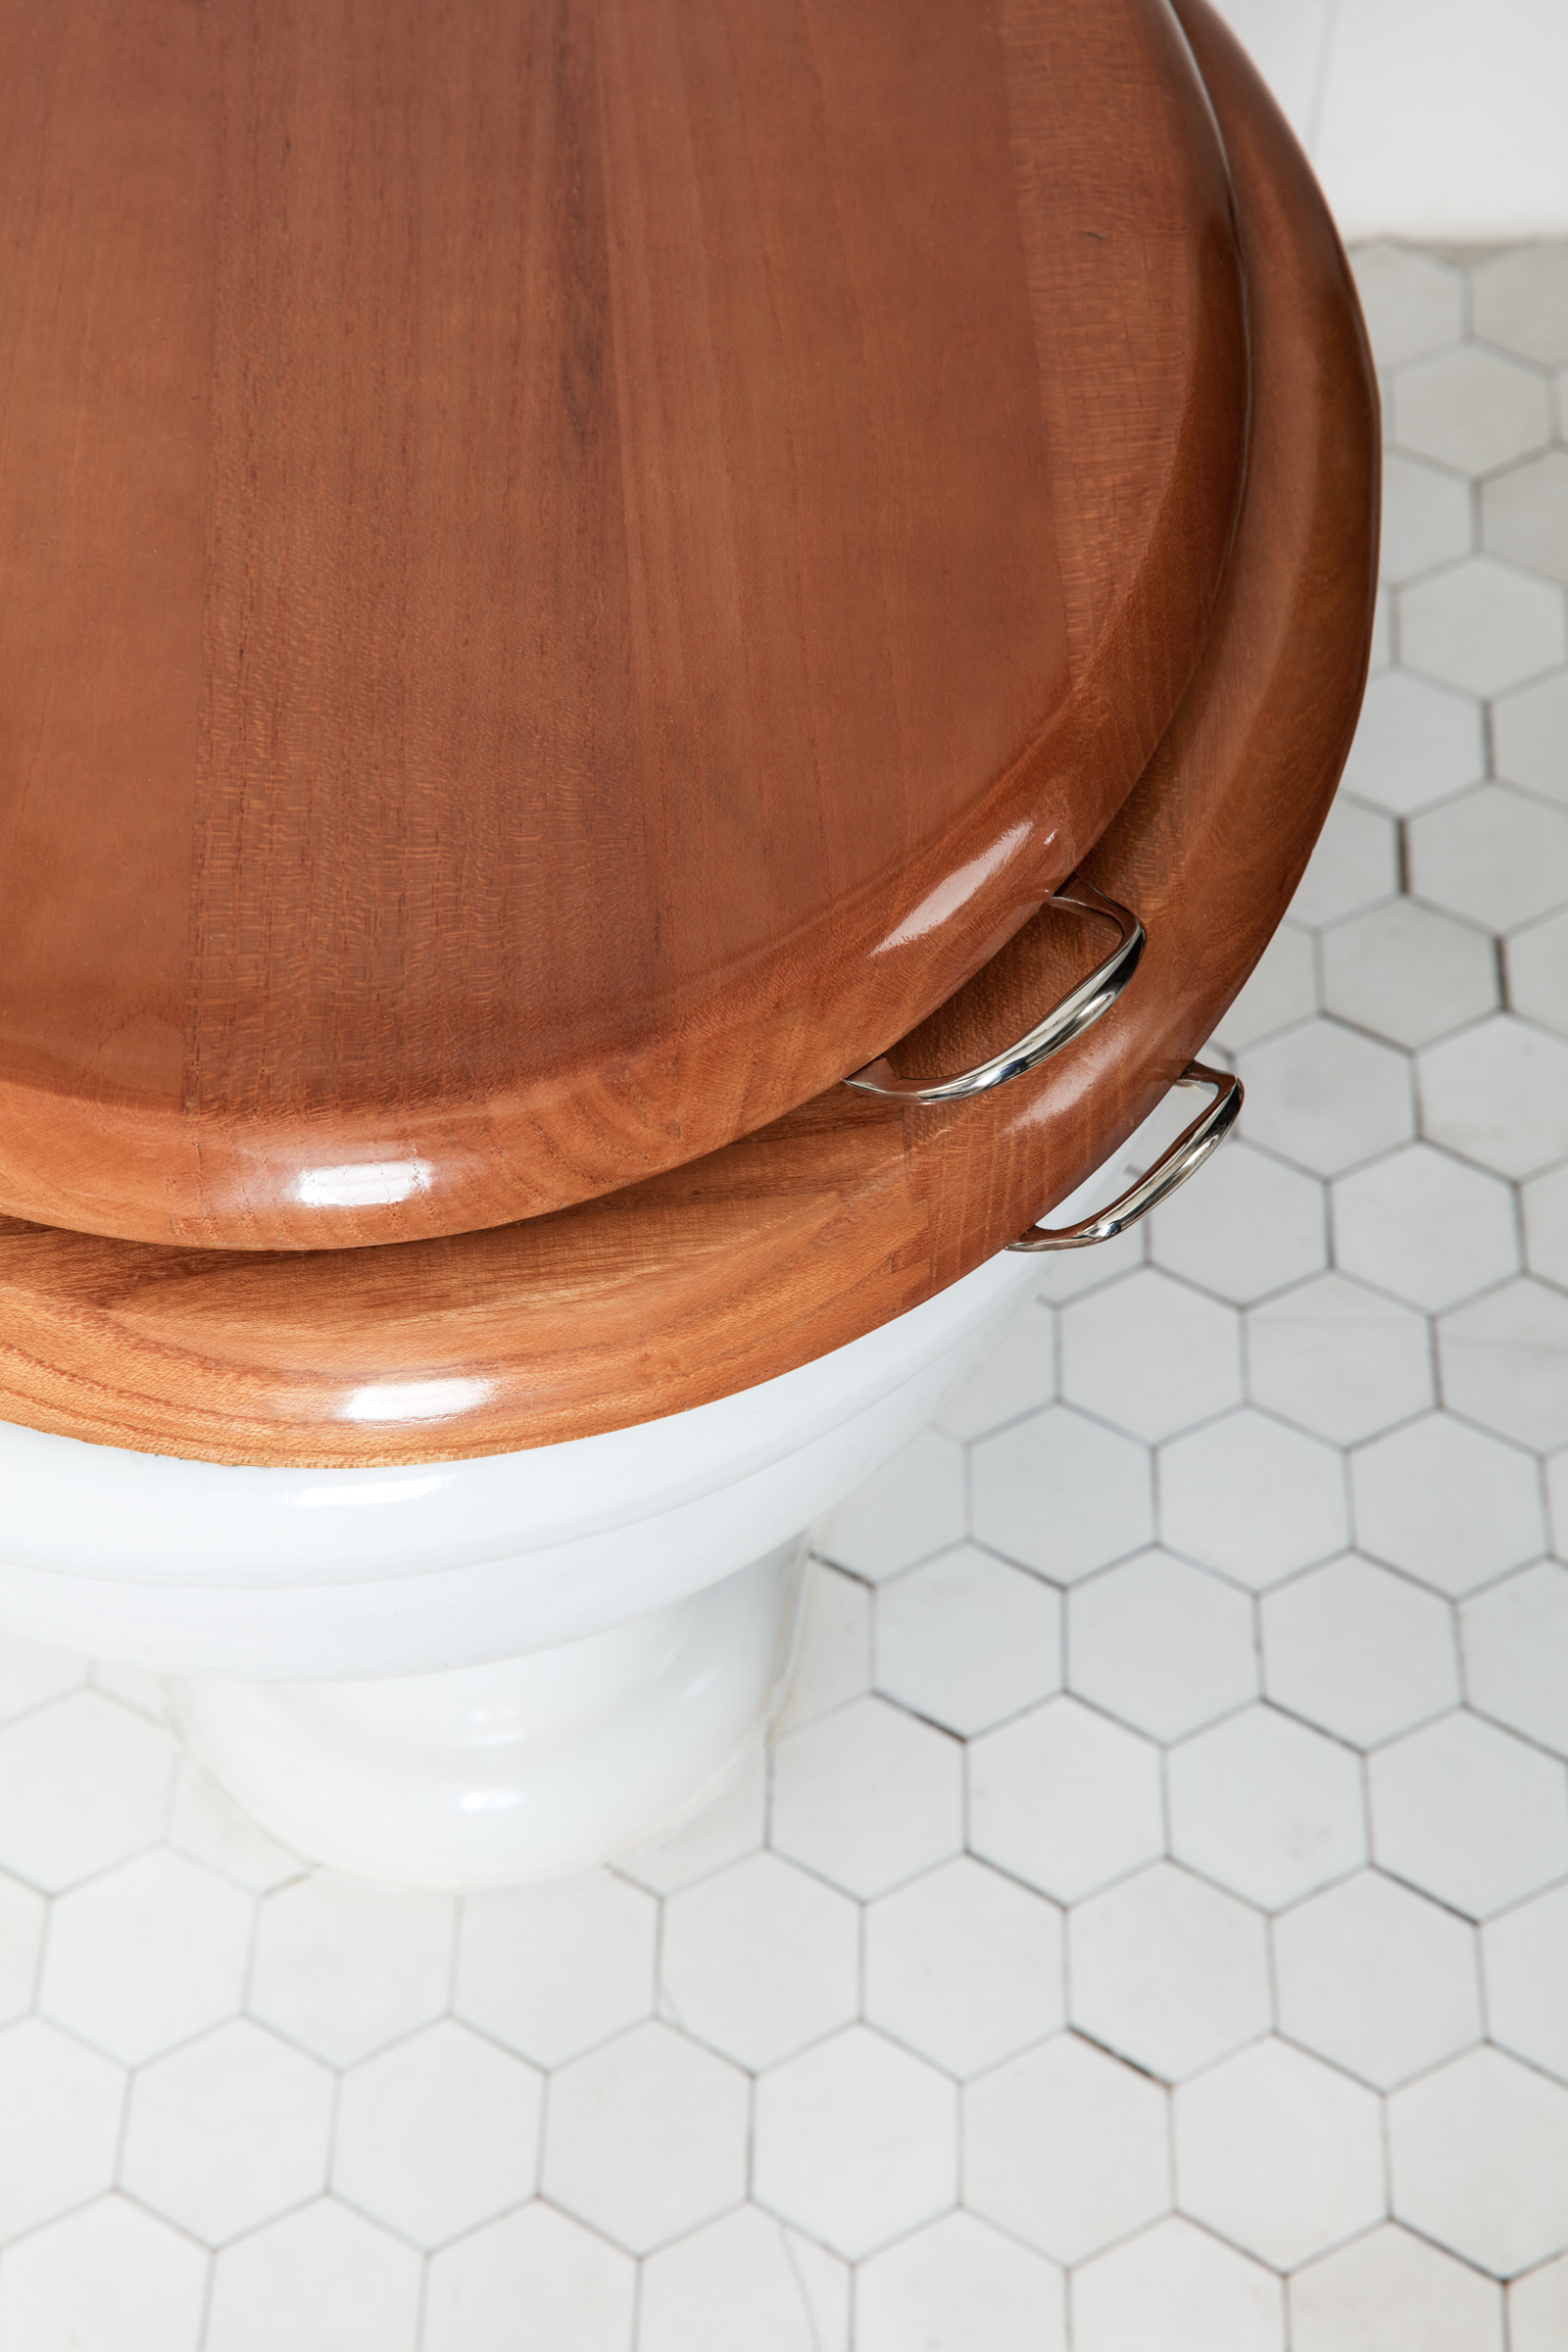
No work here. This toilet with the high tank has been in operation since about 1900. We added lid handles (aka sanitary handles) to the toilet bowl seat and lid. It is painful to buy these (they are spendy) but I really believe in putting the lid down for sanitary reasons and hate touching the actual seat. These are quick to clean and add a certain vintage charm. I’d say overall this toilet is a renovation win. It functions perfectly, actually the best flush in the whole house.
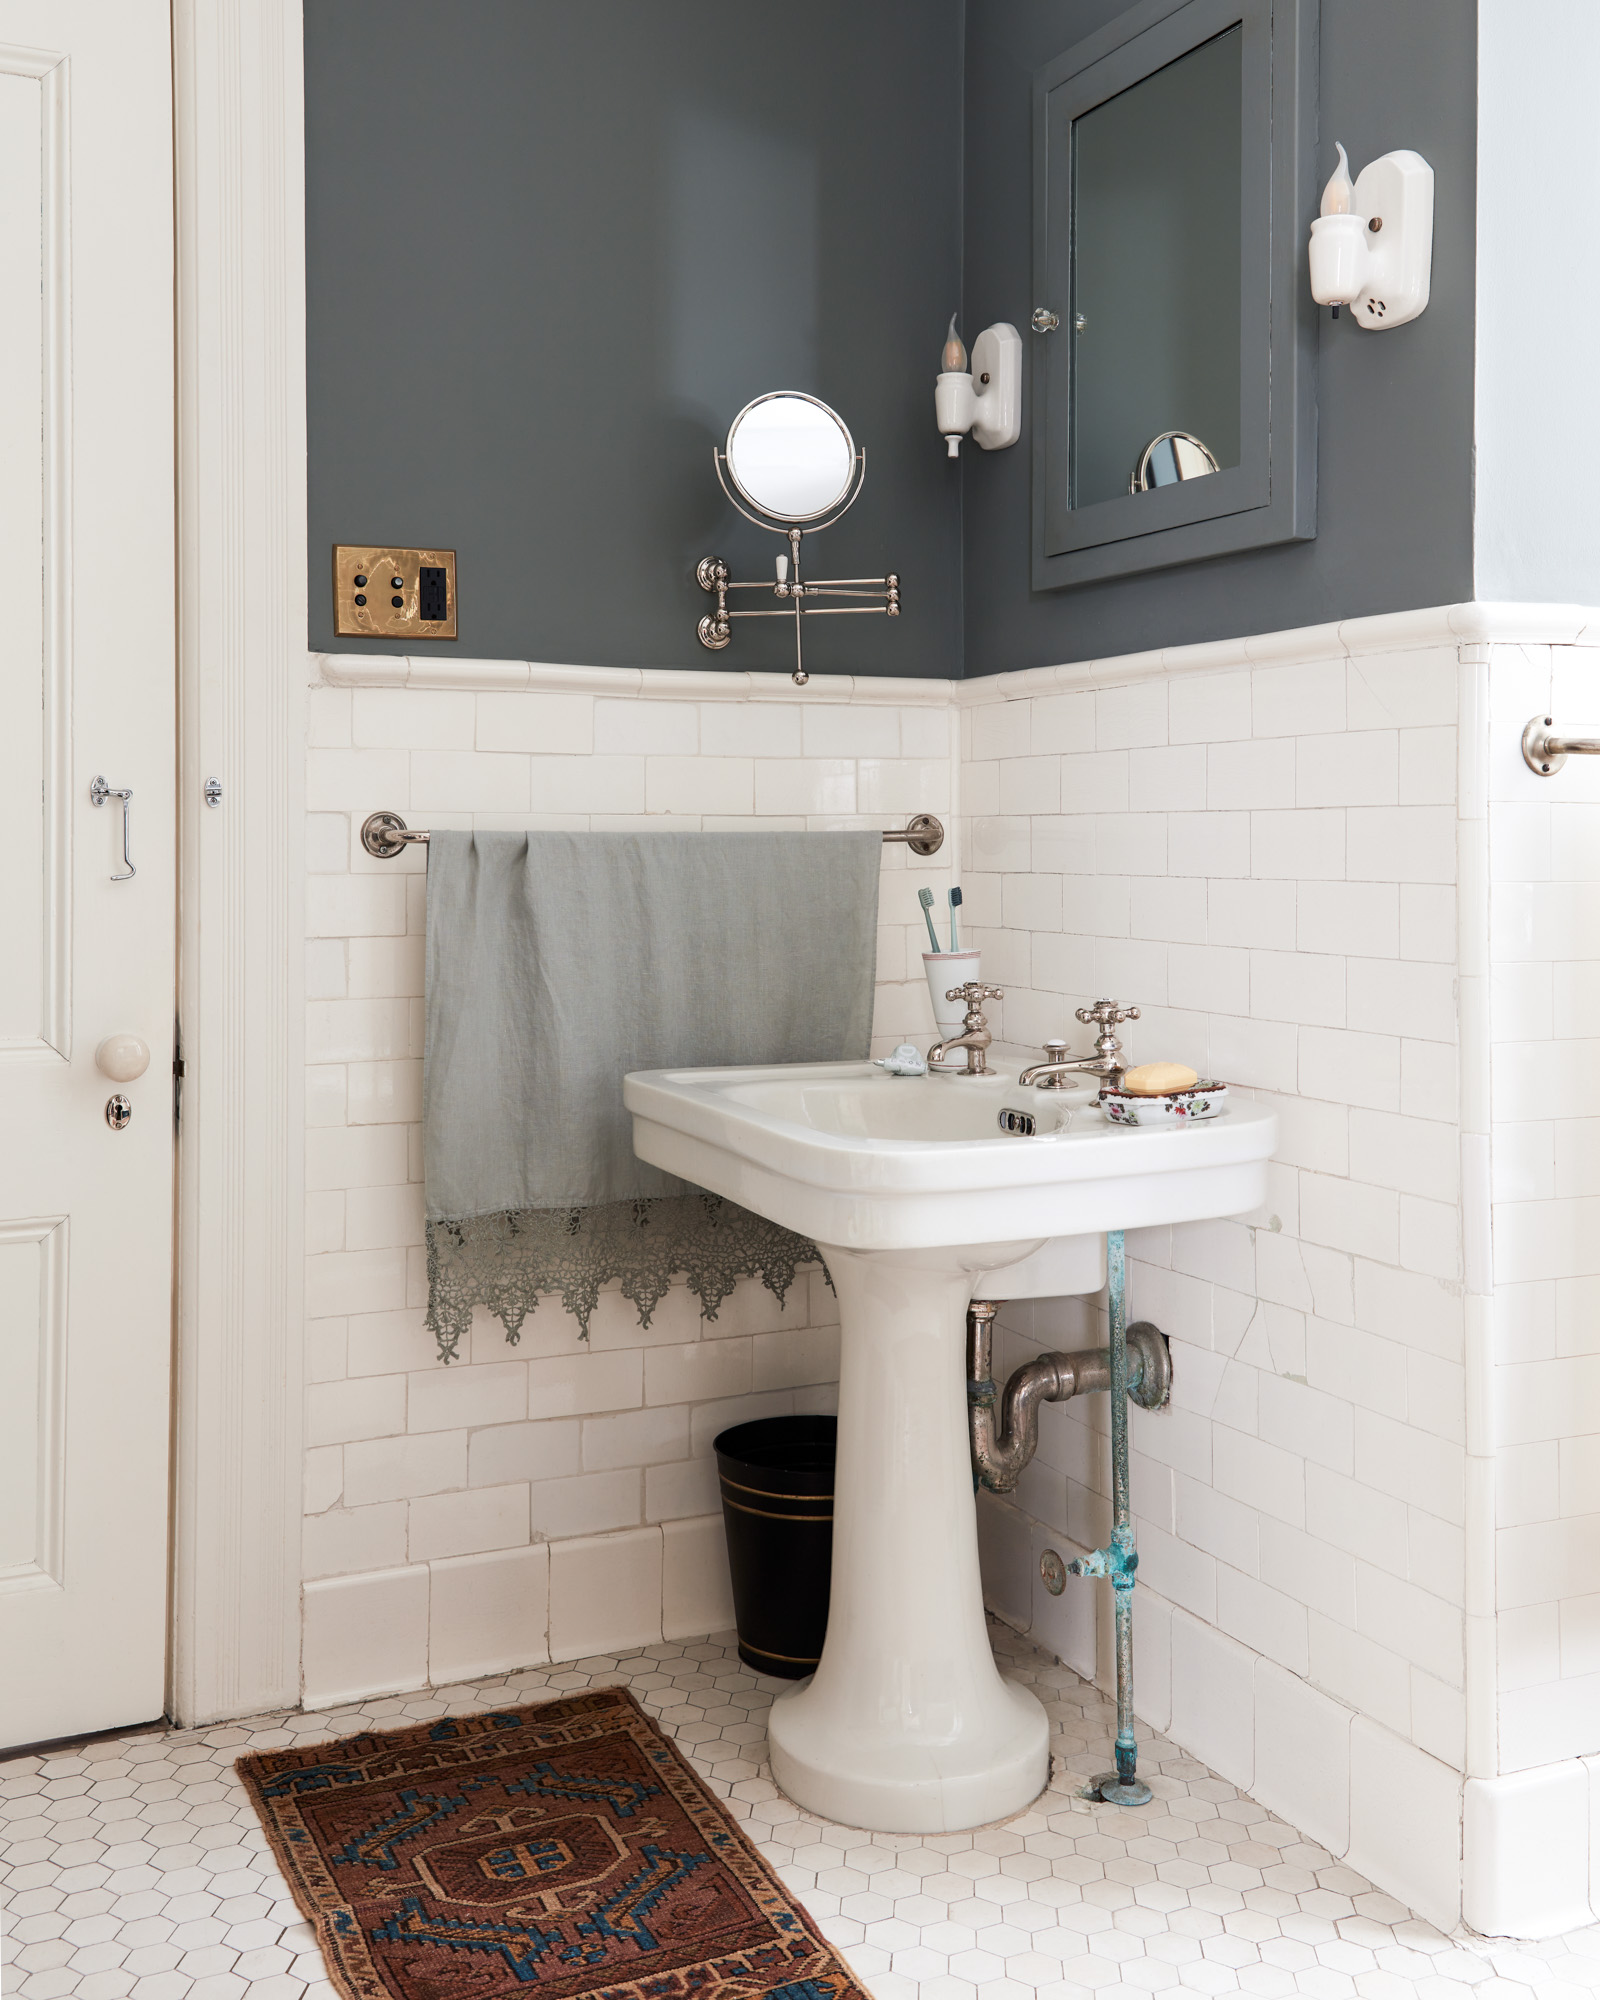
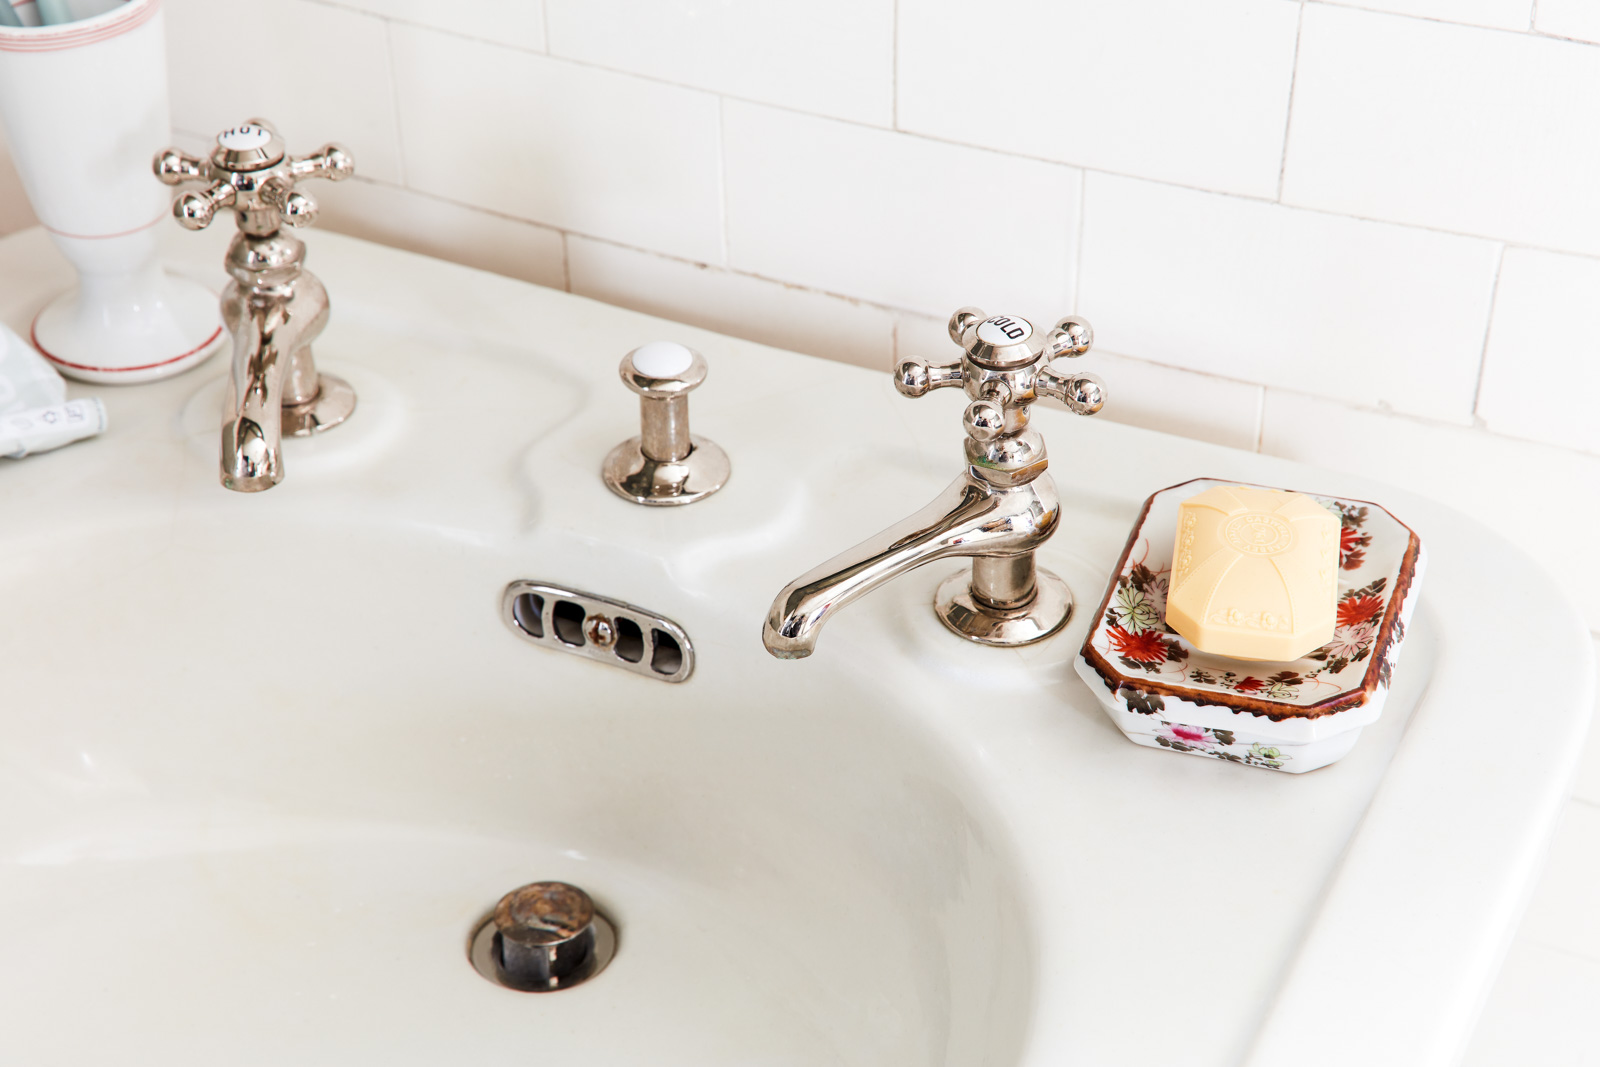
The Sink
This very antique JL Mott sink is a pain. Mainly because of the stopper. Our discussions surrounding this sink were so insanely long and ridiculous – dealing with this sink was our biggest pain for this project. Here’s the sequence of questions we asked each other:
Do we want to add a faucet with a mixer so we can get ‘warm water’ rather than the old fashion hot side faucet and cold side faucet? In today’s modern culture we leave water run, however back then, that would have been unheard of. Indoor plumbing was new and electricity was new. The sink would have been filled and used for washing up or shaving, meaning if you wanted warm water, it was right there in the sink basin.
Do we want to change the plug for the sink to a stopper? The plugging mechanism is hidden in the column under the sink. Will wanted to keep it – I was on the fence. I wasn’t sure it was possible because of the functionality. Then when they renickeled the stopper column, they lost/broke the little porcelain dot that was in the center. Of course you can’t find those anywhere, so Will custom made one from a small piece of wood and painted it high gloss. While this sounds simple enough, this is HOURS of research and work.
The Floor
We left it as is with all it’s cracks and age. It’s a matte tile from around 1900. I love the age and the character. I did give it a good scrub with Bar Keepers Friend and rinsed well. A little discoloration here and there never hurt anyone.
The Radiator
This just needed a paint job. We used our normal technique of spot treating any rust and using a sprayer to paint. There’s a saved highlight reel on our IG profile called ‘painting rads’.
Adding an Exhaust Fan
We knew adding a serious shower would also add a lot of moisture to the room. We got a really powerful fan and love it – it works really well. If you want to read more about my exhaust fan cover historic hack, I wrote a separate blog post about it. From a time point of view, this project also took about two weekends to complete. Cutting into the roof is no joke! It’s gotta be done right!
The Design of the Bathroom
Now we get to the pretty part! The design. I’ll discuss the concepts for my design and share all the resources for this project.
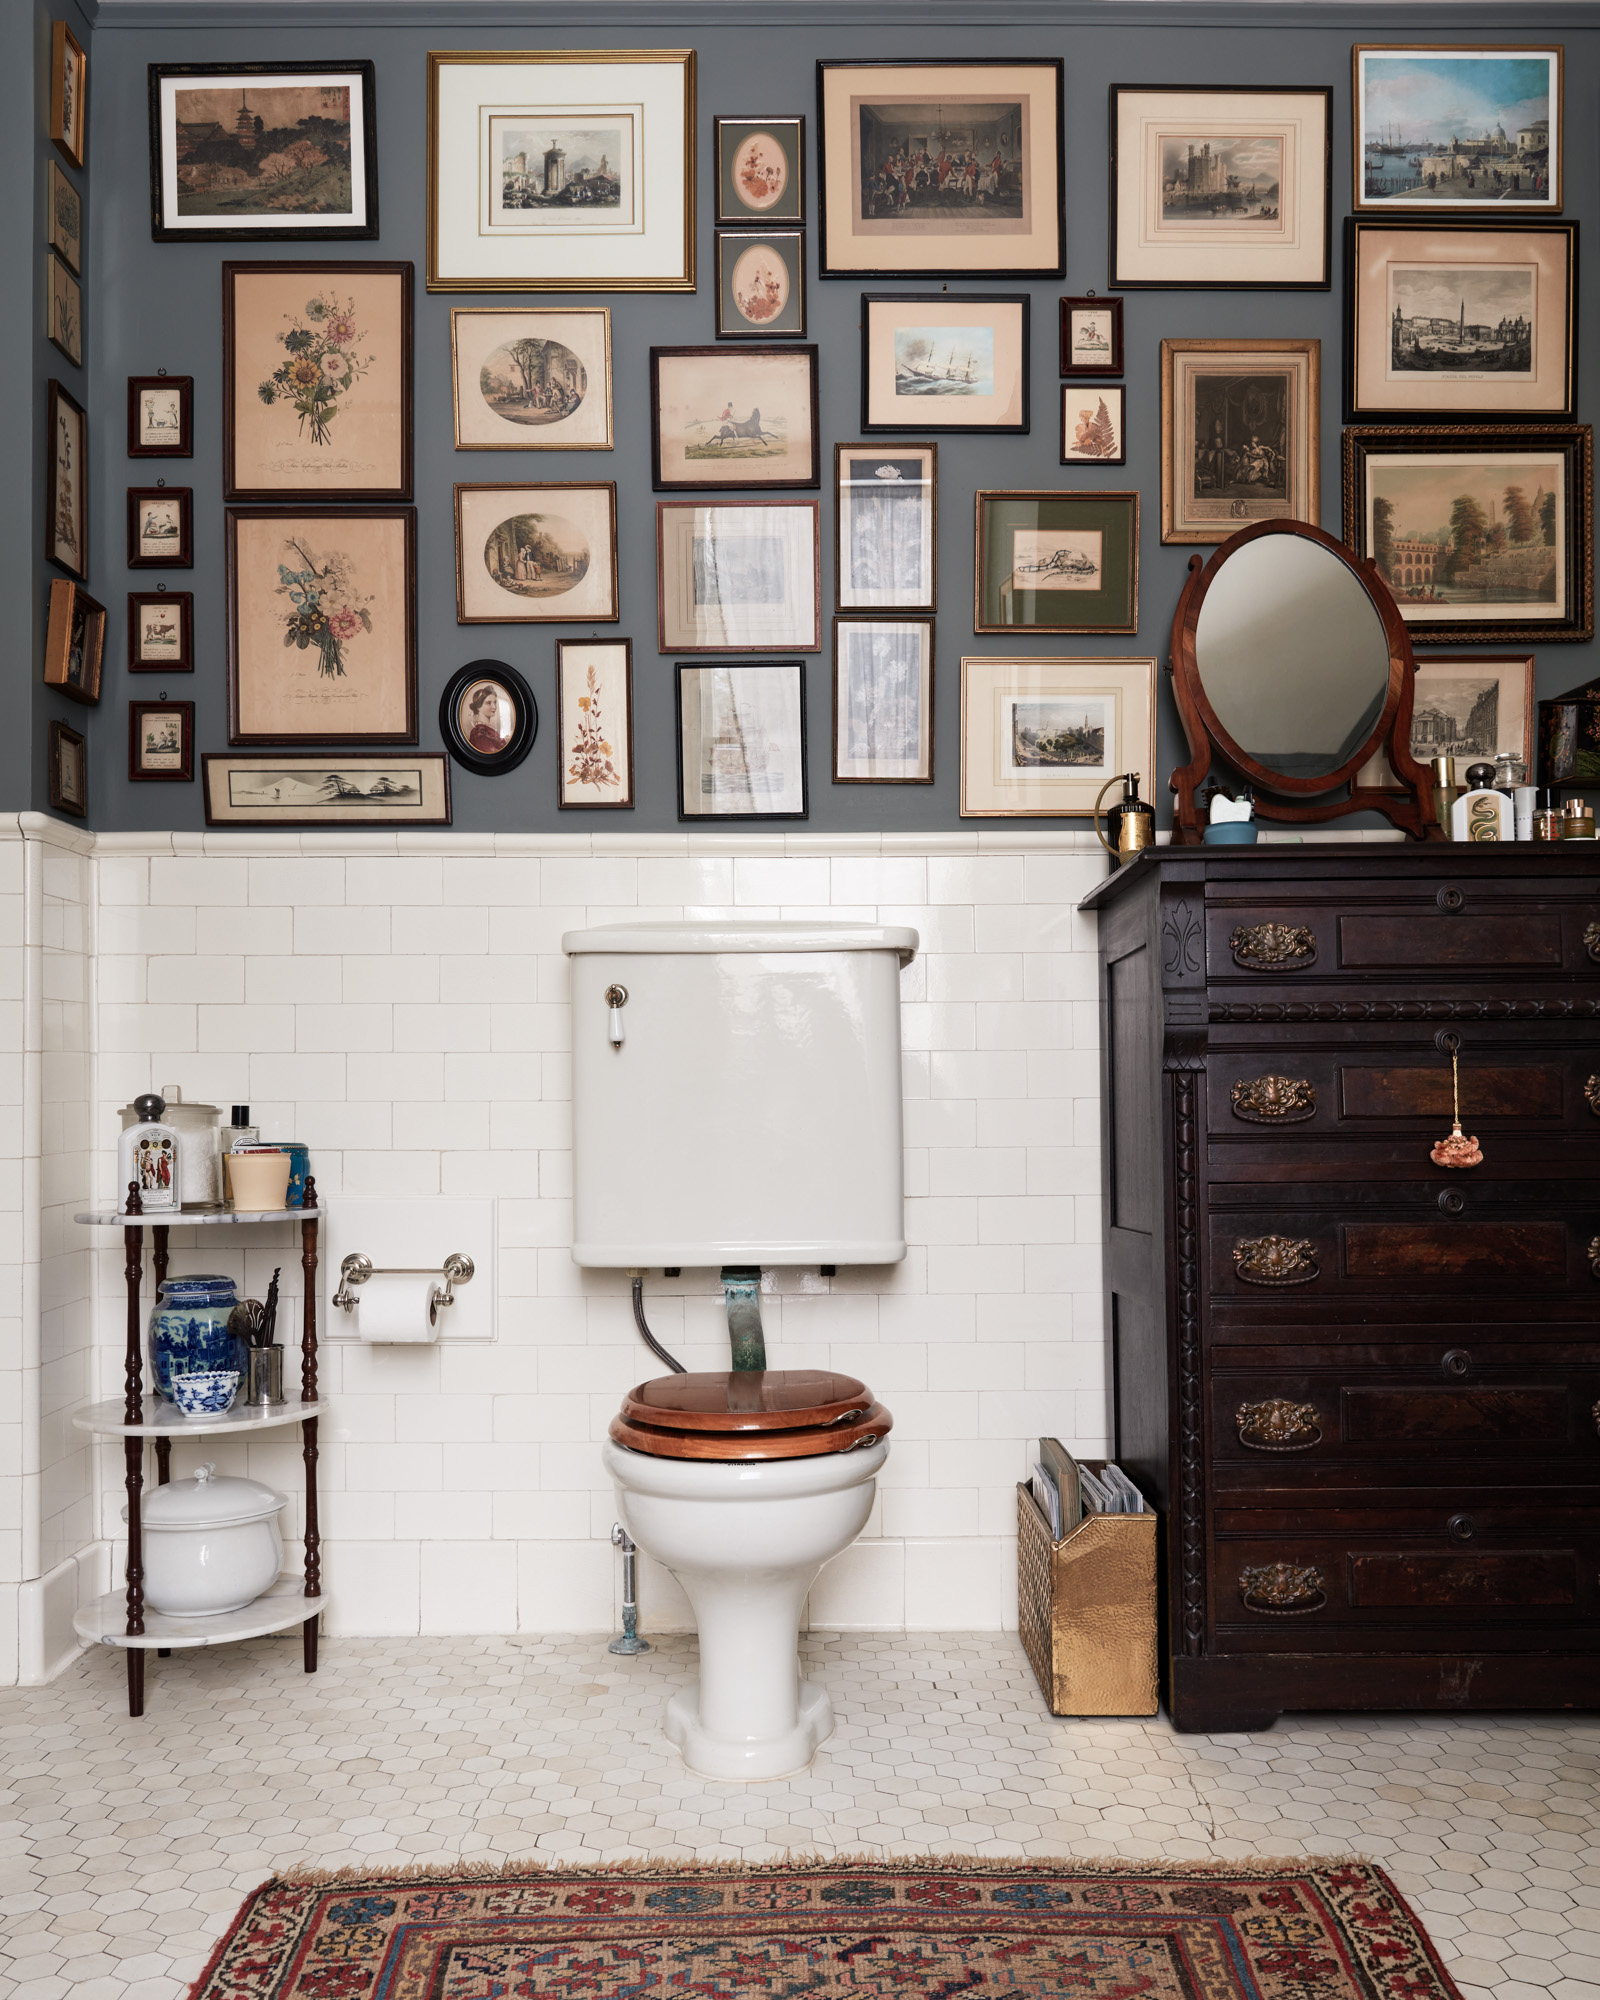
I love bathrooms designed as rooms, but also wanted to design the room in keeping with the vintage bathroom concept of it being a ‘sanitary’ room. When sanitation was moving from a chamber pot that was stashed under your bed or using an outhouse to the concept of a flush toilet, bathrooms were designed with a fine line of sanitation and convenience in mind. The tile is high for cleanability and everything is white. In historic bathrooms you’ll still see things like wooden toilet seats (they didn’t have plastic back then), which we decided to keep. I can say with the sealant on the wood it’s way more sanitary than an old plastic seat, and more friendly to the environment. That wooden seat has been there for decades and just refinished to maintain it. I digress, I could talk about the subject of bathrooms forever…. I find older bathrooms with the tile to the ceiling in all white appealing, however I wanted something that would blend in with the regular rooms in the house as well.
Color
For color in the bathroom, we added tile and paint and I stayed tone on tone for the top part of the room. There was no way I could ever match the white/off white color for an area that large, so we decided to acknowledge it was going to be a new product. I wanted the tile above the tub to clearly be different from the bottom tile, but also relate. We matched the size of the historic tile and the corner detail of the curved tile, and used a color and texture that would work well together.
For the rest of the walls, I matched a similar paint color to the new tile because it would make the bathroom feel more cohesive. I don’t like introducing a lot of ideas or color zones in smaller rooms. While this bathroom is not on the tiny side of bathrooms, it isn’t large either.
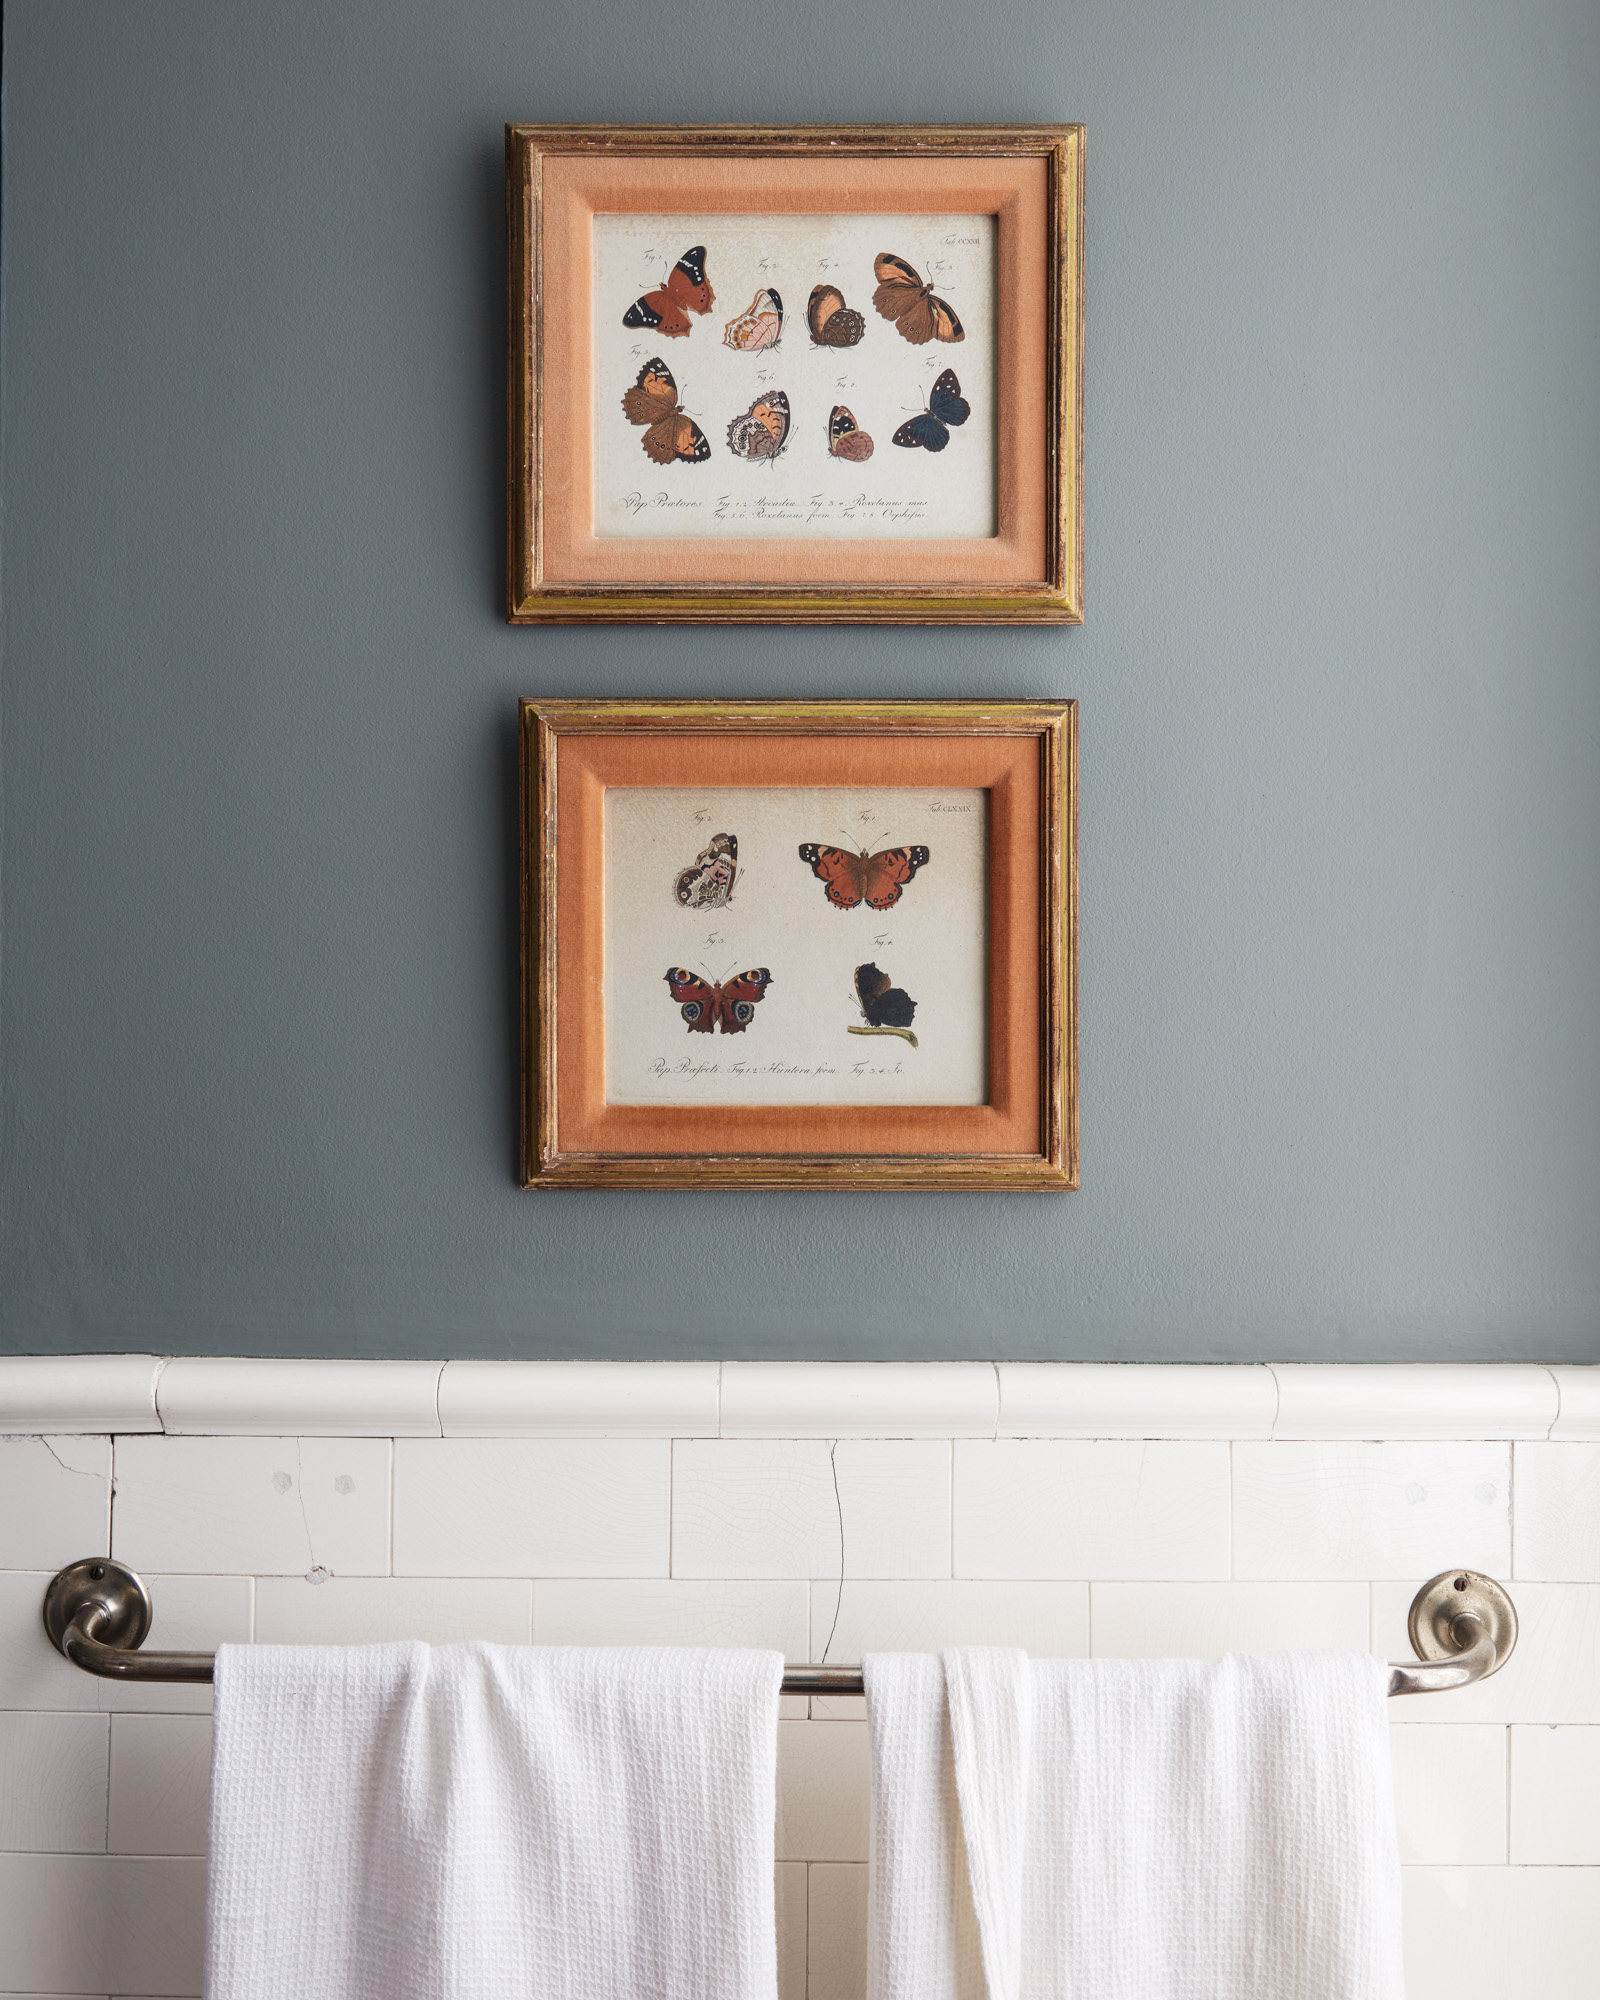
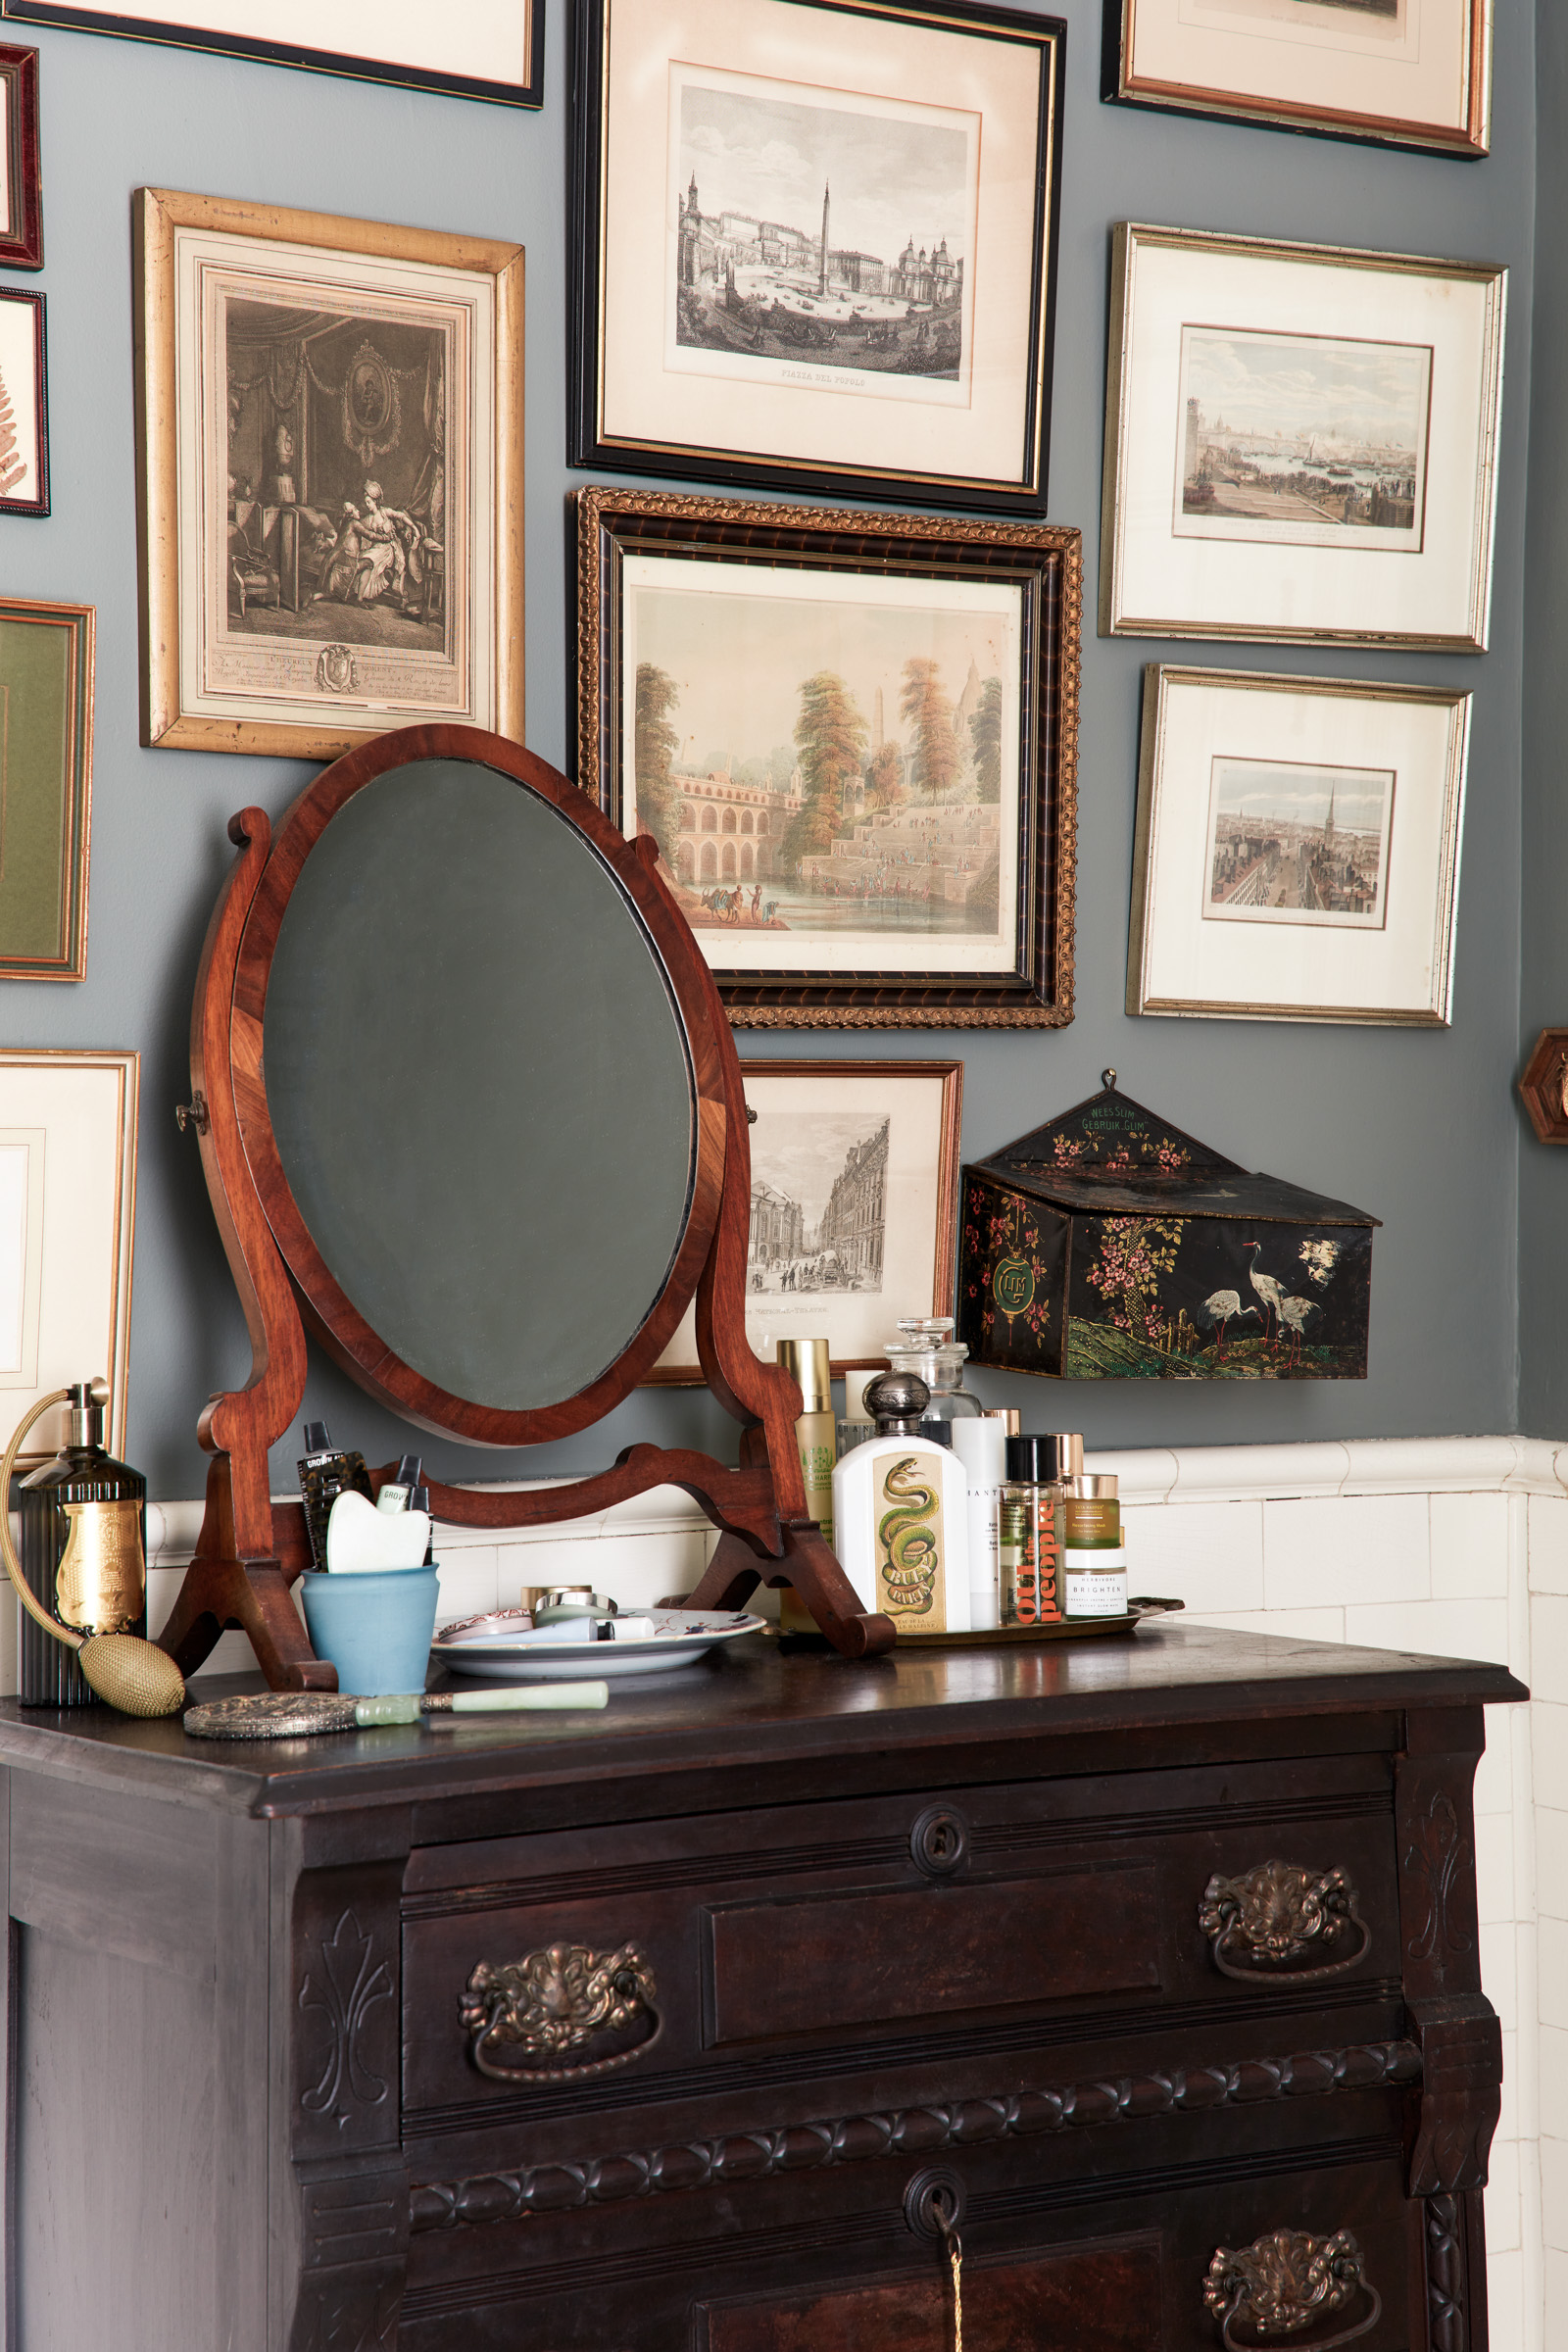
I’m a maximalist at heart, as many of you know, and showcased this on the wall behind the toilet. I love a good salon wall and this is a very large wall for a bathroom. Putting a few larger scale pieces of art on it didn’t make sense to me because there is no place to stand back to admire the art at a larger scale. The bathroom is a ‘T’ shape and the main sight lines are from either door.
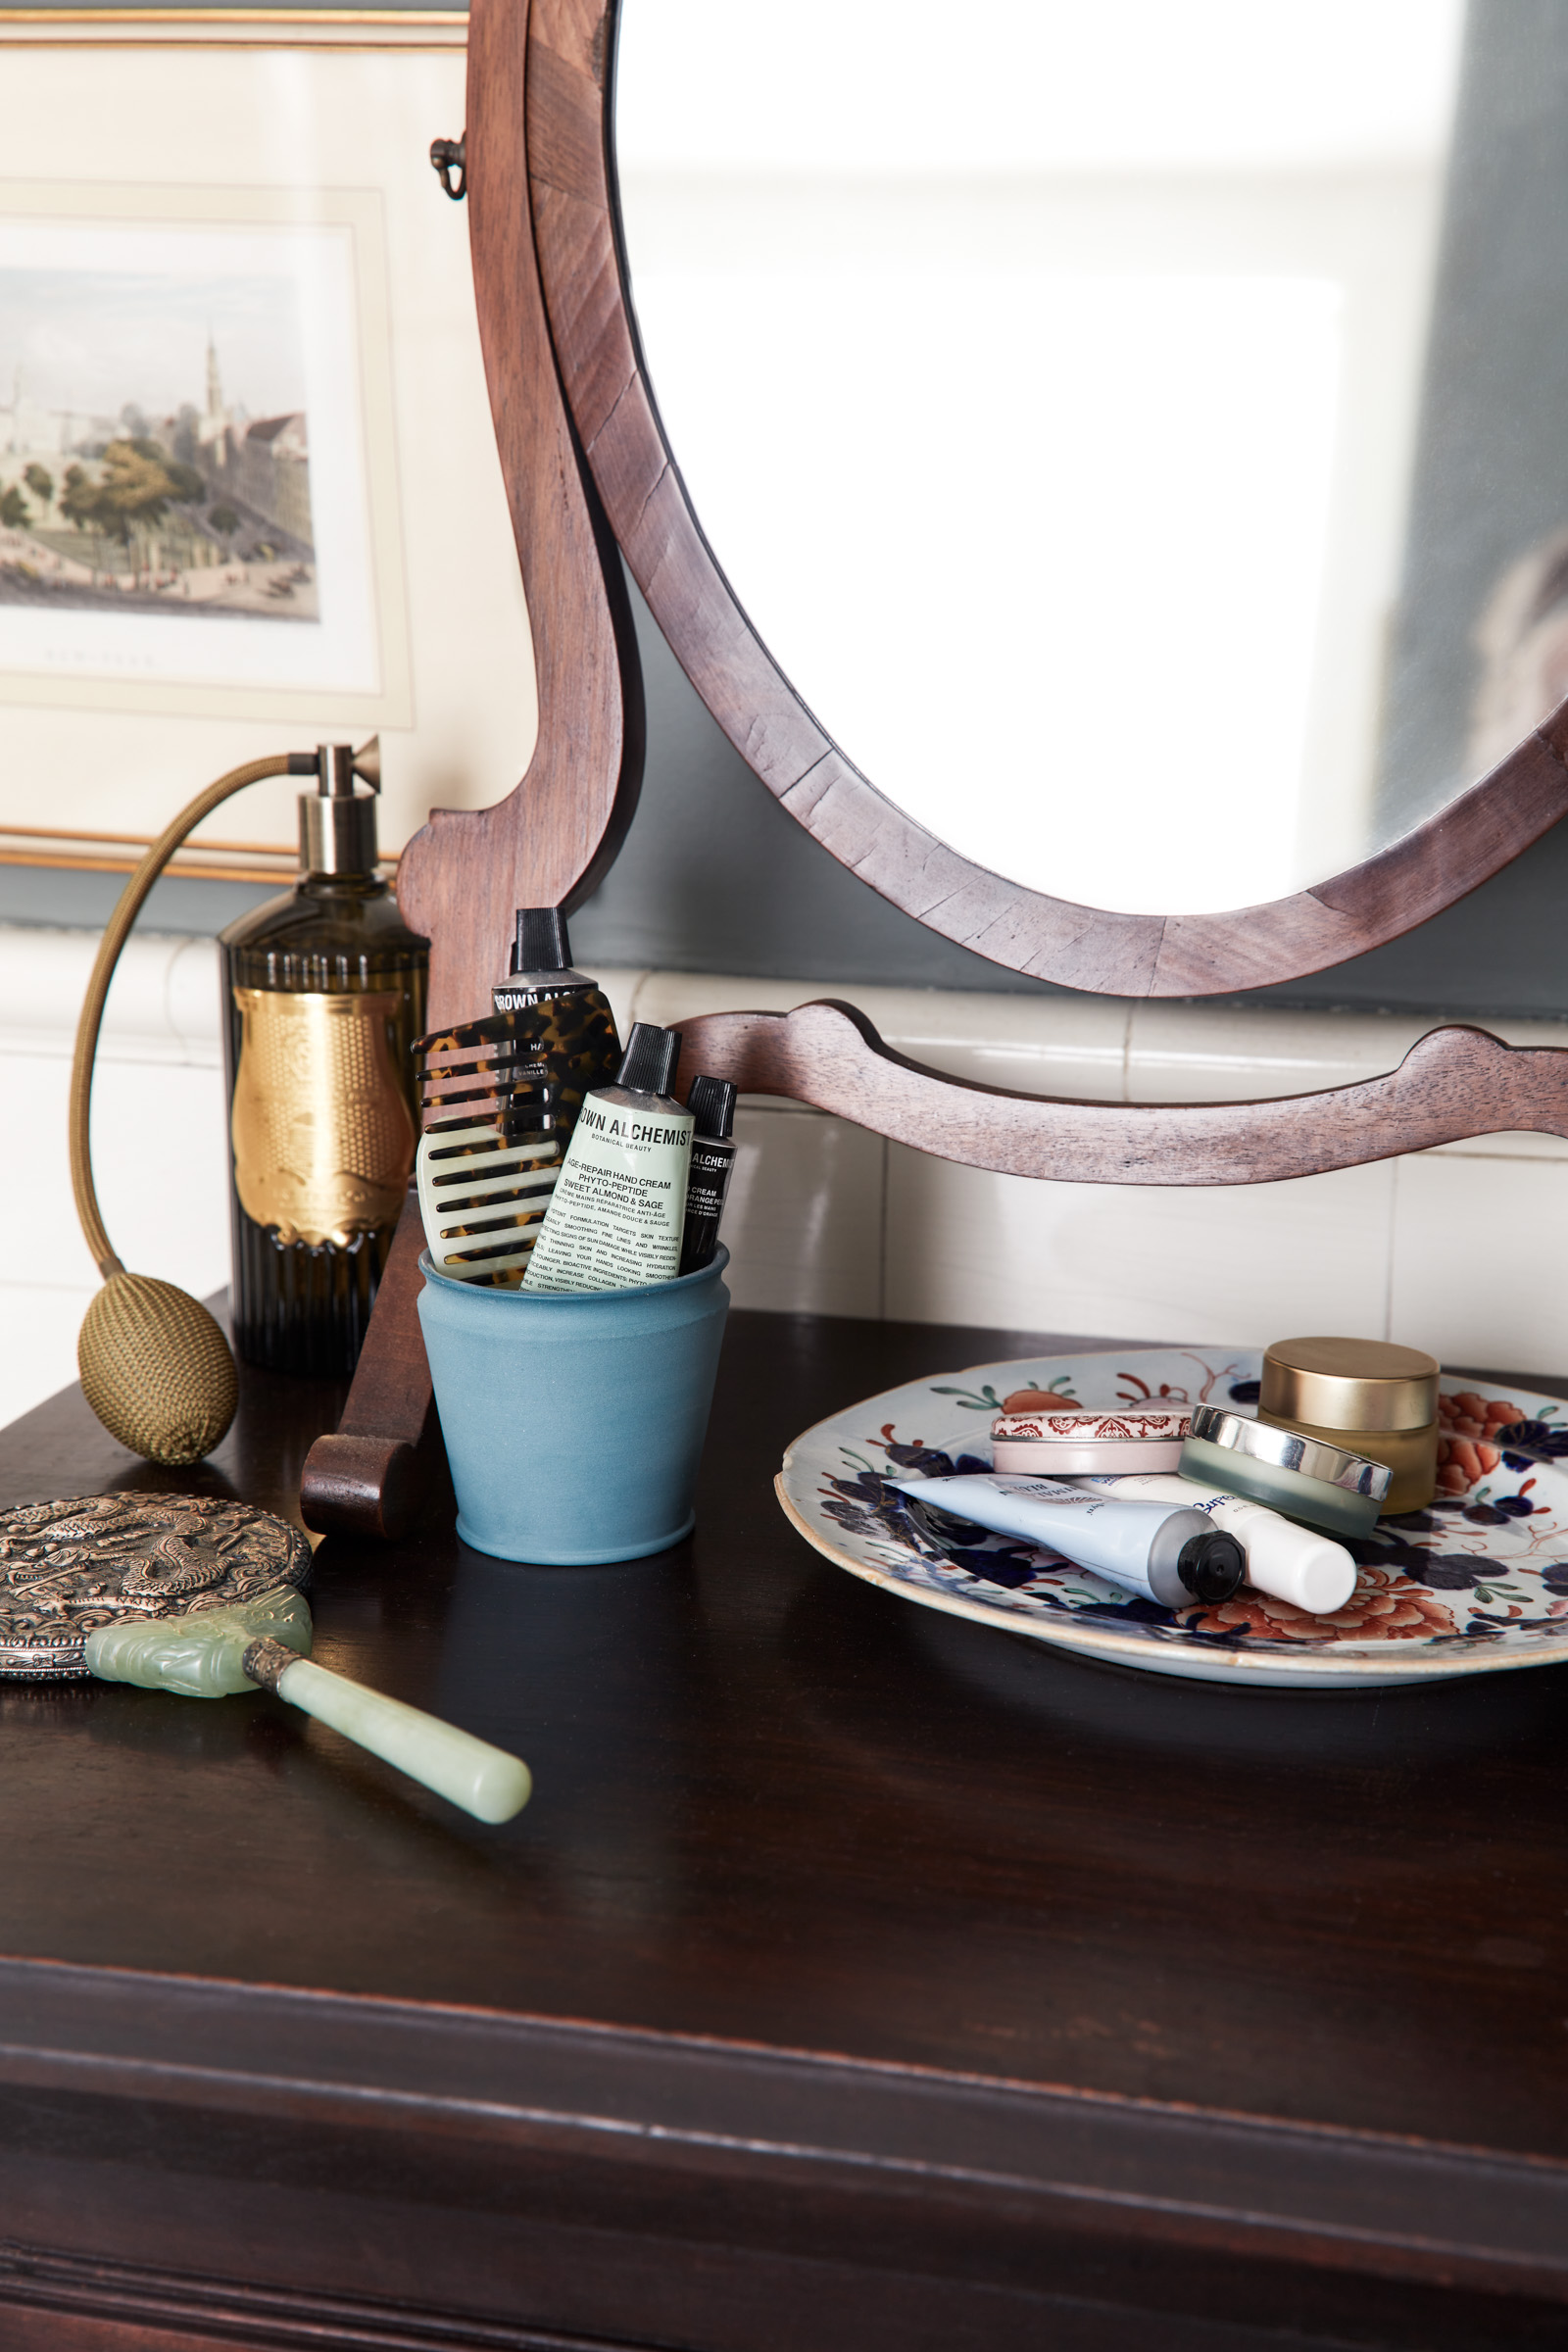
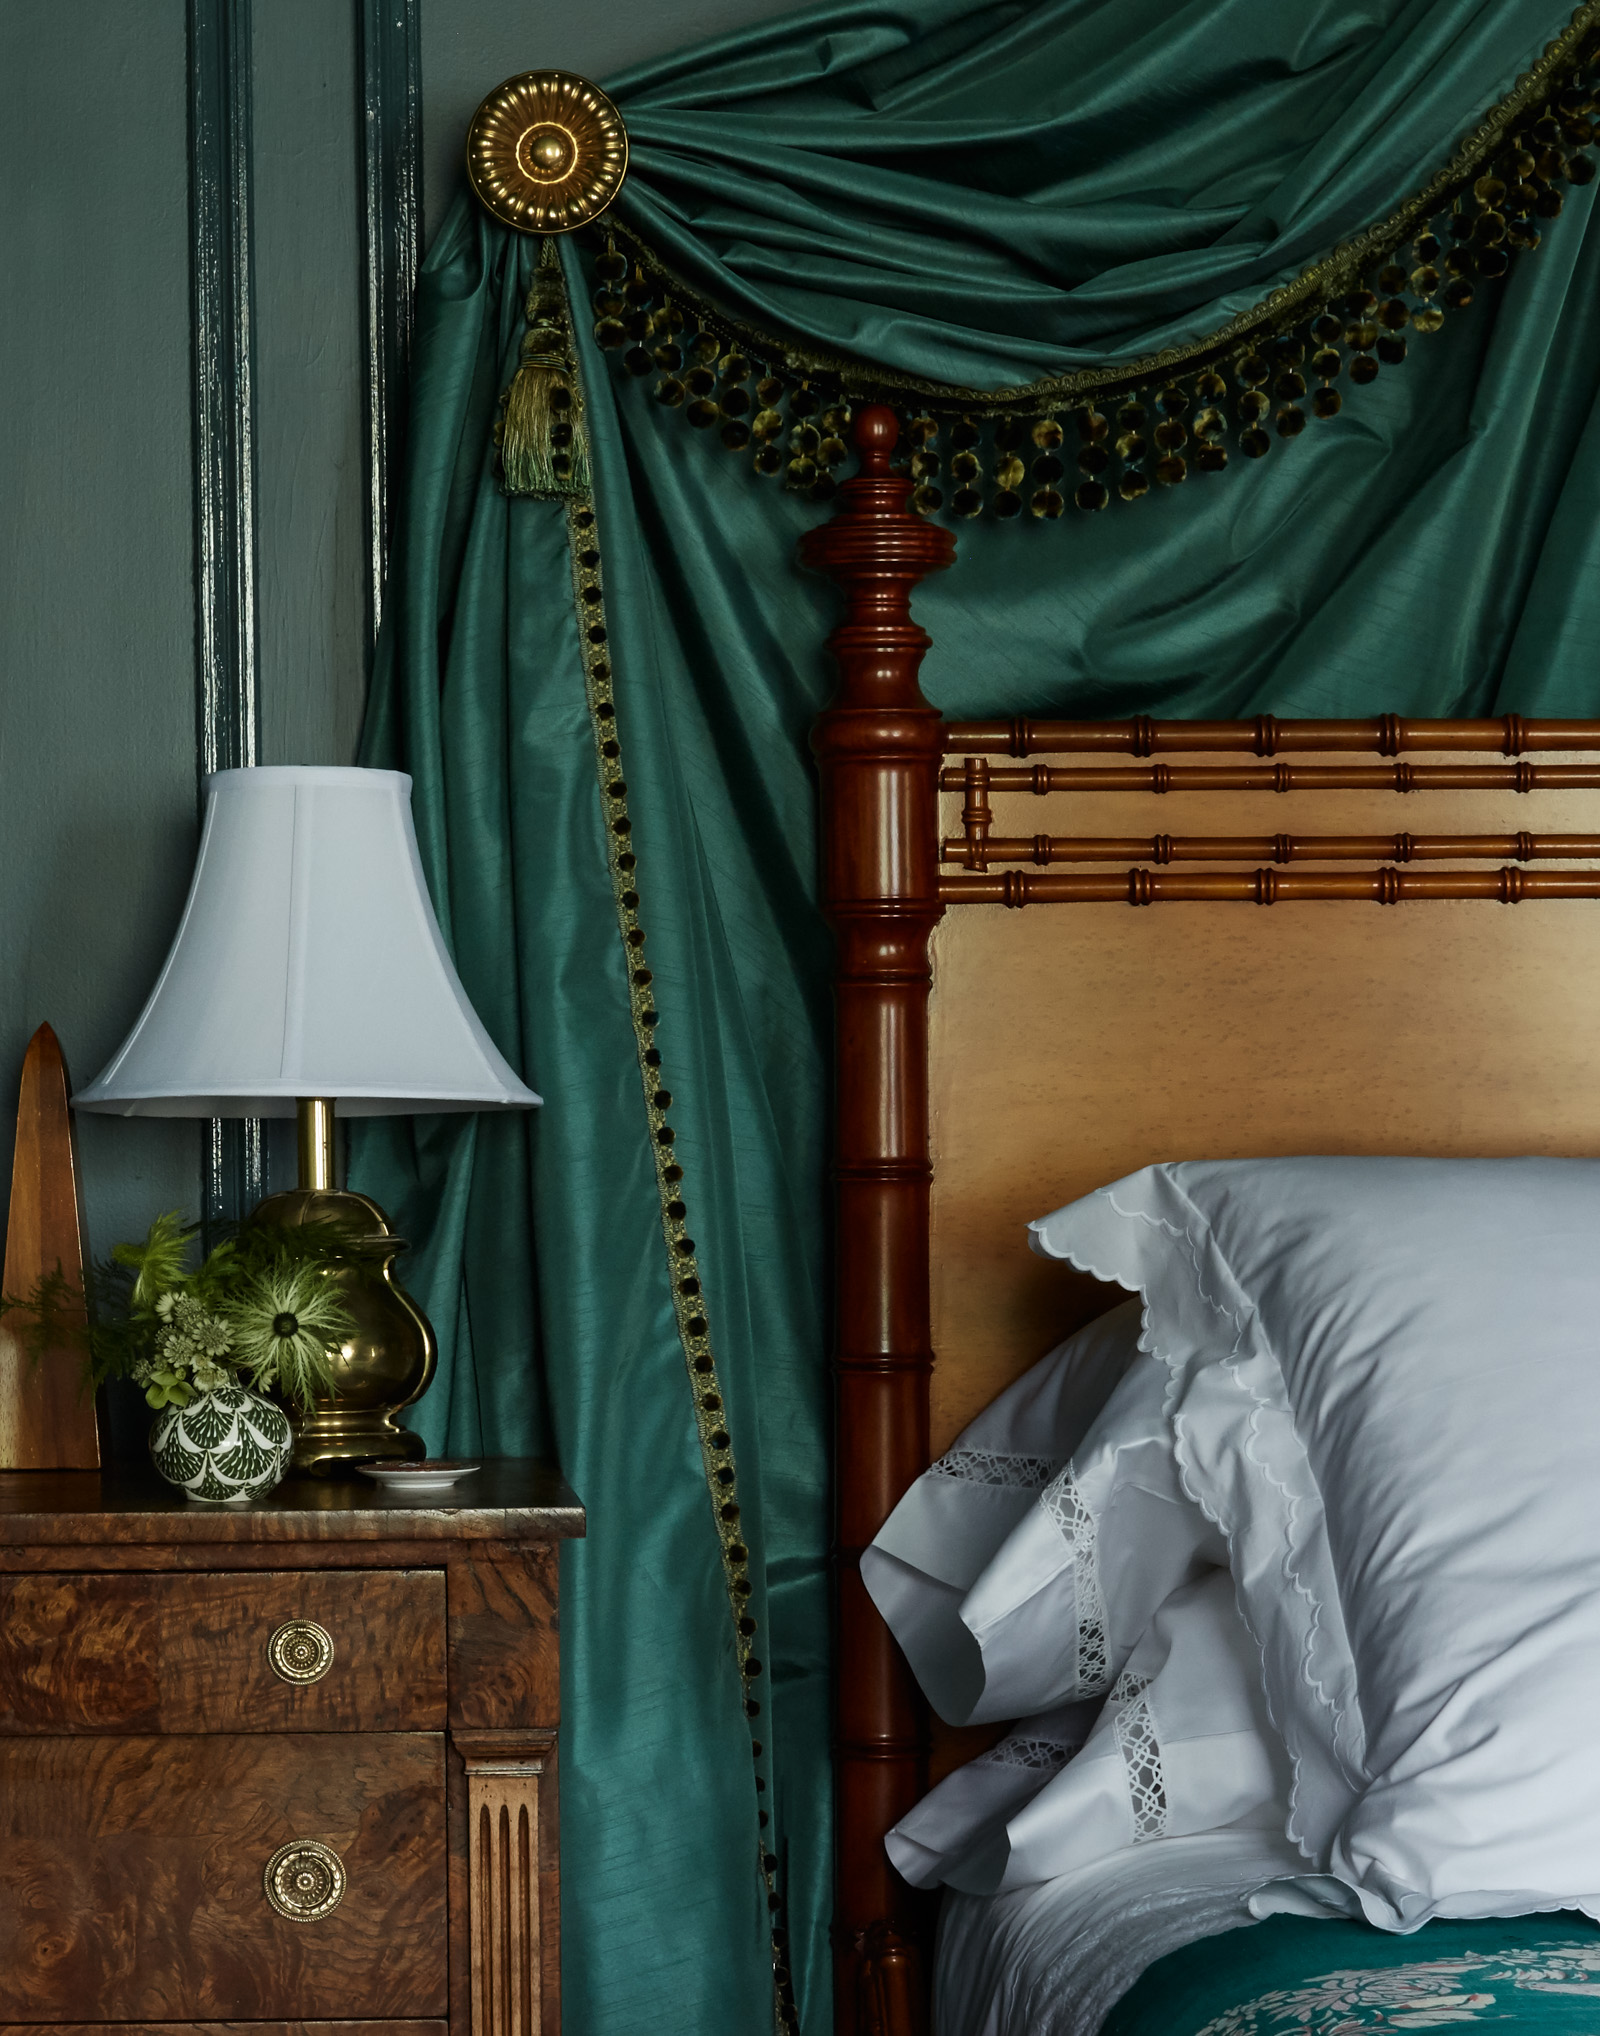
For accents of color I introduced hints of reddish rust orange in the art and rugs. In our connected bedroom, we used a wallpaper with a lot of blue, plus our actual bedroom is painted a rust/orange color.
I listed the color resources below. I can’t tell you how much I love this tile and paint color. It’s insane. This is the room that made be addicted to matte paint for bathrooms. It looks so vintage and performs really well.

The Salon Wall
This design feature generates a lot of questions – I’ll do my best to answer them. One is about moisture and all the art. We have an exhaust fan on before we step into the shower, plus if the humidity is high, we crack a door when we get out. The exhaust fan is so good, most of the time when I get out of the shower the mirrors aren’t even fogged up. It also helps this bathroom has a decent sized foot print, meaning it’s not super small. If you love the look but are concerned about moisture, consider a wall of plates or decorative tile.
The second question is how to curate all the art. Especially since all the art is vintage and purchased at different times over the span of a year. I try and stay within a size range and vary sizes smaller, then I try to stick in a certain color palette. How this would play out: determine your largest piece size (mine is 11 x 14 ish) then size down. I try to add in a few odd sizes too, ovals and tiny pieces to break up the space. I also don’t hang things evenly and in a grid – I think it adds that ‘collected over time’ look that I love so much. The last thing I’d want is for the wall to look like I purchased these all at one time and it come off as contrived.
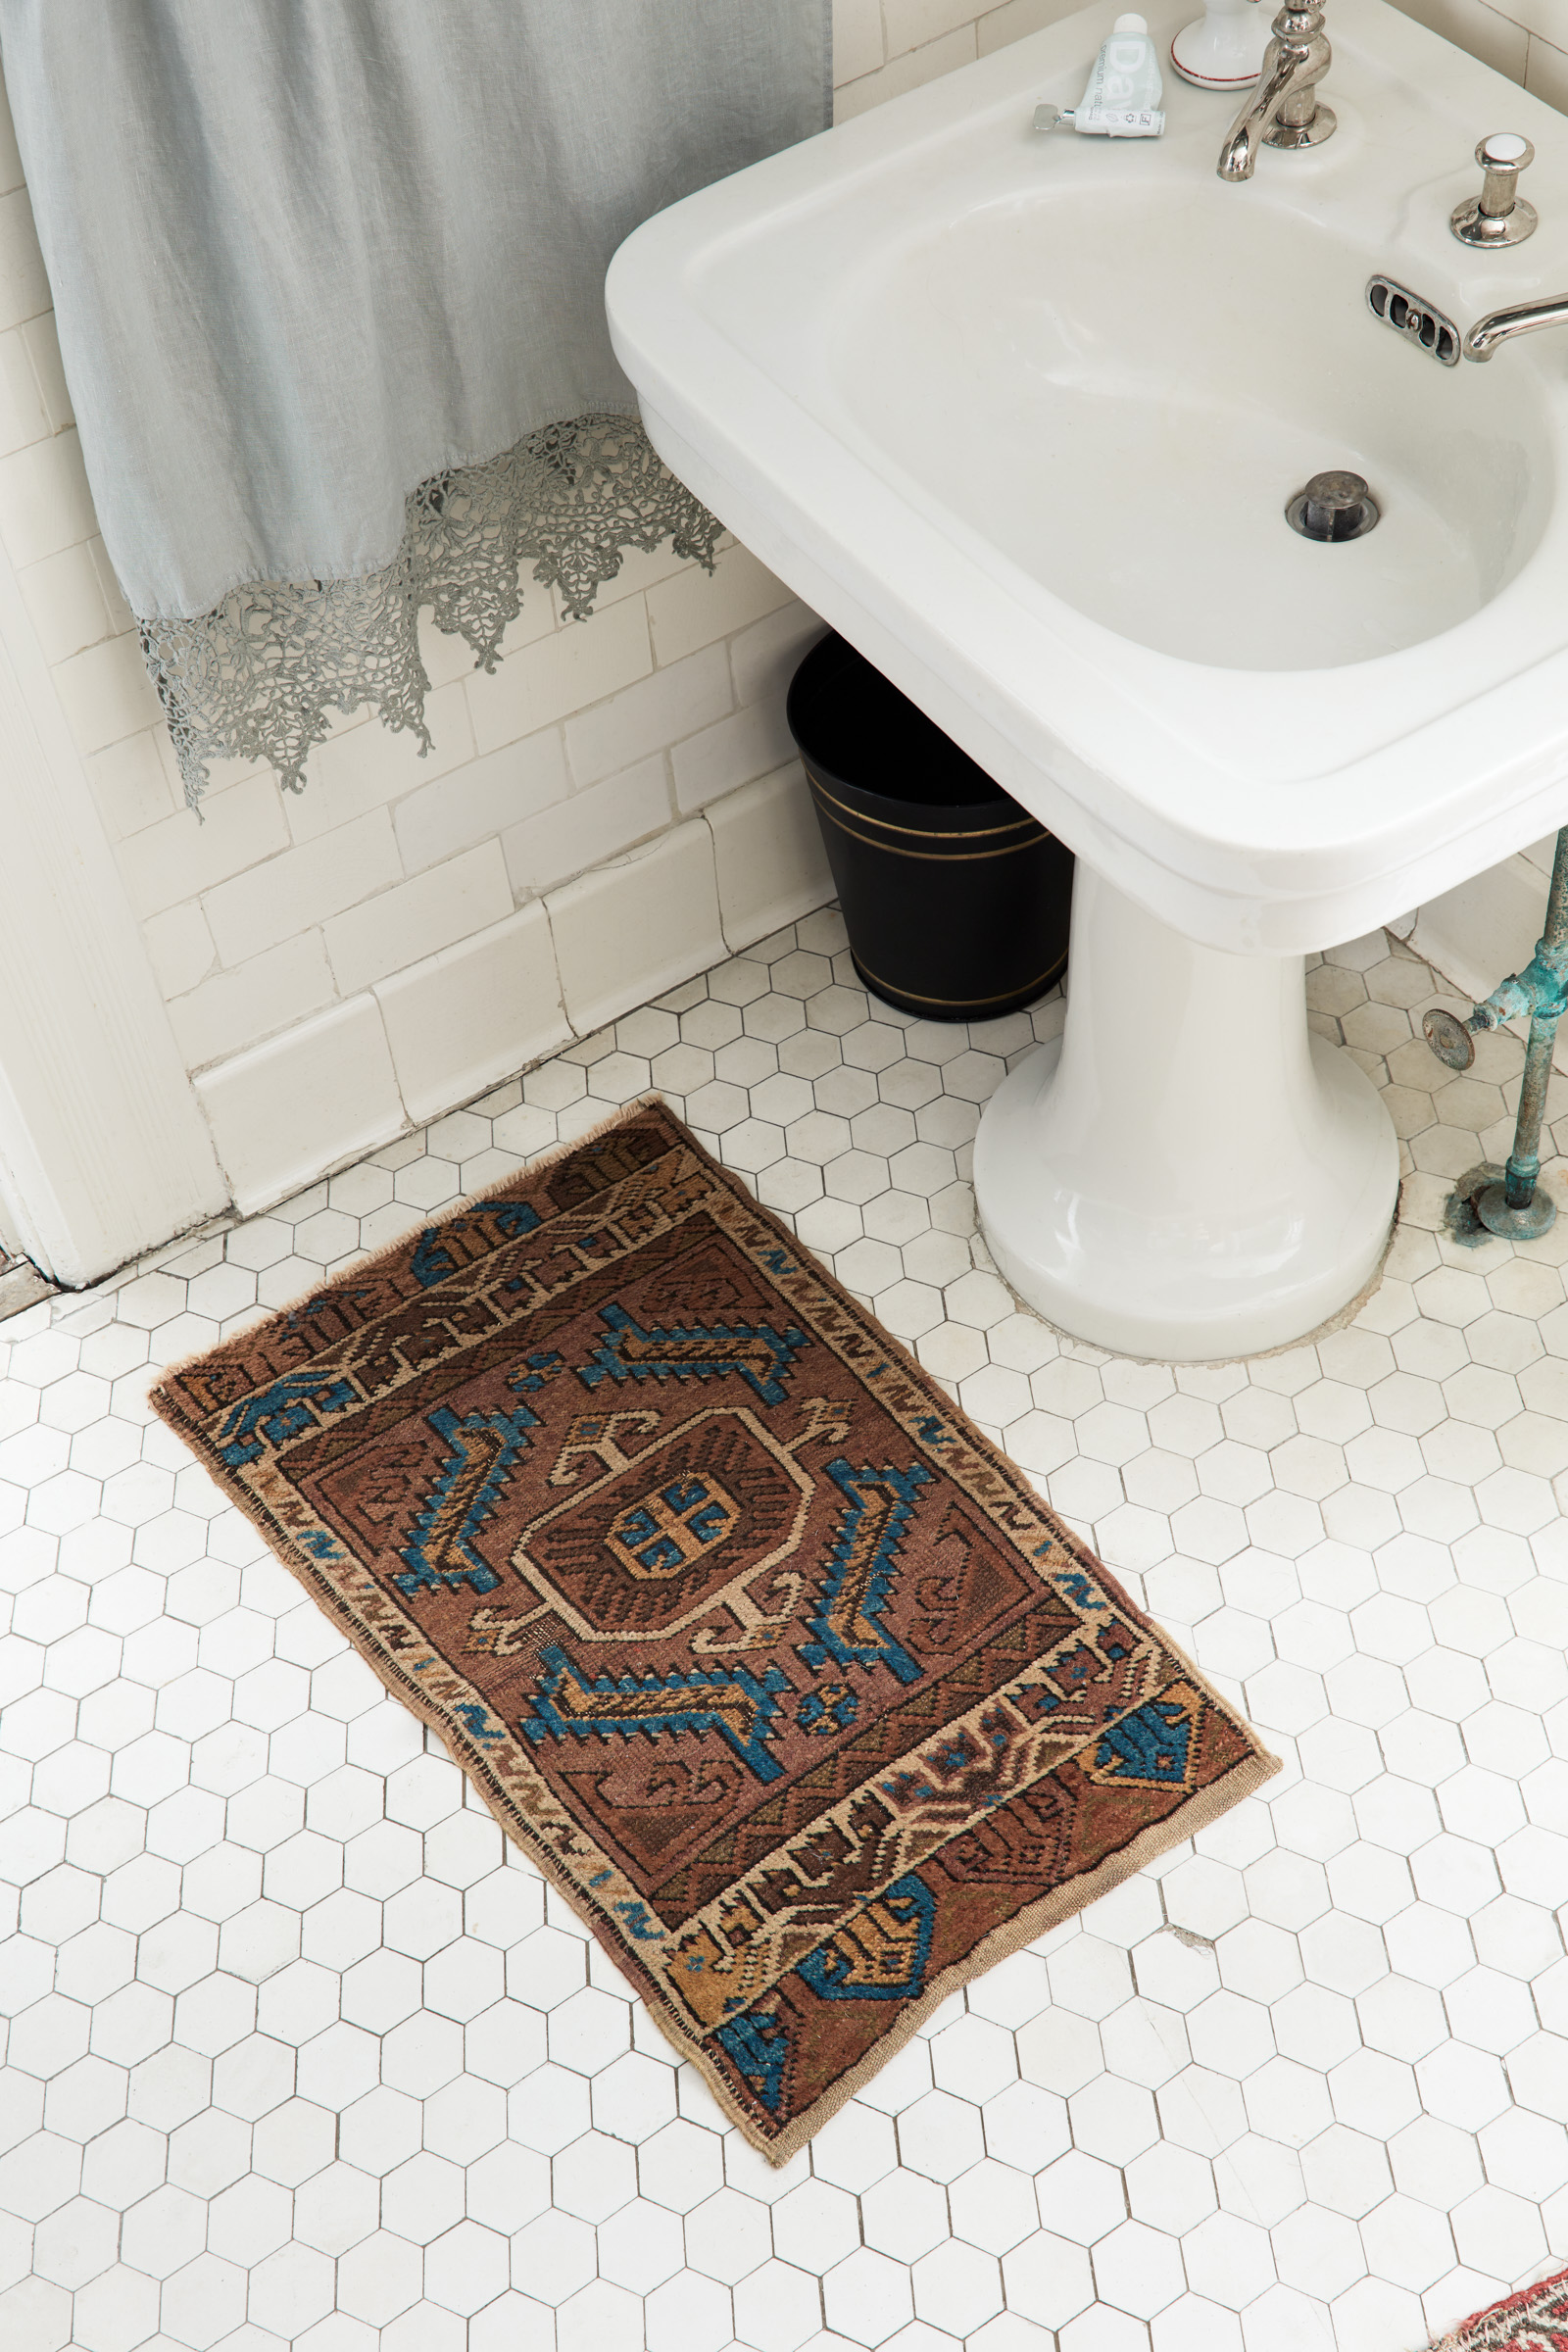
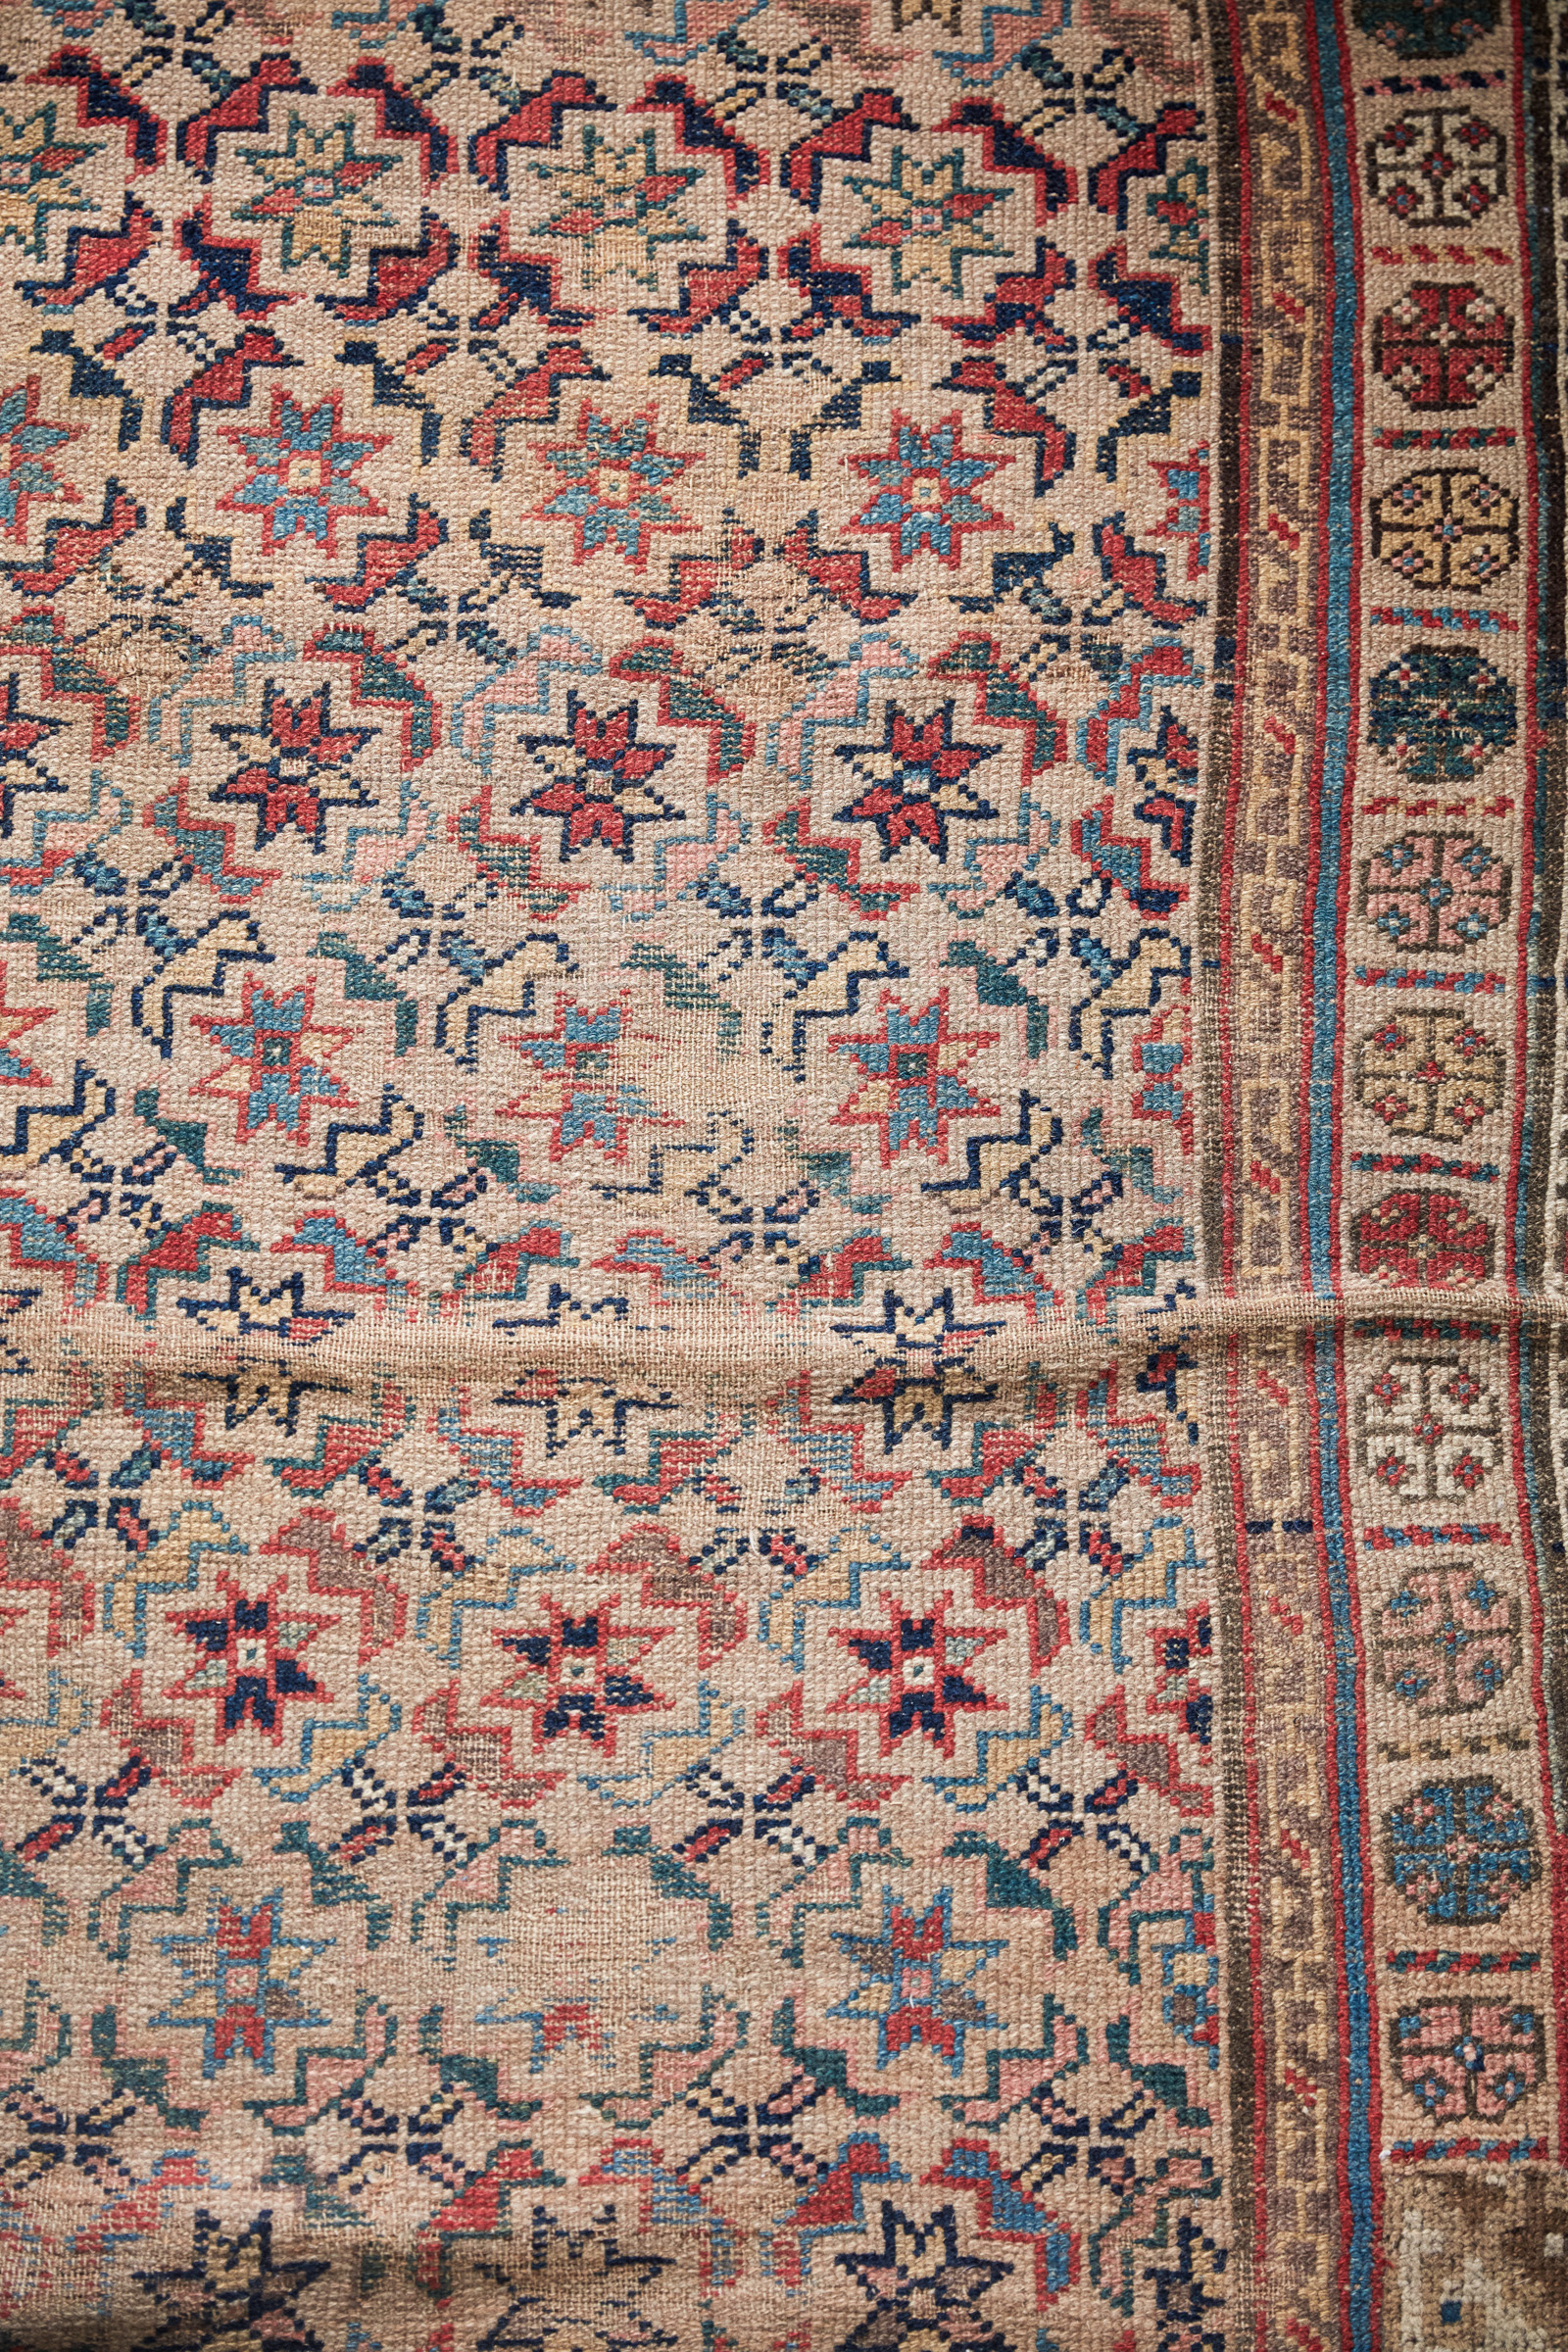
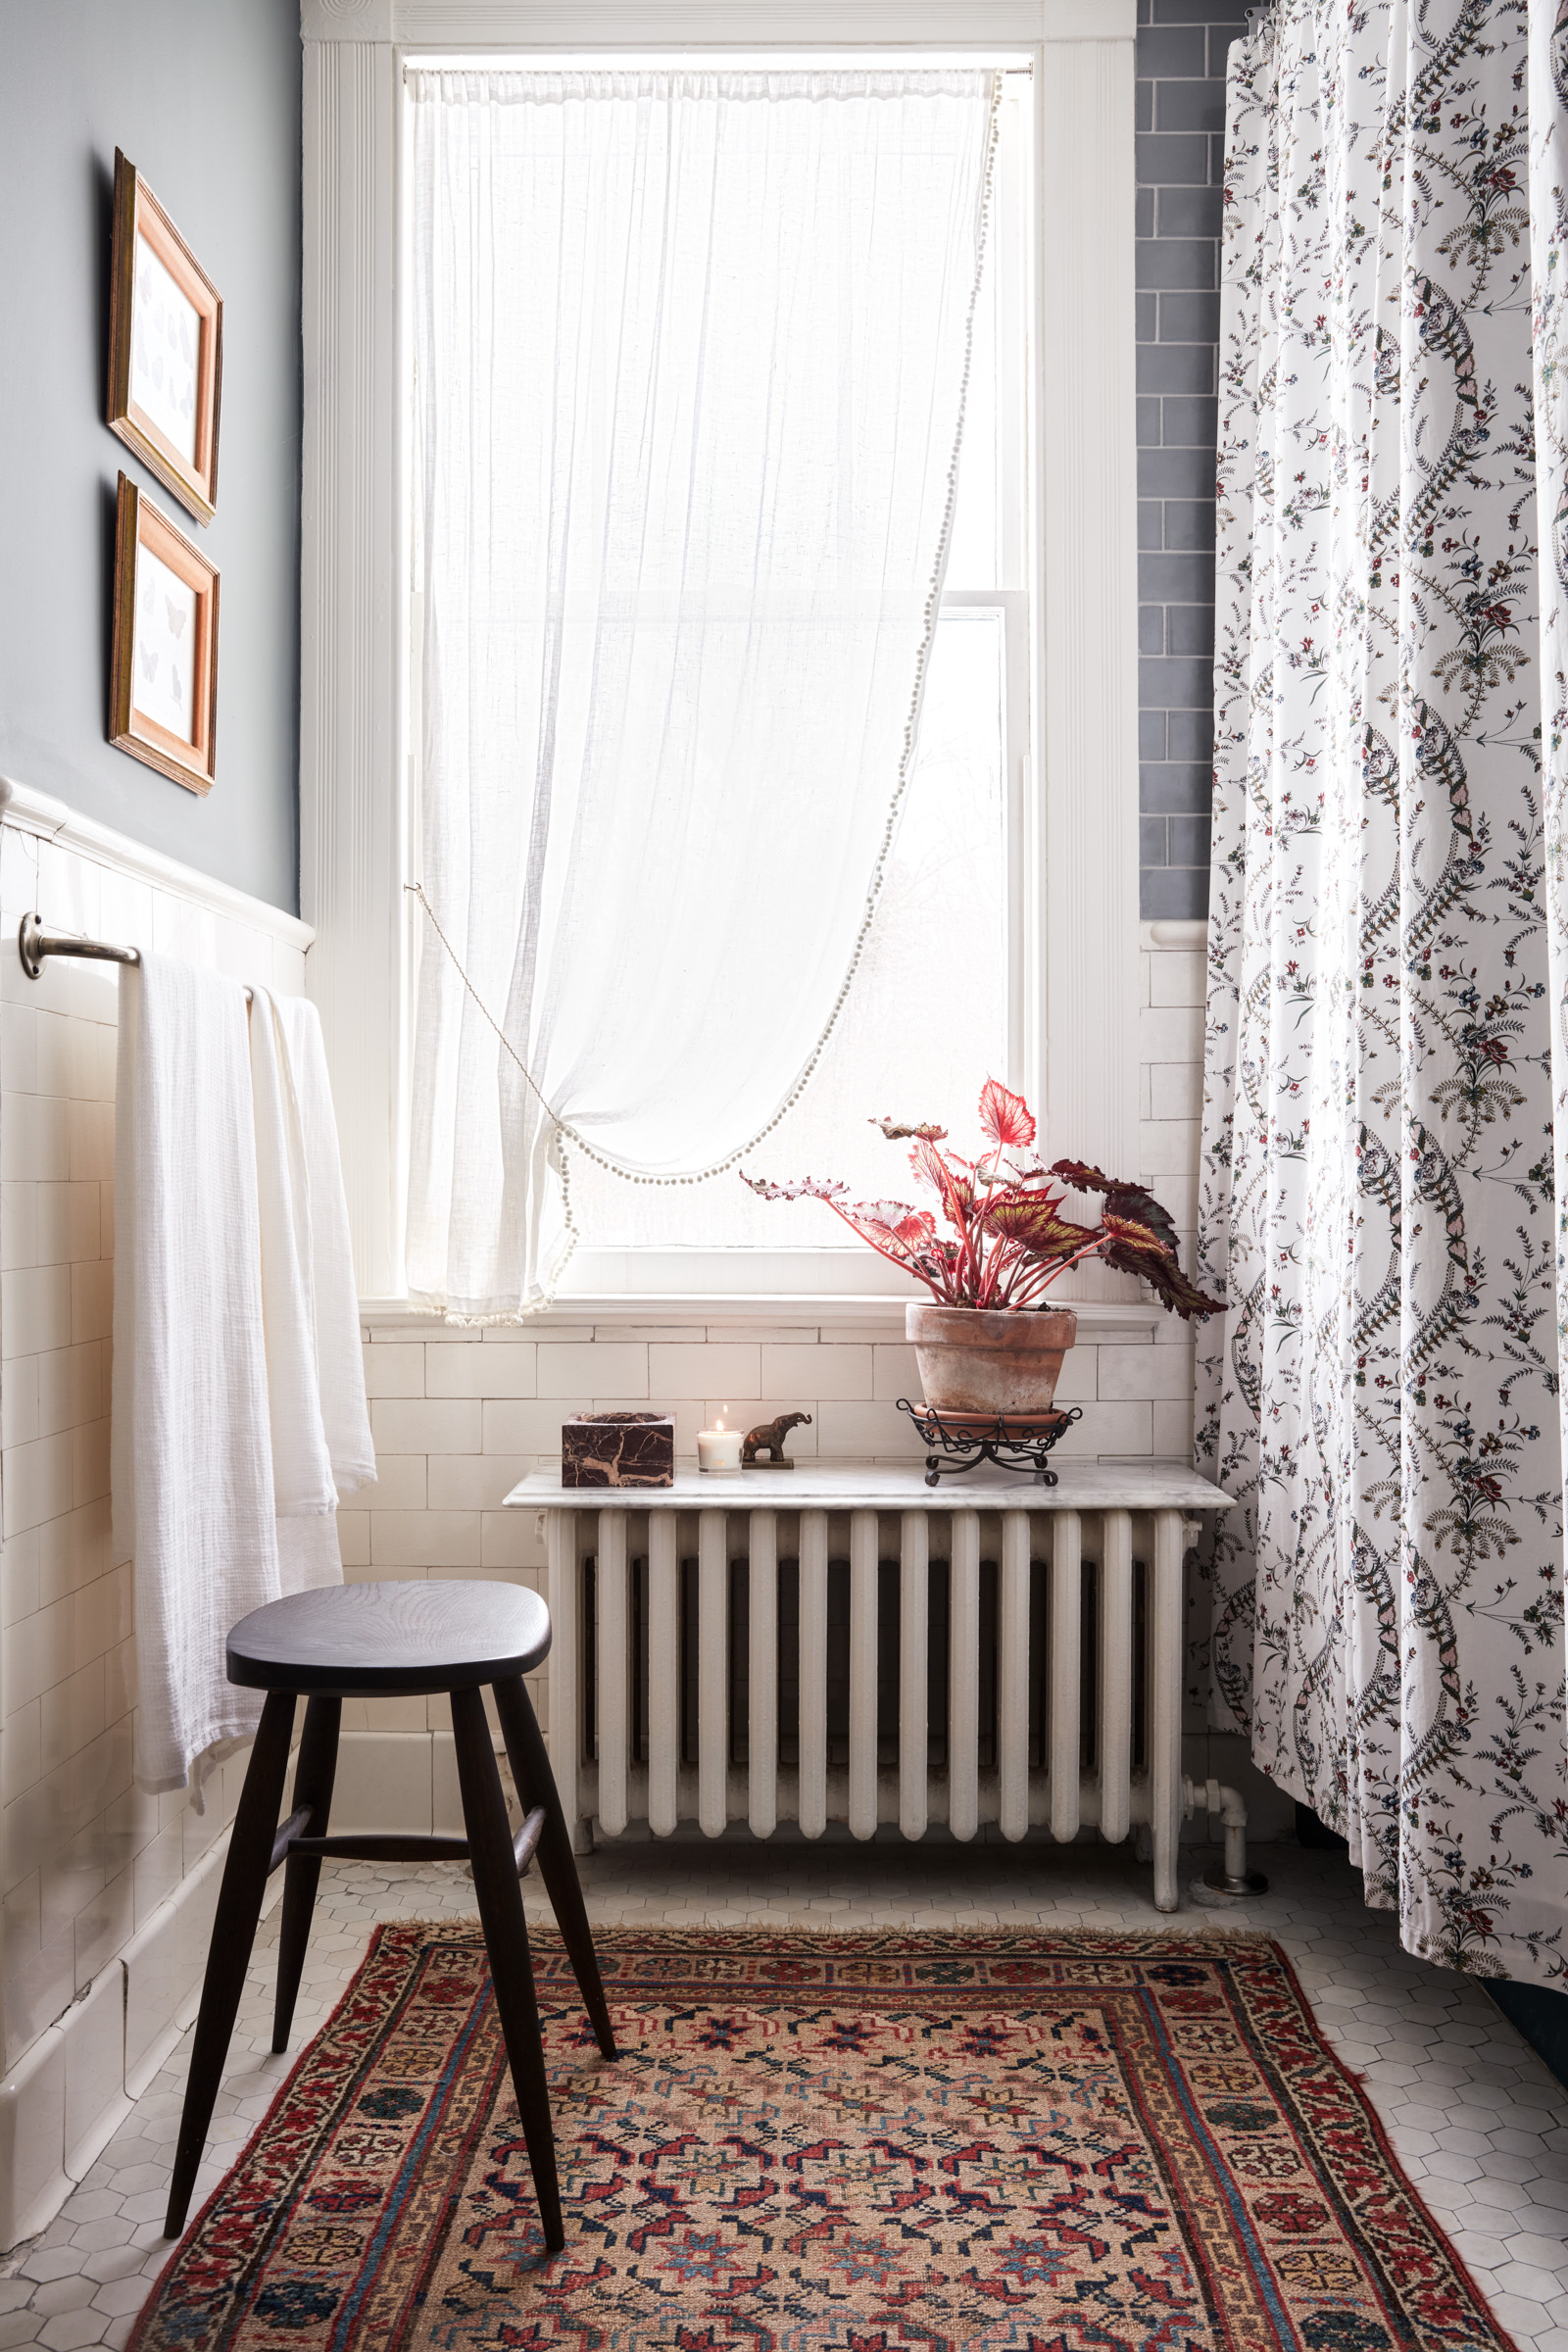
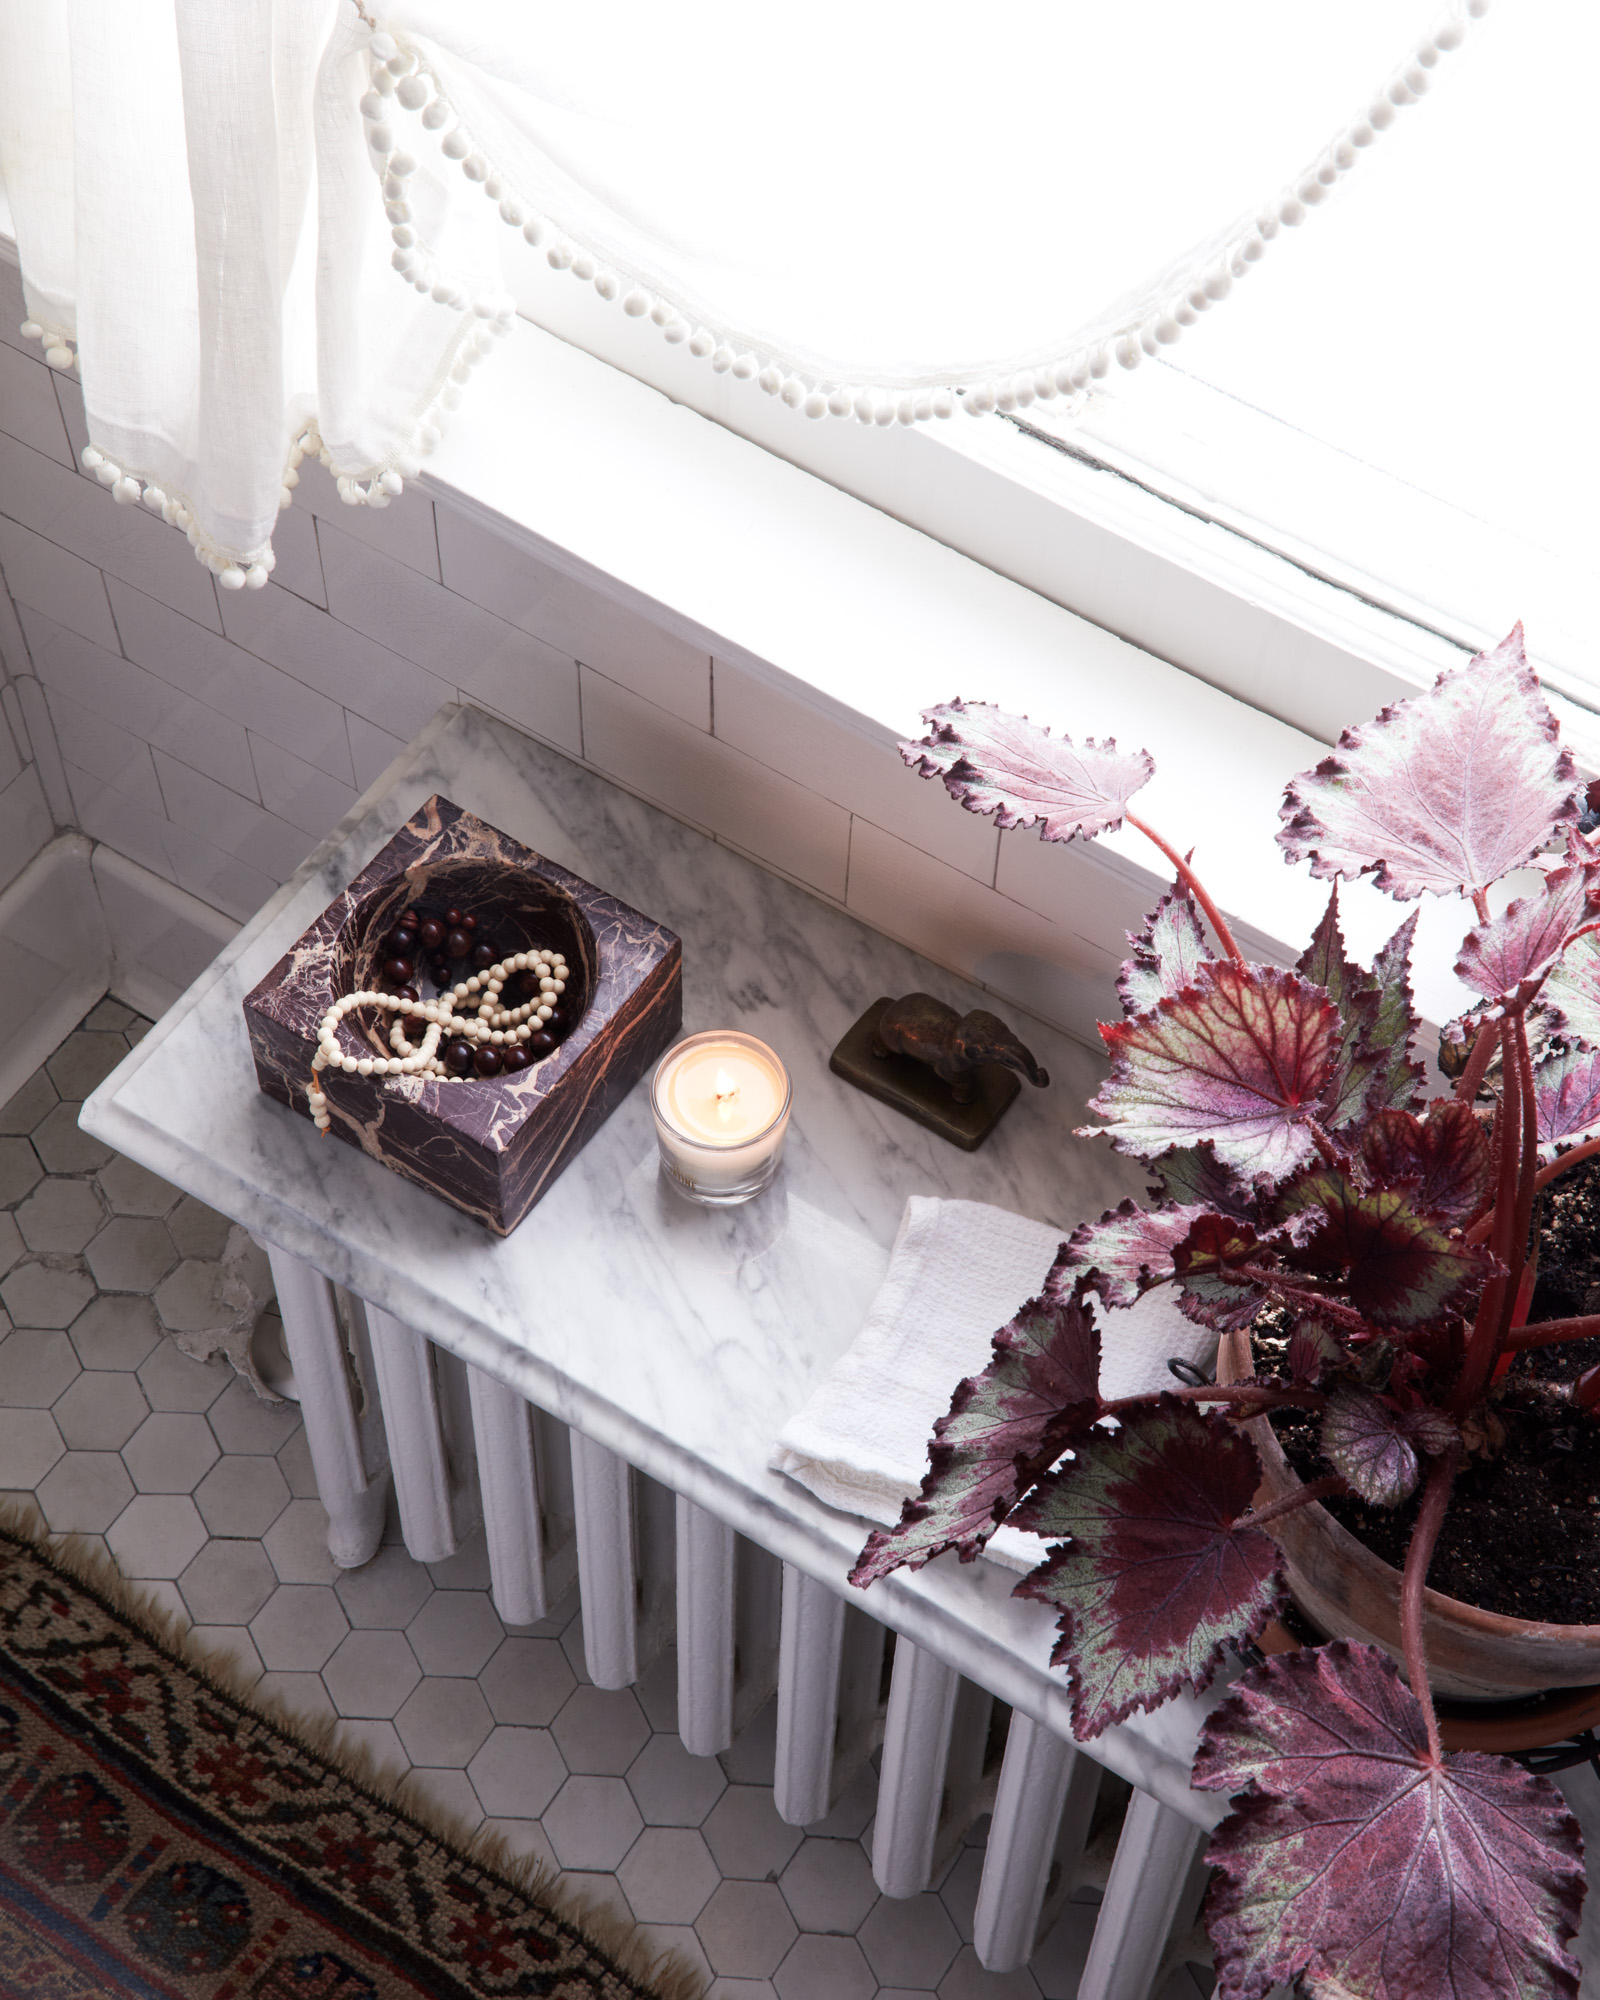
For the rug, I knew that was one place I could add a lot of vintage texture and charm. It also let me introduce the blue and red/orange that leads into the next room. This rug has a lot of pretty character and even a repair. It adds personality and functionality. Will’s ONE request was having a rug in front of the sink. The floor can get very cool (even in the summer) and he said standing there to shave on the cold floor was not fun, hence the little rug.
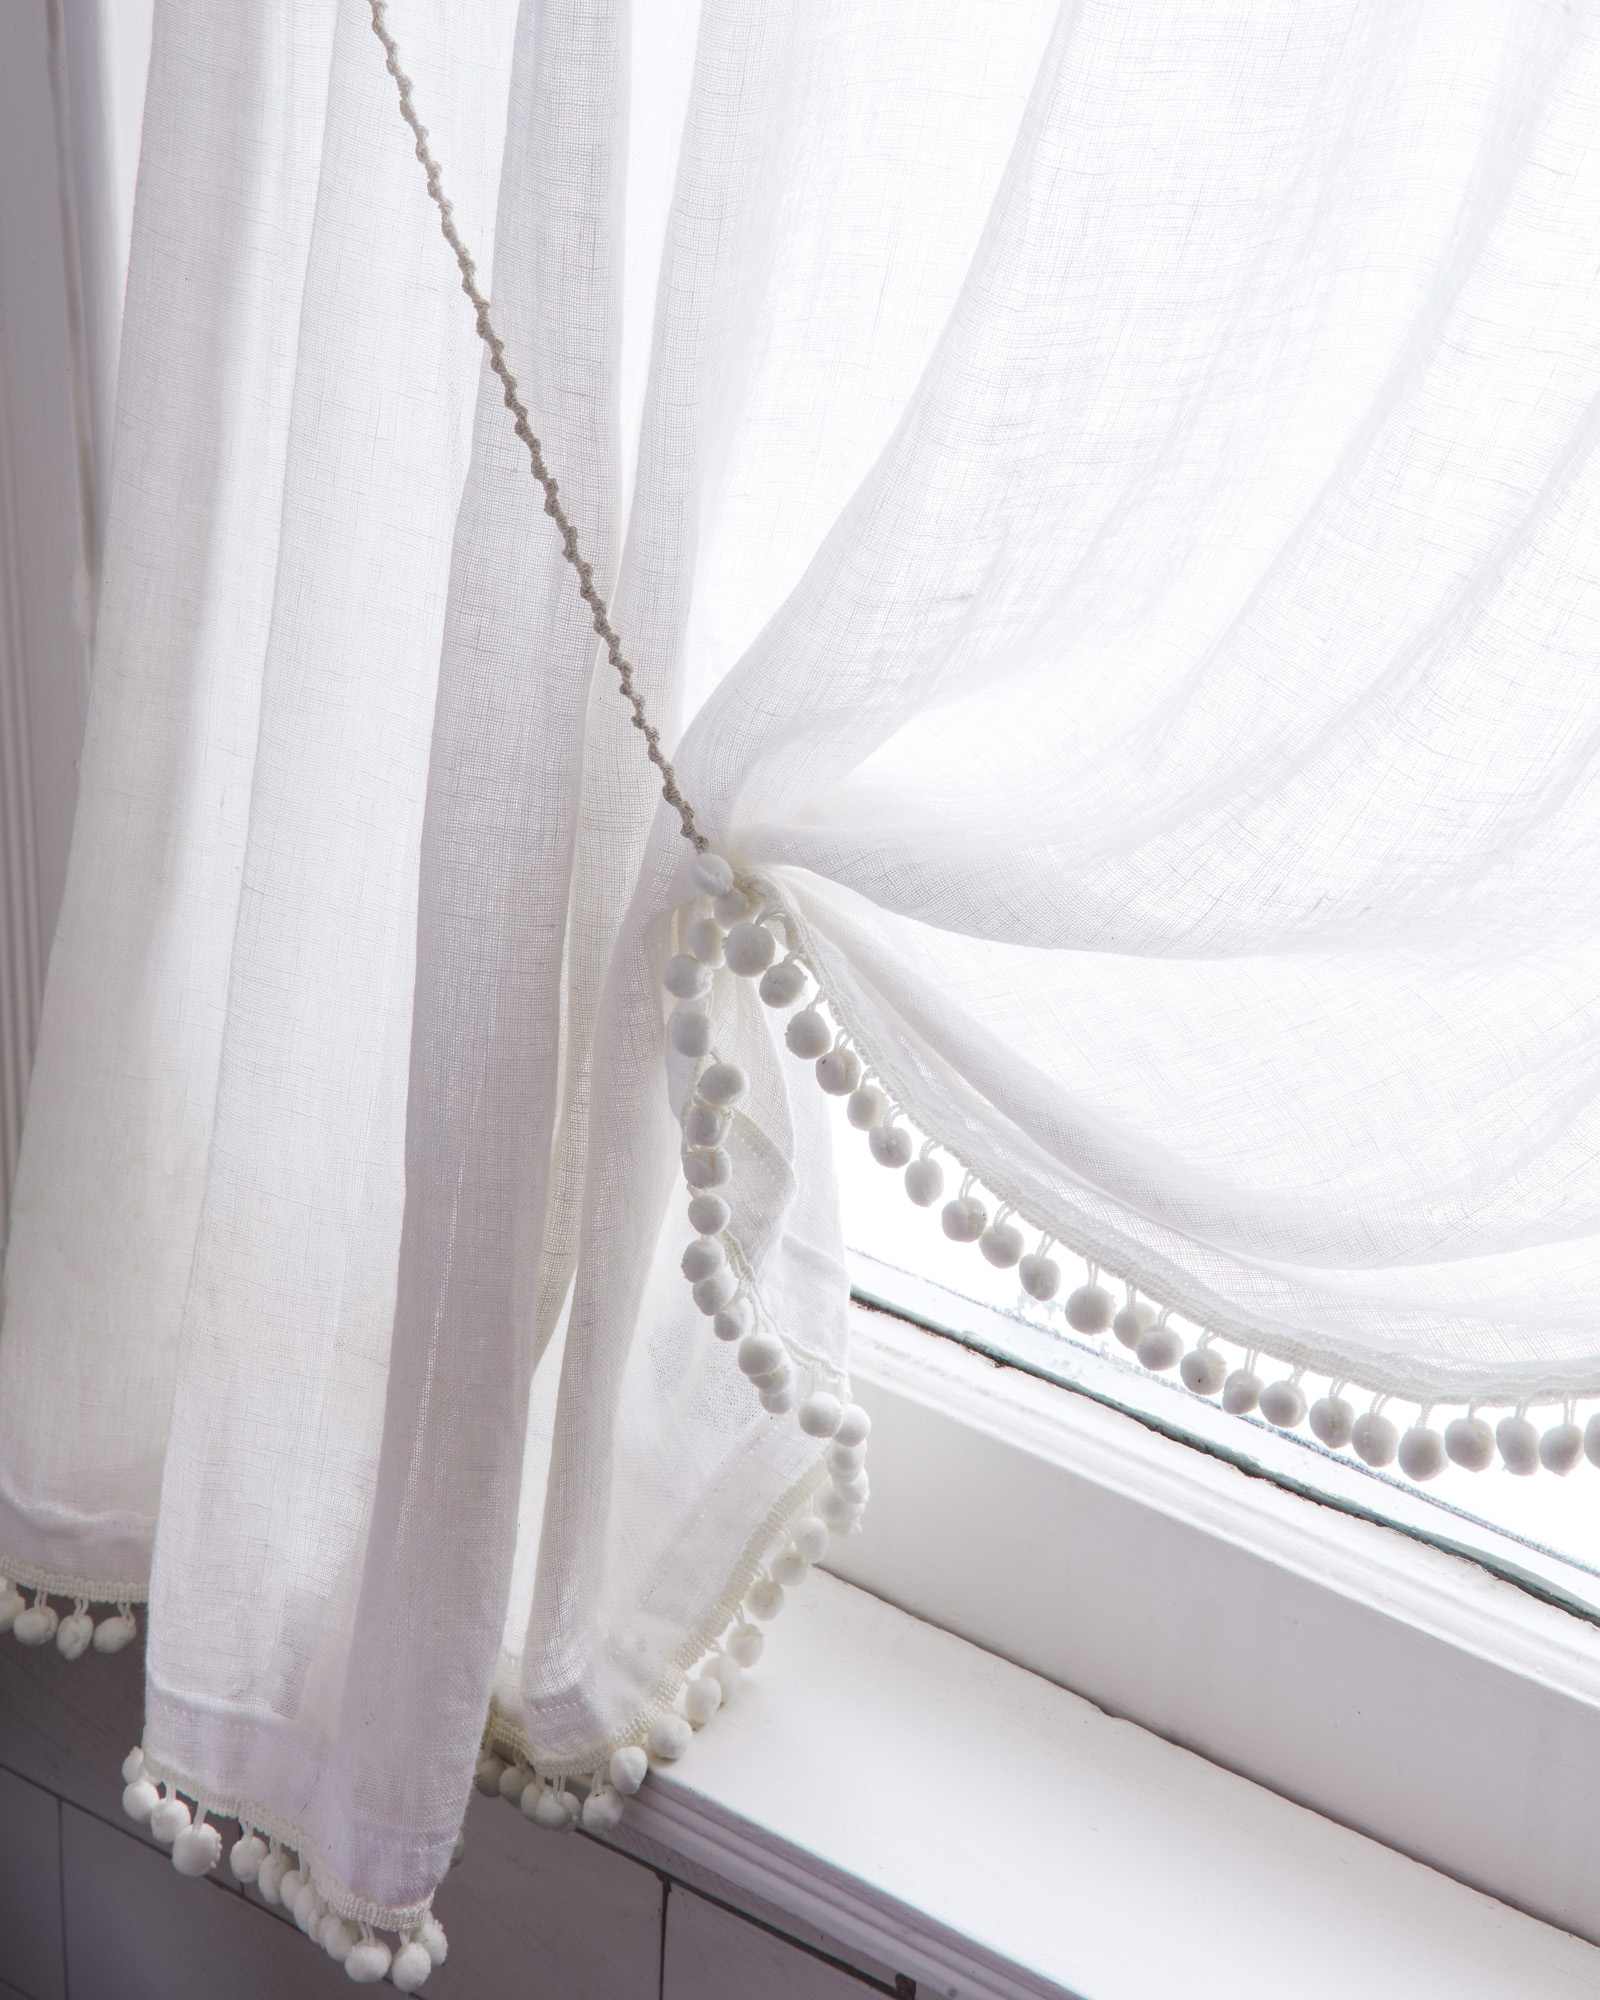
The window treatment is a simple style I use throughout the house. I made it and used very simple materials like a gauze linen and pom pom trim. I have a sewing machine and love making all my own window treatments – it’s a great way to not only save money – but to make your home look more custom. I use this style often for our house, it keeps a formal leaning house casual and approachable. Plus it looks pretty blowing in a spring breeze.
I also made the outside shower curtains. We needed a custom length and all the shower curtains I found online were frankly a bit plain. I listed the source below – so many wonderful pattern options if you are willing to sew your own. I used the button hole function on my machine to make the holes across the top.
Resources!
This is the part where I share every single resource I used for our bathroom. If you see something missing, most likely it’s vintage or came with the house. I also included some notes about companies and product details where appropriate.
- I used some affiliate links, meaning I make a small commission if you buy a product I recommend.
- If it’s a small business, I make a note, please support them!
- If the product was gifted, I added a * asterisk * next to the item for full disclosure. Thank you to all the companies who provided product, it helps to offset the cost of producing this style of content.
A note about budgeting. How you budget and what you spend on is deeply personal. We tend to be at the extremes of high/low. One area we spent on are things that are installed forever. This is hopefully the last time we do this bathroom in our lifetime, so product costs can reflect that point of view. Our personal point of view for anything that has installed items (floors, plumbing, etc.) is do it once, and do it right. It might take us a bit longer to get a project done, but it’s worth it.
Paint
Benjamin Moore, Duxbury Gray HC-163 in Aura Bath and Spa*. This is a matte paint designed for bathrooms and humid areas. I’m obsessed and want to use it everywhere. The finish is really nice. I’ve also scrubbed toothpaste off the painted areas of the walls and it holds up.
Tile
Fireclay Tile, our color is similar to Overcast*. If you are planning a historic style bathroom renovation I would highly suggest looking at Fireclay. I did look at tile at restoration specific companies, however the color palette was SO limited. Fireclay has all the specialized pieces you need to create a historic look, plus the color selection. Their tiles are also handmade in California, and reflect that handmade look you want in a historic inspired bathroom. Some of their tiles have a slight crackle finish and are really ‘old’ looking in a good way! I also find their website very user friendly (this guide to tile trim!) if you plan on designing the bathroom yourself. And one more important fact: Fireclay is a Certified B Corporation, meaning they have social and sustainability responsibility as a company. It’s a really wonderful business model you don’t see often in the home product industry. Here’s a podcast I listened to a few months ago about Fireclay and their business model. It’s wonderful to have a beautiful, well made product and it’s even better when the company has a business model that deeply cares about their employees. Plus, their customer service is just beyond good. What could have been stressful, was a pleasant experience. (They didn’t ask me to say this – my own opinion!)
Light, center ceiling
Habitat for Humanity, $5
Sconces and Medicine Cabinet
Came with house
Extending Mirror
Perrin and Rowe*
(We also worked with Perrin and Rowe with our downstairs bathroom and it is top notch. If you want a British look and feel to your bathroom or kitchen, this is a great company for that look and feel.)
Toilet Paper Holder
Perrin and Rowe* This TP holder is what I like to call the marriage saver. There is NO reason not to change the roll. There is a hinged bar that lifts up and it’s the best design ever. No silly spring loaded piece that pops off. We also used this in our downstairs bathroom.
Shower Fixture
Perrin and Rowe*
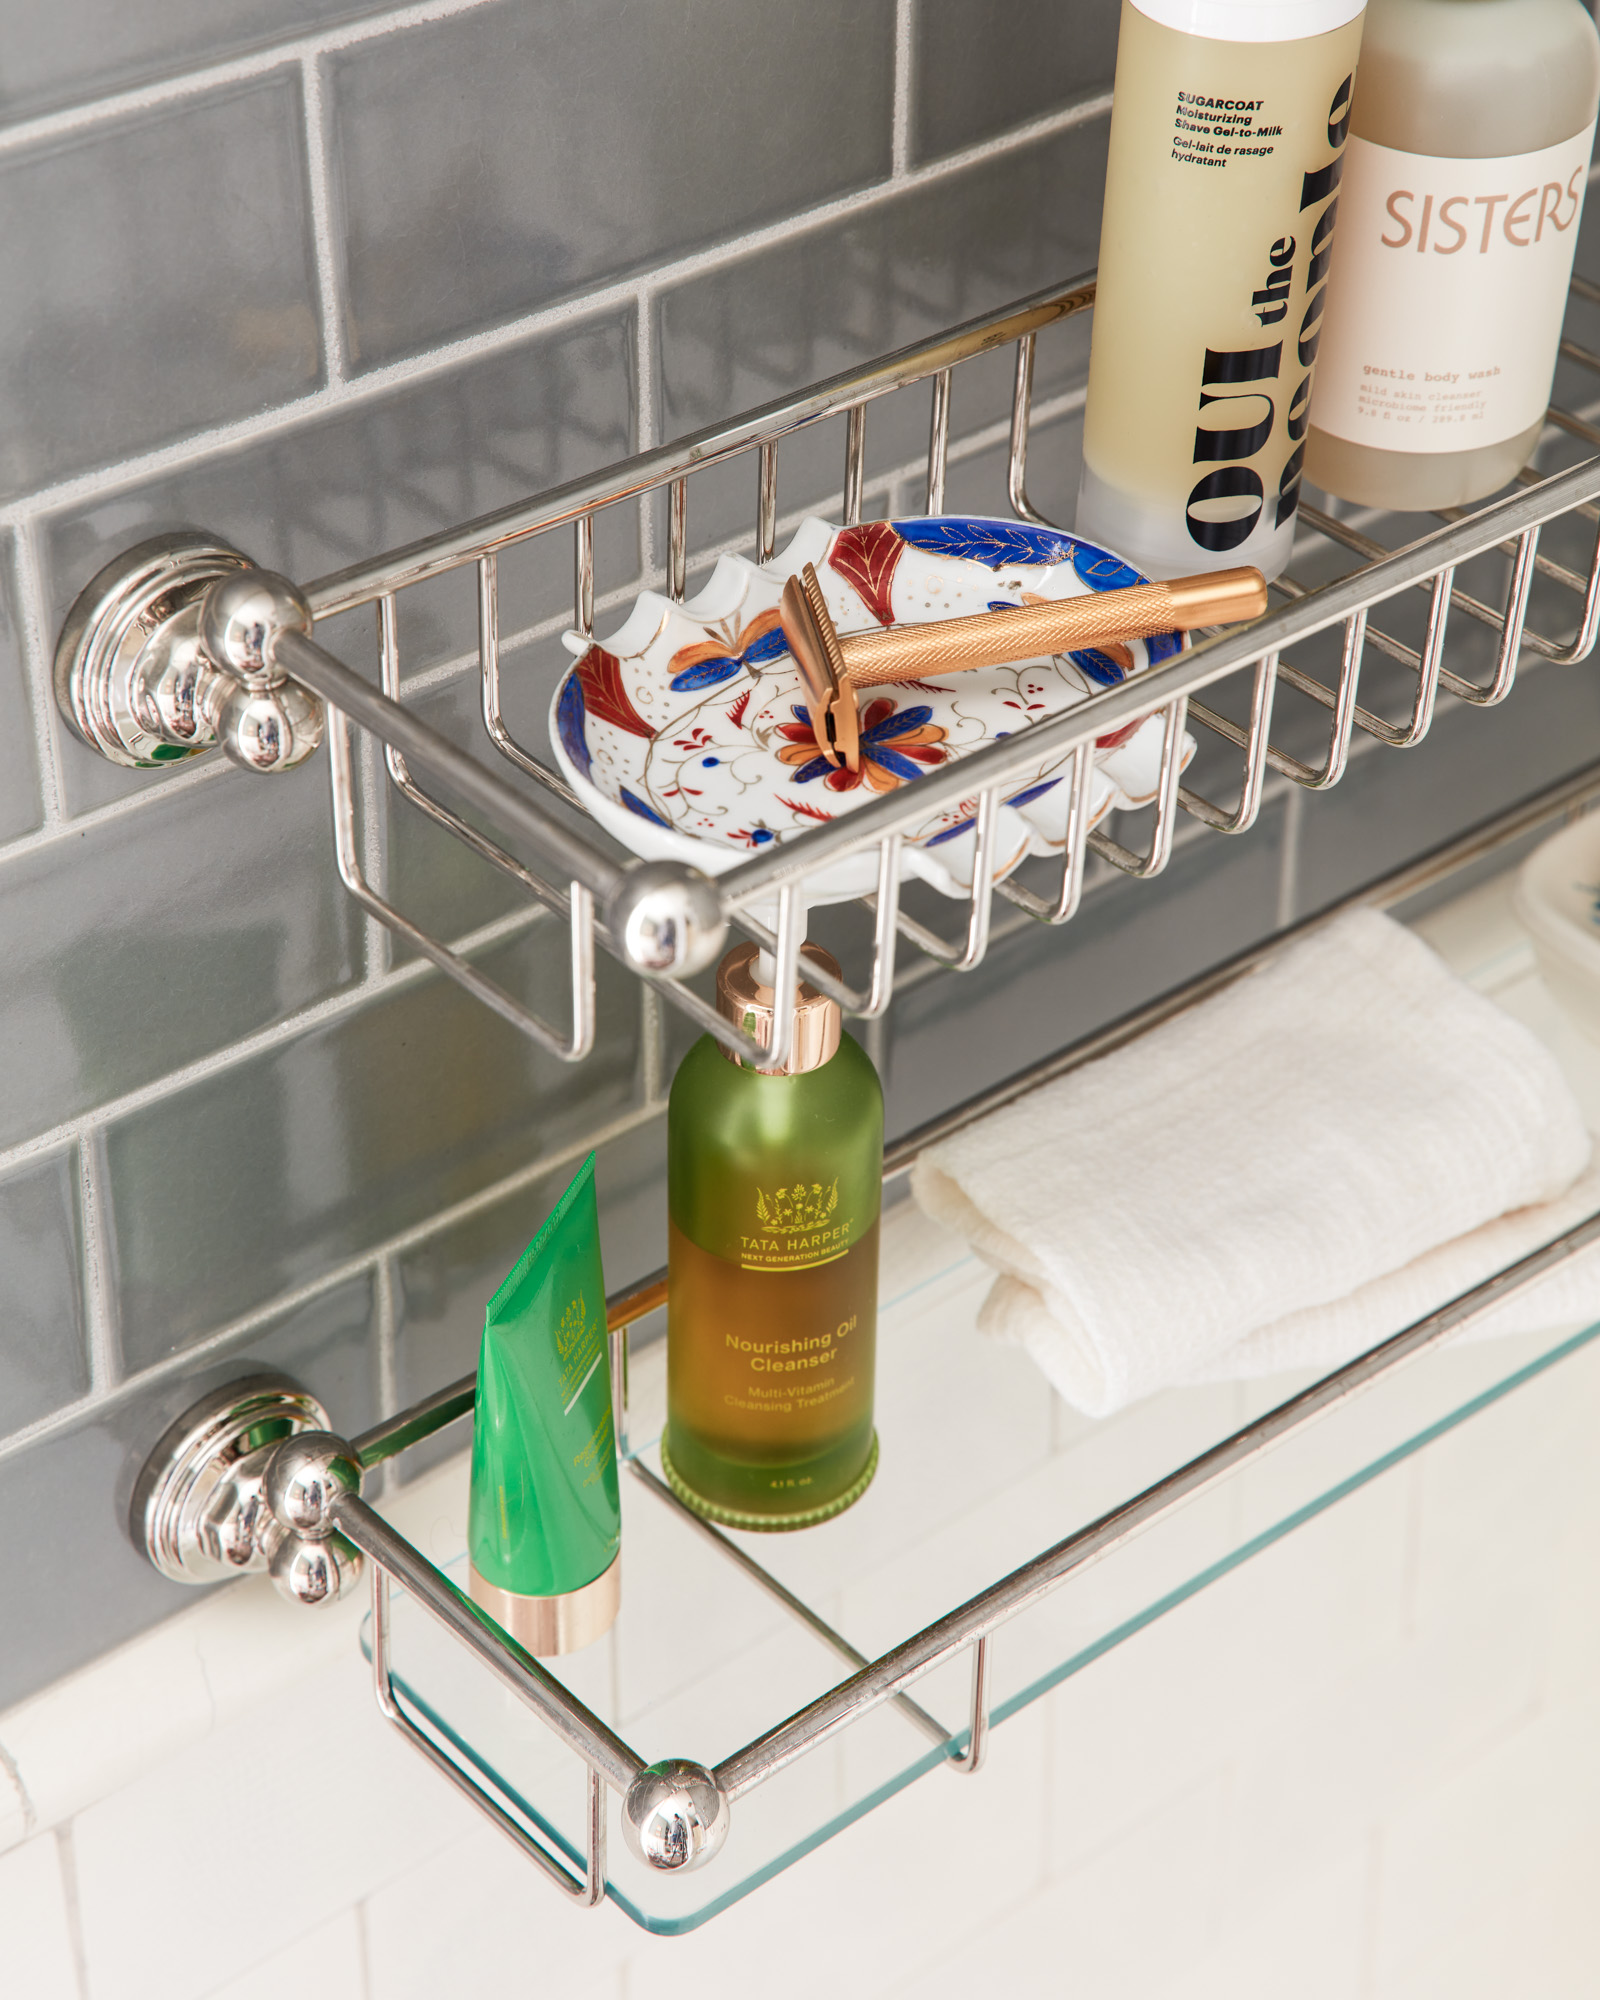
Shelf and Basket Shelf in Shower
Perrin and Rowe* Glass Shelf and Shelf Basket
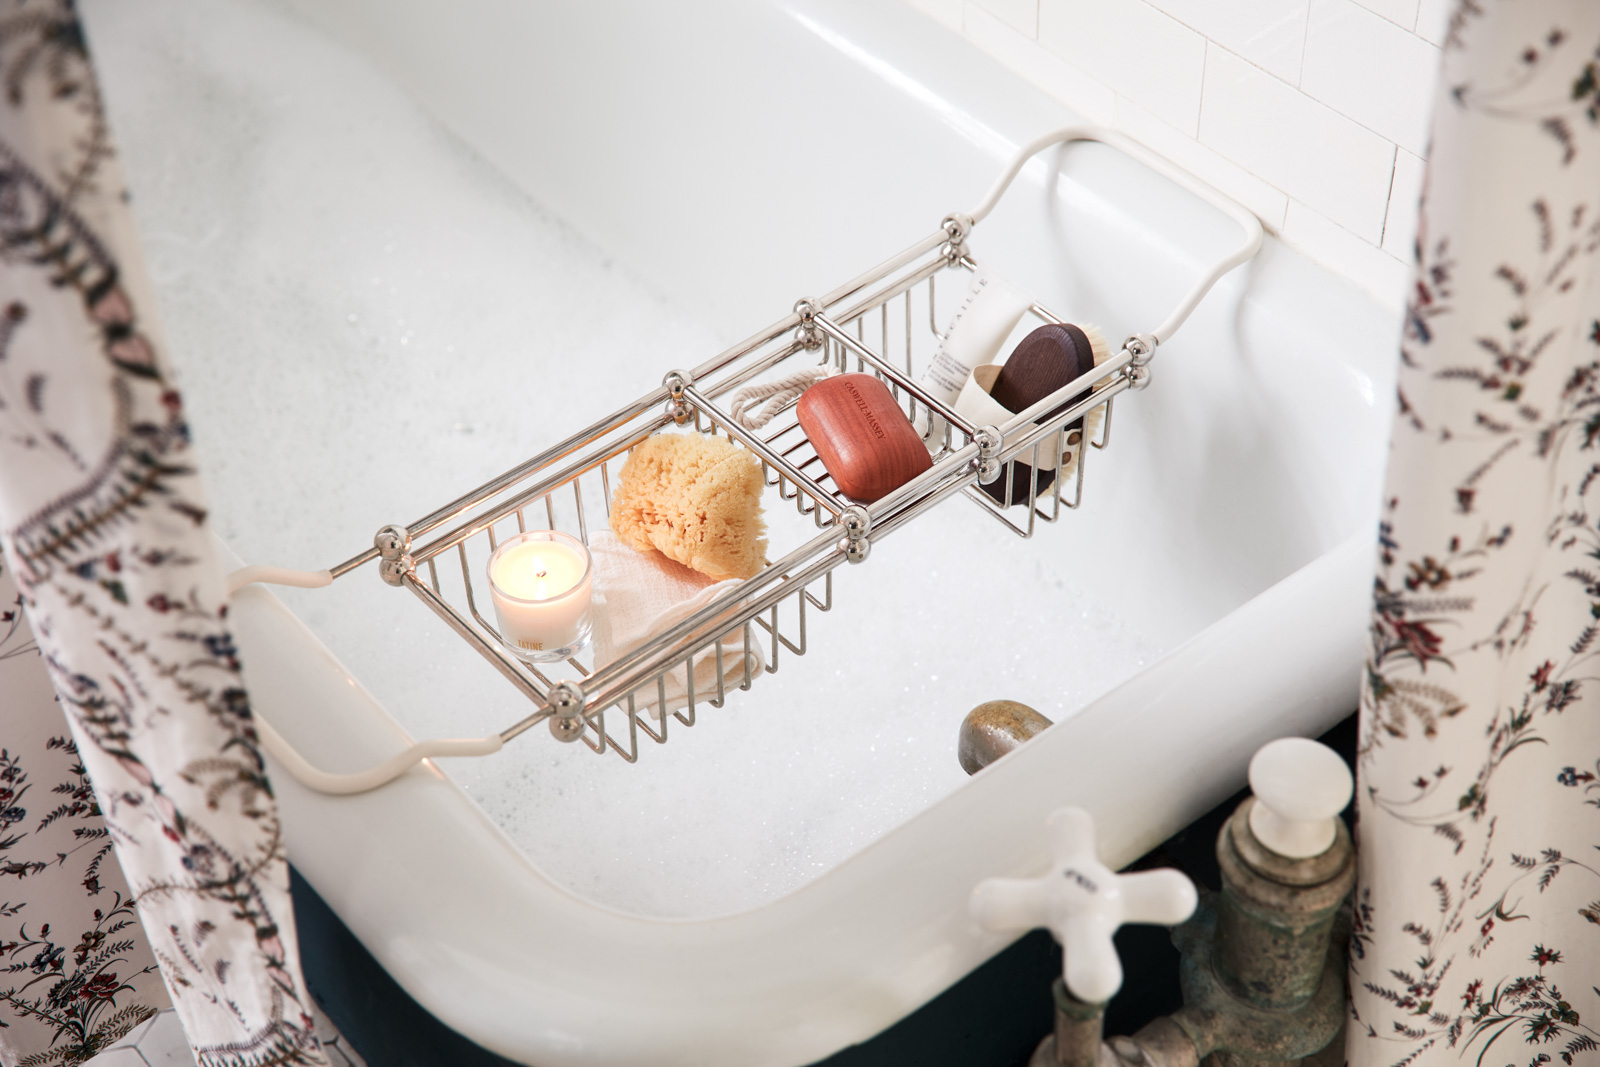
Bath Tub Caddy
Perrin and Rowe*
Before this renovation I had a bathtub caddy that wasn’t that great of quality and it rusted very quickly, hence a better quality seen here.
Hook (on back of door)
Perrin and Rowe*
Sanitary Handles
Perrin and Rowe (this link to to the a seat and hinges)
I know the price is a bit spendy here, however so worth it if you want people to actually put down the toilet lid.
Curtains
Fabric from Grey Lines Linen
This is a family business in NYC (retail location) and NJ. I love their handkerchief and gauze linen for curtains. I recommend prewashing in cold water and hanging to dry. Love, love, love this company. Wonderful resource if you are working on a whole house.
Curtain Rod
A favorite of mine from Rejuvenation, I use these curtain rods all over the house – especially if you have an old house with small casings. I used this style for most larger windows and this style for cabinet interiors.
Dresser
Vintage from local antique store, $130
Round marble and wood side table
Vintage from FB Marketplace, $25
Marble on Top of Radiator
Used, FB Marketplace, $50
All Artwork
Vintage. My average price per item is about $30. (The most I’d spend is $45, however some items were $10.)
Stool
DBO Home. Small business, husband/wife team based in Connecticut. (Also shop for handmade ceramics.)
Shower Curtain
Wavy Floral Fabric by the Colonial Williamsburg Shop* (sewn by me). Shop at their site here, or at The Patchwork Co. where you can find the full line. There are so many great historic patterns in this collection. It’s cotton and washable – make sure to wash before sewing. I could see this prints being used for bed curtains, chair covers, etc.
Shower Curtain Liner
Ours is a longer length because of our ceiling height. With this brand, you can select semi-custom lengths.
Shower Curtain Rod
You can customize the size on these – very handy if you are working with a funny sized space.
Shower Curtain Hooks
For a double curtain (outside curtain and inside liner).
Rug*
This is from one of my favorite rug shops Upstate Rugs. I like the rugs in our house to have a certain vibe to get a more vintage look. If you find yourself in Hudson NY, they have a shop or shop online. Woman owned, small business.
Hand Towel with Lace Trim*
Bella Notte Linens. Heritage quality linens made in California. Family owned and women led small business. (Also look at their velvet bed coverlets. So good!)
Off White Towels and Wash Clothes*
Jayson Home
Table Top from Our Shop
Trays for Drawer Organization and Ceramic Cups (blue and yellow)

I so love and admire what you’ve done here! Wonderful way to preserve the historic character while making it functional and beautiful. Bravo!
Love this room. I really appreciate that you kept all the old tile and fixtures and concentrated on upgrading functionality and aesthetics. Definitely worthy of World of Interiors!
I always look to your blog for top-notch, quality renovations and inspiration! The bathroom is stunning!!! Looking forward to seeing more bedroom progress.
This bath renovation is spectacular. I live in an old house and the layout is similar to one that has given me difficulty. Thank you for sharing, especially the sources for the tub retrofit. I also have vintage fixtures. Your white trim paint is spot on. Would you mind sharing the color of the door/trim paint? These old white fixtures of mine run a little blue.
Hi Mary! We use two white paints for trim. One is Farrow and Ball Whimborne White and the other is Benjamin Moore Capitol White. These are both a bit creamy but not too yellow.
Love love love!
One question I have is on the plumbing pipes where these is the greenish discoloration, I’m curious why you didn’t paint them. Would love some additional insight as I’m sure there’s a reason!
I like the way they look! It’s old copper pipes that have changed color over time. Similar to how a copper roof or downspout might look. 🙂
Beautiful job! I can’t get over how- done, settled it all seems! Like of course it always this way! What a tremendous thoughtful renovation. You blow me away with the thoroughness of your design. And thanks for the small peek into the bedroom. Small question-what did you use for the tieback for your curtain?
I made the tie back like i made friendship bracelets in the 90s. LOL. I just used a string that matched the fabric. 🙂
Spectacular as always! Thank you so much for producing so much beautiful content during this renovation, and for sharing all of your sources. I love learning about renovation and design this way – seeing you two go through such a thoughtful process. Gorgeous. When can I move in? 😉
This is simply magnificent. Every detail is perfection! Thank you for sharing your process.
Amazing bathroom! I love how it looks but even more how thoughtful you have been with your choices on what to replace/add. Just beautiful. Everything looks like it has been there forever, including the new tile. I also really appreciate your explanation and thought process. Great post. Looking forward to the bedroom 🙂
Ive been waiting a while to see this bathroom all done. Beautiful! I, too, am a maximalist and love your style. Give us more please!
Room after room at Stony Brook, I am in awe, and this bathroom is no exception. You have an admirable knack for giving your spaces a unique, thoughtful, and collected atmosphere.
I love a house filled with stories because that’s what makes it a home after all. We recently embarked on our own labor of love with an 1870’s Chicago townhouse but are wisely concentrating on the structural issues ahead of the interior. A girl can dream and plan though! That brings me to a question:
I love the idea of a vintage rug in a bathroom but am wary about the practicality of keeping it clean and about the moisture. What’s your experience with a vintage rug’s resilience in a bathroom?
Thank you! I’ve had vintage rugs in my bathrooms since my first apartment in NYC. We keep a small bathmat nearby and use that. But honestly these old rugs are really durable. As long as you are not soaking it daily, I think it would be fine. I’d also make sure the quality of the rug is good and can get wet – a good rug dealer should be able to answer that question for you.
It looks beautiful! Excellent job!
Hi! I spotted your marble shelf on the radiator and had to come check out your beautiful bathroom! I’ve been wanting to put a marble shelf on mine—did you just set it on, or did you attach it somehow?
It’s heavy and just sitting there! We don’t have kids or anyway for the shelf to get knocked over, so I’m fine with it just sitting. You can also buy cast iron shelf brackets to secure the shelf.
Hi. Your home is stunning! Can I ask you what colour of blue you painted on your bath? I have wanted to paint mine a blue, but I cannot find the right shade to date…this is gorgeous! Many thanks.
What a beautiful transformation! I’m so impressed by how you preserved the historic charm of the bathroom while integrating modern elements. The attention to detail, particularly the tile work and the color palette, really brings out the timeless appeal of the space. It’s also inspiring to see how you maintained the original fixtures like the clawfoot tub, which adds so much character.
I’m curious—when it comes to preserving historical features during a renovation, how did you balance the need for modern functionality with maintaining the bathroom’s original aesthetic? Were there any challenges you encountered while finding the right materials to blend the old and the new?